Summary of Bird Feeder Monitor using Arduino
This project monitors how many birds visit a feeder and how long they feed using an Arduino Yún and an Adafruit CAP1188 capacitive touch sensor, logging counts and durations to a Google Docs spreadsheet during configurable periods around sunrise and sunset. Sensor-equipped perches detect bird contact; data is processed on the Yún, sunrise/sunset times fetched by Python, and results are sent to Google Forms/Sheets.
Parts used in the Bird Feeder Monitor:
- 6x3x2 Project Enclosure
- 3x2x1 Project Enclosure
- 1/4" Copper Foil Tape (roll)
- CAP1188 8-Key Capacitive Touch Sensor
- Arduino Yún
- micro-SD card
- DB-9 male connectors (2)
- DB-9 female connectors (2)
- Bird Feeder (CedarWorks Plastic Hopper Bird Feeder)
- Tail Light connector from automotive supply store
- 5-VDC power supply (located in garage)
- Wiring and solder for perch connections
- Wood block for mounting
- Velcro tape
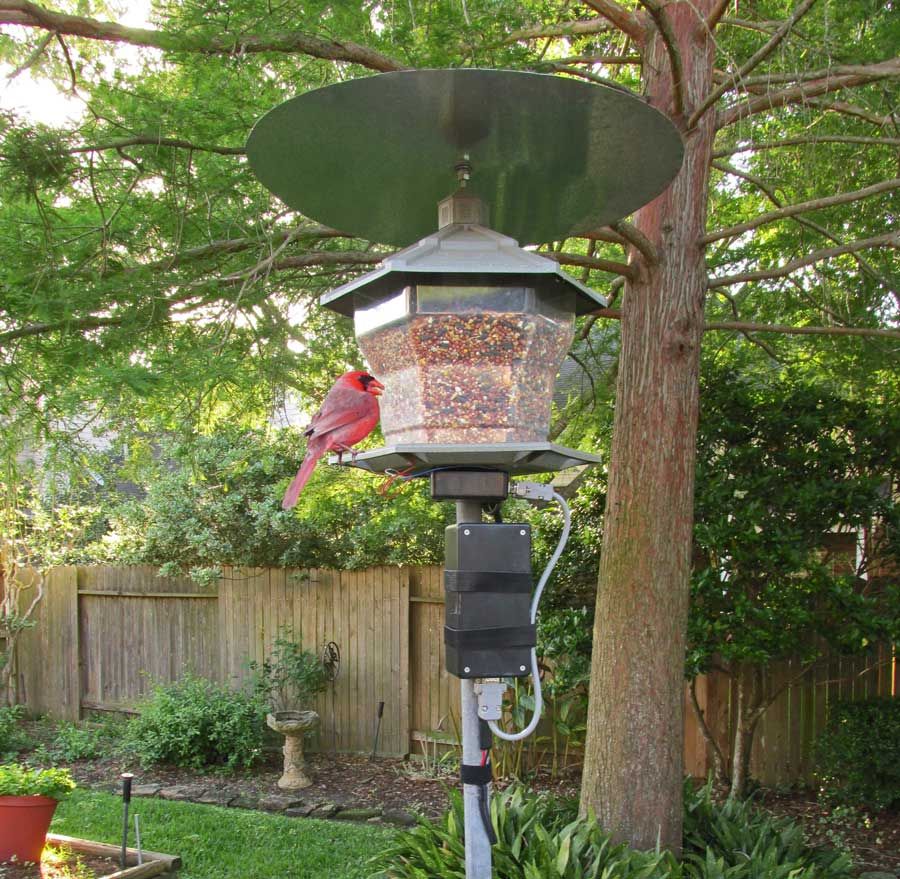
This is a project to monitor the number of birds that visit my bird feeder, as well as record the amount of time spent feeding. I used an Arduino Yún and a capacitive touch sensor, Adafruit CAP1188, to detect and record the birds feeding. On a routine basis, the accumulated data is sent to a Google Docs spreadsheet to record the number and time spent by the birds visiting the feeder.
Data is only transmitted during a set period of time prior to sunrise and after sunset.
Step 1: Step 1: Parts
These are a list of the parts that I used to assemble my project. You could use a variety of project boxes to create your project, but these are the items I had on hand at the time.
1 6x3x2″ Project Enclosure
1 3x2x1″ Project Enclosure
1 roll 1/4″ Copper Foil Tape
1 CAP1188 8-Key Capacitive Touch Sensor
1 Arduino Yun
1 micro-SD card
2 DB-9 male connectors
2 DB-9 female connectors
1 Bird Feeder (CedarWorks Plastic Hopper Bird Feeder)
1 Tail Light connector from automotive supply store
Step 2: Step 2: Wiring
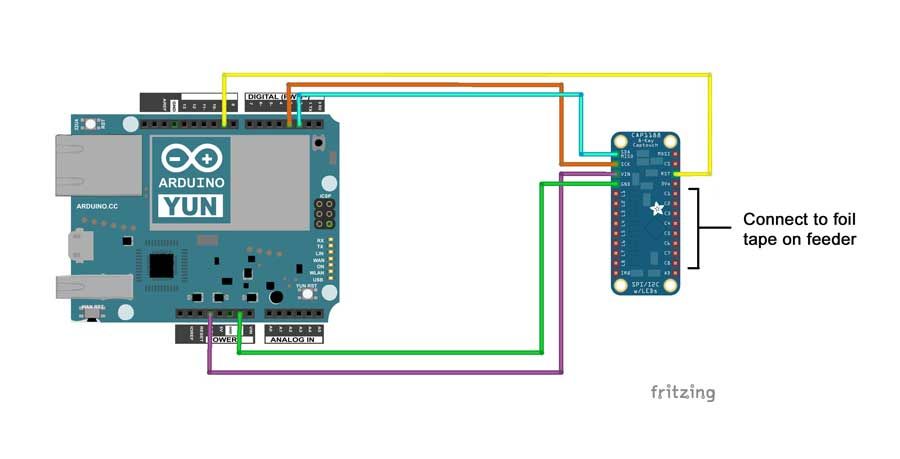
The Arduino Yun and the CAP1188 are wired to provide a hard reset of sensor at startup. There are other capacitive touch sensors available with either one, five or eight sensors. I chose eight because my bird feeder has six sides.
Wiring:
CAP1188 SDA == Yún Digital 2
CAP1188 SCK == Yún Digital 3
CAP1188 RST == Yún Digital 9
CAP1188 VIN == Yún 3.3V or 5V
CAP1188 GND == Yún GND
CAP1188 C1-C8 == Connect to wires on each perch
Power for the Arduino was provided externally, by running a wire underground from my garage, and up through the pipe used as the bird feeder stand. The wire was connected to a 5-VDC power supply in the garage. This project should work with batteries, but I didn’t want the hassle of changing batteries on a routine basis.
I constructed a 16″ long cable with DB-9 connectors on both ends to connect the Project Box with the Arduino Yun and the box containing the CAP1188. The capacitive sensor needs to be located as close to the perches as possible.
Step 3: Step 3: Installing Python Packages and Scripts
The CAP1188 requires that you download and install the libraries for this sensor. The library can be found at the following site:
https://github.com/adafruit/Adafruit_CAP1188_Library/archive/master.zip
Instructions for installing the library and examples are located in a README.txt file within the zip container.
This program monitors the sunrise & sunset for your specific location, and begins counting and timing at a specified time before sunrise and for an equal amount of time after sunset. Before and after that time, no data is sent to your spreadsheet. This project uses a python script to read the sunrise and sunset information from Yahoo! weather each evening or at startup get these times.
The following python library needs to downloaded and installed on the Arduino Yún.
python-weather-api
pywapi – https://code.google.com/p/python-weather-api/
Instructions for installing this library is located at the above website.
Python Scripts
The location ID in the ‘getastonomy.py’ python script needs to be modified to include your location. It is currently configured for Missouri City, Texas. One way to find your ID is to go to the following website:
Enter your location, and your location ID will appear as part of the URL address. Replace the USTX0905 in the line of the script with your location ID.
result = pywapi.get_weather_from_yahoo(‘USTX0905‘,’imperial’)
This will allow the script to fetch the sunrise and sunset for your location. Instructions for modifying ‘sendgdocs.py’ are located in Step 6.
Once both scripts have been modified you must move them onto the micro-SD card directory ‘/mnt/sda1/’ of the Arduino Yun.
 Bird_Feeder_Monitor.ino
Step 4: Step 4: Wiring the Bird Feeder
Each of the perches on the feeder was covered with 1/4″ wide self adhesive copper foil tape. A small hole was drilled through the tape and perch, and a wire was soldered to the foil tape and routed beneath the feeder.
Note: With the bird feeder shown above, I recommend a gap between the ends of each foil stripe of 1 1/4″ – 1 1/2″. I discovered that the larger birds, such as grackles and doves, are capable of touching two foil strips at the same time if they are placed to close together.
A block of wood was shaped and glued to the bottom of the feeder to provide a level area to mount the Project Box containing the CAP1188. Velcro tape was applied to the Project Box as well as the wooden block to provide a means of attaching.
In order to refill the bird feeder, I unplug the power inside the garage. Next, I disconnect the DB-9 connector from the Project Box attached to the bottom of the feeder, which allows me to lift the feeder off the pipe with the Project Box still connected to the bottom. Once the feeder has been refilled, I place it back on the pipe stand; connect the DB-9 cable; and plug in the power.
Step 5: Step 5: Creating a Google Doc Form
In order to send data a Google Docs spreadsheet, you must first create a Form with all of the required fields. In my example, I have six ‘cnt’ fields and six ‘time’ fields that are integer input. For example, the fields are named ‘cnt1’, ‘time1’, ‘cnt2’, ‘time2’, etc. Once your finished with the Form, you click “View live form” to see the finished form. While viewing the Form, right click the page and select “View page source”. Search and find all of the HTML “input” fields in the source code. Make a note of the name for each of the fields you entered on the form. This information is needed to create your Scenario in PushingBox.
For more detail: Bird Feeder Monitor using Arduino
- What hardware detects the birds on the feeder?
The Adafruit CAP1188 8-Key capacitive touch sensor detects birds via foil-covered perches. - What microcontroller is used to record and send data?
An Arduino Yún is used to read the sensor, run scripts, and send data. - How are the perch sensors implemented?
Perches are covered with 1/4" copper foil tape, wired and soldered to the CAP1188 inputs. - When is data transmitted to the Google spreadsheet?
Data is only transmitted during a set period before sunrise and for an equal period after sunset. - How does the system get sunrise and sunset times?
A Python script uses pywapi python-weather-api to fetch sunrise and sunset from Yahoo! weather. - How are data fields set up for Google Docs?
A Google Form is created with cnt and time fields (e.g., cnt1,time1) and the input names are taken from the form source for PushingBox configuration. - Where are the Python scripts stored on the Yún?
Modified scripts are moved onto the micro-SD card directory /mnt/sda1/ on the Arduino Yún. - Which CAP1188 pins connect to the Arduino Yún?
CAP1188 SDA to Yún Digital 2, SCK to Digital 3, RST to Digital 9, VIN to 3.3V or 5V, and GND to Yún GND; C1–C8 connect to perch wires. - How is power delivered to the feeder electronics?
Power is run from a 5-VDC supply in the garage through underground wiring up the feeder stand pipe; batteries are possible but not used. - How is the CAP1188 module mounted under the feeder?
The CAP1188 project box is mounted to a shaped wood block glued to the feeder bottom and attached with Velcro for removal when refilling.