Introduction
Did you run out of input pins? Don’t worry, here is a solution without any shift registers. In this video, we are going to learn about connecting more than 100 switches to a single pin of Arduino.
Step 1: Working Theory
Take a look at the circuit diagram first, otherwise, you won’t be able to understand what I’m saying. Whenever I press a switch the circuit will be completed through a different number of resistors,
- In the circuit, if we press the 5th switch then the circuit is completing through all the 4 resistors,
- If we press the 4th switch the circuit is completing through 3 resistors,
- If we press the 3rd switch the circuit is completing through 2 resistors,
- If we press the 2nd switch the circuit is completing through 1 resistor,
- And if we press the 1st switch the circuit is completing without any resistors.
That means the voltage reaching the analog pin A1 will be different for each switch, so we will use analogRead() function to read the values from the pin A1 and then we use an if else if condition to perform different operations for each switch.
Step 2: Let’s Build
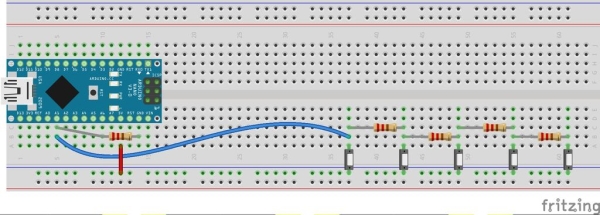
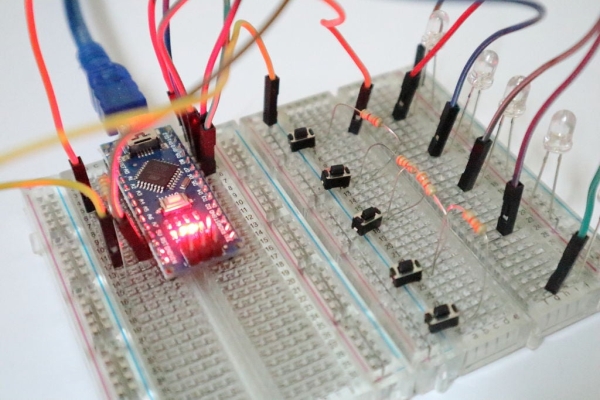
- First connect five push switches to a breadboard.
- Of course, you can connect maximum of 1023 switches theoretically to a 8-bit microcontroller like Arduino.
- Then interconnect resistors in between the push switches as shown in the diagram.
- Connect the other end of all the switches to 5v of Arduino, as you can see here I have connected the in such a way that one end is connected to the blue line of the beard board which is connected to the 5v.
- Then from the end of the final switch connect a wire to analog pin A1 of Arduino.
- Then connect a resistor across A1 and GND of Arduino, which is for pull down, That is to keep the value to zero when no switch is pressed.
Step 3: Connect Some LEDs
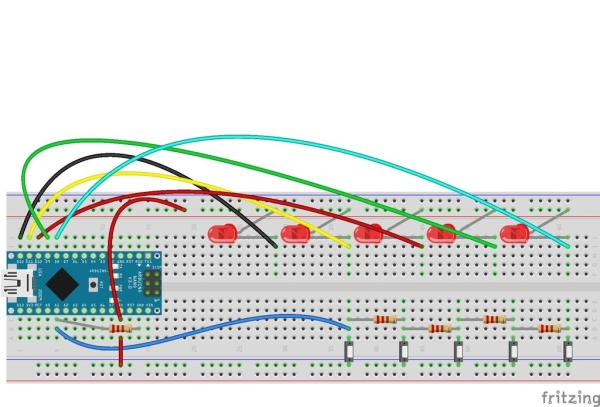
Let’s connect some LEDs to check the functioning of our circuit.
- Connect the LEDs as shown in the circuit,
- Connect all the positive terminal all LEDs to the 5v.
- Connect the negative terminal of each LEDs to the digital pin D12 to D8 of Arduino, respectively.
- Practically we have to connect the LEDs through resistors for good life time.
Step 4: Coding
Take a look at the program. All the lines are commented properly.
Now let’s upload the code and see it in action.
Step 5: Applications
- Keypad
- Full-sized keyboard for Arduino.
- Custom mini keyboard for your Raspberry Pi tablet, etc..
Step 6: Drawbacks
- Multiple switches won’t work in a single instant. If you can think of another application post it in the comments.
Thanks.
Source: 100+ Switches in a Single Pin of Arduino