This Instructable will teach you how to use the Arduino Analog ports.
Digital Voltmeters (DVMs) are a special case of Analog to Digital converters- A/DCs.- they measure voltage – and are usually a function of a general purpose instrument called a Digital Multimeter( DMMs), commonly used to measure voltages in labs and in the field. DMMs display the measured voltage using LCDs or LEDs to display the result in a floating point format. They are an instrument of choice for voltage measurements in all kinds of situations. This instructable will show you how to use the Arduino as a DC DVM (Direct Current Digital Volt Meter).
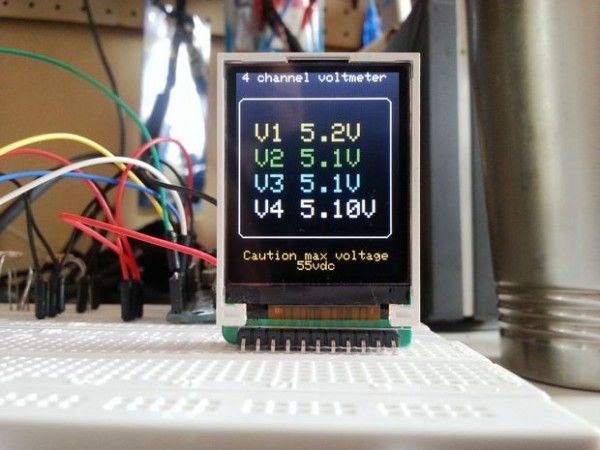
We will be using the Arduino analog inputs to measure DC voltages between 0 and 5V and displaying the values on a TFT LCD Color display.
I used the Sainsmart Arduino Nano and the Official Arduino UNO R3 to see if there are any differences.
The voltage ranges that the Arduino can measure can be easily expanded by using two resistors to create a voltage divider.
The voltage divider literally scales down the voltage being measured so it is within the range of the Arduino analog inputs(i.e.. 0 to 5 volts).
You can then program the Arduino sketch to calculate the actual voltages being measured by multiplying the input by the scaled factor.
This will allow us to measure voltages greater than 5V DC, the maximum DC voltage we can measure safely is ~50 VDC with the parts used in this instructable, but can be modified to suit your needs..
Step 1: What You Will need: Parts List
These are the required parts to build the 4 channel DVM
Total cost is around $35 dollars!
- An Arduino ( I Used the Sainsmart Nano Clone, ($13.99) and an UNO R3, but I think any one will do)
- A PC with the arduino IDE and a free USB port.
- A USB cable for your Arduino
- A Sainsmart 1.8″ TFT COLOR LCD($12.99) Display
- 4 x 1 Mega Ohm Resistors (Brown ,Black, Green) 1 for each channel
- 4 x 100 Kilo Ohm Resistors(Brown, Black, Yellow) 1 for each channel
- 4 5.1 volt zener diodes (optional|) for added protection to the Arduino analog inputs
- Jumper cables, lots of them, different sizes and colors
- Solderless Breadboard (I’m using. My RadioShack electronic experimenters lab breadboard)
- A multimeter and /or voltage reference to calibrate the DVM output
Step 2: DVM BASIC PRINCIPLES
Before we begin to put the project together, let’s review some basic principles and precautions concerning voltage measurements with a DVM.
Accuracy and precision
Our DVM will not be as accurate or precise as a commercialy available unit, but it wil certainly be more flexible.
In order to make the readings as accurate as possible, we must consider two things: the input resolution, and the calibration. Input resolution depends on the Arduinos analog input A/D converter, which is 10 bits on the Arduino uno and nano. Calibration will depend on the quality of the components used and the references used to calibrate the measurments.
Input Impedance
Comercial digital multimeters that measure DC voltage will usually have a very high input impedance of 10MΩ or greater.(i.e- the resistance between the two multimeter test probes is 10MΩ or more.)
A high input impedance for a voltmeter is needed so that the voltmeter will not affect the value of the circuit being measured.
If a voltmeter has a low input impedance, it can possibly change the voltage being measured and give you incorrect readings..
There is also a drawback, however, to having a high input impedance; The test probes are more prone to pick up electromagnetic interference (EMI) which can also offset your measurements and display “phantom” readings.
Although a high input impedance is desirable, the voltage divider circuit we will be using, will give our voltmeter an input impedance of about 1MΩ, which is acceptable for most low voltage measurements and low impedance circuits usually built by electronic hobbyists.
For more detail: Make a Mini Arduino programmable 4 channel DC-DVM