A two transistor circuit that flashes two LEDs on and off alternately.
Prerequisites
Complete tutorial two – Transistor Timer before attempting this tutorial.
Components
In addition to an electronic breadboard, wire links, a 9V battery and a battery clip, you will need:
| QTY | PART | DESIGNATOR | NOTES | TYPE |
|---|---|---|---|---|
| 2 | 22k resistors (red – red – orange) | R2, R3 | 1/4W, 5% or better | Resistors |
| 2 | 470 ohm resistors (yellow – violet – brown) | R1, R4 | ||
| 2 | 100uF | C1, C2 | Electrolytic capacitors, 16V or more Try using 47uF or 33uF capacitors to speed up the rate at which the LEDs flash | Capacitor |
| 2 | KSP2222 or PN2222 | Q1, Q2 | NPN transistors 2N2222, BC107, BC108 or BC109 transistors can be used in the circuit, but have a different case to the KSP2222 / 2N2222 | Semiconductor |
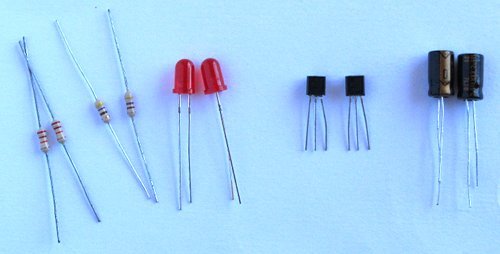
| 2 | 5mm red LED | D1, D2 | Or similar LED |
The required parts are shown below:
Circuit Diagram

Building the Circuit
Insert the two transistors into the breadboard with the flat face pointing down as shown in the photo. Use wire links to connect the emitter of each transistor to the bottom rail. Get the two LEDs and the two 470 ohm resistors ready.
Connect one end of a 470 ohm resistor to the collector of each transistor. Connect the other end of the resistor to a tie point on the other side of the breadboard center channel.
Connect an LED to each resistor as shown below. The anode of each LED is to be connected to the top rail of the breadboard.
Get the two 22k ohm resistors and two wire links ready.
Connect the two 22k resistors across the middle channel of the breadboard. Connect the top lead of each 22k resistor to the top rail of the breadboard using a wire link.
Get the two 100uF capacitors ready.
Insert the capacitors with the positive lead of each capacitor on the collector of its corresponding transistor. Connect the negative lead of each capacitor to its corresponding 22k resistor.
Get two wire links ready.
Use wire links to connect the base (middle pin) of each transistor to the negative lead of each opposite capacitor.
Power up the circuit using a 9V battery.
For more detail: Make A Dual LED Flasher Using Arduino