In this Instructable I will show you how to make a cute and kid friendly Obstacle Avoiding Robot I like to call Yogy.
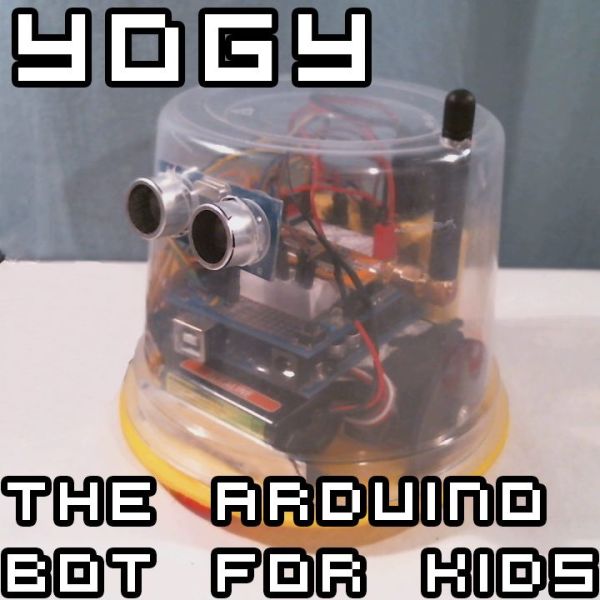
Yogy gets his name from the Yoghurt tub body he is made from. I am a sucker for seeing the best in trash and this Yoghurt tub looked too good to be thrown away. I salvaged it and decided to give it a new life, a better life, a life as a robot!
You can follow through with me and make Yogy by following the written steps or pictures, which are pretty self explanatory.
Or if you don’t feel like reading through and clicking with your mouse, you can check out the videos of the build with commentary!
Step 1: Parts List
Electrical Parts:
• Arduino Uno
• Prototyping Shield + Mini Breadboard
• 2 * Continous Rotation Servos + 2 * Wheel Servo Horns
• HC-SR04
• 8 Ohm Speaker
• Male and Female Breadboarding Jumper Cables
• 4 * AA Batteries + Pack
• 9V Battery
• LED
• Power Switch
• Yoghurt Tub
• Acrylic or a CD (or any other material you can make a base from)
• Small Square Bracket
• Small Screws
• Coke Bottle Lids
Tools:
• Coping Saw
• Screwdriver
• Stanley Knife
• Hot Glue Gun + Glue Sticks
• Wire Cutters
• Wire Strippers
• Double Sided Foam Tape
Optional Extras:
• 2 * APC220 RF modules
• Soldering Iron + Solder
• Scrap Pieces of Cardboard
• Electrical Tape
Step 2: Marking the Layout
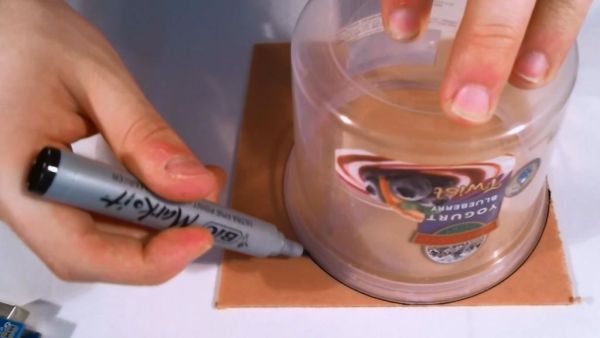
First you will need to trace the outline of your yoghurt tub onto the material that you wish to use as the base of the robot. This particular tub is 12.5 cm in diameter and 10 cm tall. If you can’t find something similar in size go larger, as any smaller and all the components won’t fit.
Next you will want to place your continuous rotation servos onto the template and arrange them so that the output splines are in the centre of the circle. This is important as it keeps the centre of rotation in the centre of the robot, meaning the robot can turn around on a point. Once you have them where you would like trace around the servos with a marker.
Next grab the circular servo horns and mark around them. You do this because we will have to cut holes in the base to allow the wheels to poke through. Make sure you have sufficient room and mark the holes you need to cut out.
Step 3: Preparing the Drivetrain
One method to cut out the wheel holes is to drill two holes either end of the wheel hole with a drill bit the same diameter as that of the width of the hole. Using a Coping Saw connect the two holes together. Once this is done double check to make sure there is enough clearance between your wheel and the hole as you don’t want the two to rub against each other.
Once you are happy that your two servos and wheels are going to fit nicely you can peel the protective sheet off the acrylic.
Attach a strip of Double Sided Foam Tape to the side of the servo, this will be used to attach it to the base.
Attach another strip of Double Sided Foam Tape to the bottom of the servo, this will be used to join the two servos together.
Step 4: Attaching Drivetrain and Power
Peel the protective sheet off the bottom strip of tape and join the two servos together. Press them together quite firmly and hold for a few seconds to ensure the bond is adequate.
Then peel the protective sheets of the two sides of tape and press them against the base. Again it is important to press and hold to make sure they are really well stuck together. The next stage is to mount the batteries. In my case I am using a 4.8V rechargeable battery pack so first I need to see if it can fit.
Placing the battery pack at the back of the servos and placing the yoghurt tub over them all makes it clear that it will all fit together nicely. You can then begin to attach Double Sided Foam Tape to the back of the battery pack.
Peel the protective sheet off the tape and attach it to the two servos.
Step 5: Attaching Arduino
Next attach another bit of Double Sided Foam Tape to one servo and attach the Arduino Uno to it on the flat section of the underside. (The bit where the Arduino logo is)
After doing this, your robot should look a little something like this.
For more detail: Yogy – The Arduino Powered Robot Made For Kids