Cap’n ArrDrownHo! is the lovechild of Ardweeny and Boarduino and he’s here to commandeer your AVR ships. ArrDrownHo! inherits pros of both and cons of neither. Pick up an AVR chip and start prototyping instantly on a breadboard! Want to replace that costly Arduino in your project with a cheap AVR, but don’t know how? Use the simple plug-and-play ArrDrownHo! piggybacked onto the AVR to act as interface for programming and provide power.
I’ll let the features of ArrDrownHo! do the convincing:
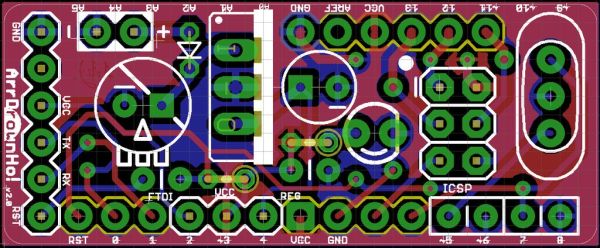
- On-board power regulator: Accepts 7-18V to power your AVR safely
- Serial communication pins: To connect USB-to-serial boards for communication with PC and uploading Arduino sketches
- 6-pin ICSP: To upload code or burn bootloader using a programmer
- On-board 16MHz crystal/resonator: For precise timing. Both crystal and resonator are comptible with board.
- Selectable power source: Choose power from 5V regulator, FTDI board or AVR programmer
- Breadboard and perfboard/veroboard compatible
- Tiny 1.6cmX4cm (0.65″X1.6″) package: Takes only 1 extra row on a breadboard.
- Home fabrication friendly: No plated through holes!!!
- Power indicator LED
I made this when I wanted a simpler way to work with AVRs. Boards like Boarduino and RBBB used plated through holes which I couldn’t make at home. Ardweeny required soldering pins to AVR’s legs and provided very few features. So I combined the two and took the best of both worlds.
Here’s a pretty bad video of it in action:
Notes:
This can only be used directly with ATmega8, ATmega168 and ATmega328.
To burn bootloader or Arduino sketches, a programmer is required. You can check out my Instructable on how to make one.
For serial communication or uploading Arduino sketch to an AVR(with bootloader), a USB-to-serial converter like FTDI or ATmega8u2 breakout board is required.
Edit: Modified board so resonator can also be used for timing! If using crystal, middle pin for resonator can be ignored. If using resonator, no need to solder capacitors C1 and C2.
Step 1: Materials Required
- LM7805 power regulator x1
- 10uF 25v electrolytic capacitor x1
- 100uF 50V electrolytic capacitor x1
- 1N4001 diode x1
- 1K ohm resistor x1
- 10K ohm resistor x1
- LED 3mm x1
- 0.1uF ceramic capacitor(code: 104) x2
- 12-22pF ceramic capacitor(code: 12-22) x2
- 16MHz crystal x1
- Male header strip(can be replaced with longer ones) x1
- Female header x1
- Jumper x1
Tools and materials required:
- Very thin wire for vias
- Double sided copper clad board
- Stuff needed for fabricating board like etchant, drill, saw etc.
- Soldering Iron
Batteries and AVR not included ;P
Step 2: Fabricate the board
Download the eagle files on the Intro page of this Instructable. The board is double sided and plated through holes are optional. So you can send it to fab house or make it yourself. Print, etch, cut, drill and you’re done. Apply tPlace silkscreen using toner transfer.
Step 3: Solder vias
This step is required only if you fabricated the board yourself. If the board has plated through holes, you can skip this step.
Insert a thin wire in all the vias marked in the image and solder it on both sides. Cut off excess.
Keep in mind to keep all solder joint’s height on bottom side as less as possible, except for male and female headers, Why? Check out the last step “Step 8: Imperfections in design” for explanation.
For more detail: ArrDrownHo! – Easily convert AVR to Arduino