I put this together as part of my UnoJoy project, where we’re using the Arduino as a platform from which to explore how we interact with video games. You can check out more of our projects for UnoJoy at unojoy.tumblr.com, or more of our other projects at the Exertion Games Lab.
Step 1: Materials
A pencil – the softer the lead, the better
Some 1+Megaohm resistors
Paperclips – make sure they’re bare metal, not coated in plastic
Wire
An Arduino
Clear tape (optional)
Step 2: Theory
1 – When you touch a conductive object, you create a certain degree of capacitance. This increases the ability of the conductive material you touched to store a charge.
2 – We can create a cheap capacitive sensor by measuring how long it takes for a piece of conductive material to go from a grounded state to a higher potential state when pulled up to that higher state through a resistor. The higher the capacitance, the longer it will take the conductive material to be pulled up to the high state.
3 – Graphite conducts electricity. You may have seen this before in the Drawdio project, where they use a pencil trace to create sound.
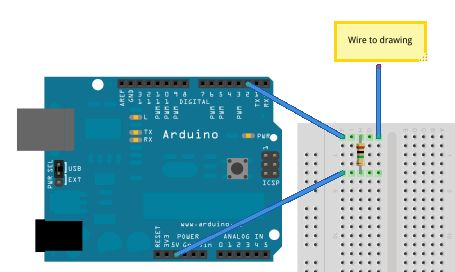
Therefore, if we take our conductive pencil line, pull it to ground, then try and pull it to a higher state, we can measure how long it takes, and if we’re touching the drawing, it will take longer to get to a high state than usual. Conveniently, we can use the Arduino to automatically pull our trace to ground on and off. If we attach a pull-up resistor to our line, when the ground connection inside the Arduino is turned off, everything attached to the pin will start to be pulled up to VCC.
So, our circuit diagram will look something like the above. We use an external pull-up resistor rather than the Arduino’s internal pin pull-up resistors since we need much more resistance than the 30K ohm internal ones, otherwise, the resistance of the graphite tends to dominate and prevent the sensor from working.
Step 3: Putting it together
First, draw something – You’ll want to follow the following rules:
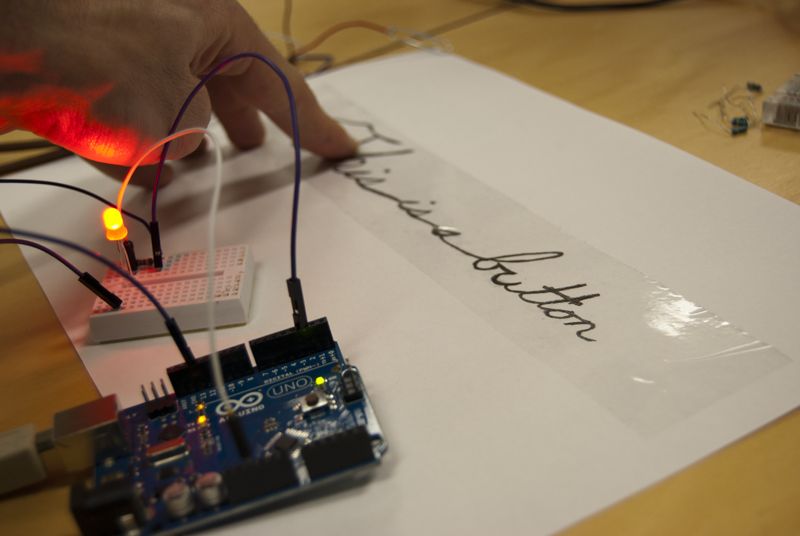
– Make a big filled area at the edge of the paper – this is where you’ll connect your wire to the drawing via paperclip.
– Make sure all of your drawing is connected – you’ll only be able to read from parts that are all touching.
– Re-trace over your lines at least once or twice – you’ll want to get some nice, thick lines of graphite on the paper.
Now take one side of your wire and connect it to a paper clip – you can just strip it and wrap the wire around the clip, but you might want to solder it make sure it stays on.
Connect the wire up like so:
Then load the attached code to your Arduino.
 DrawnSensorExample.ino