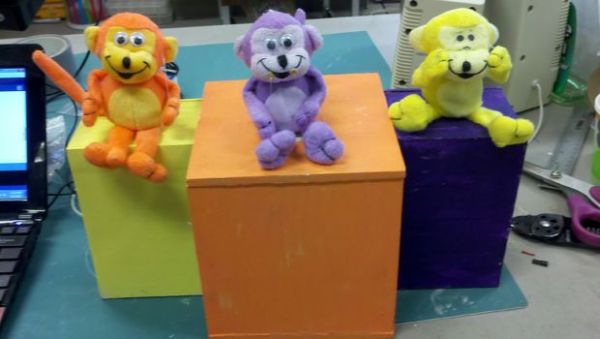
This instructable will guide you through the process of building a set of automaton monkeys in the style of “Hear No Evil, See No Evil, Speak No Evil.” Our design ends with two monkeys reacting at the push of a button located in the Speak No Evil Monkeys eye. This design can be extended to include the third monkey or to include separate triggers to control each monkey.
This project was conducted within the class “Things That Think” at the University of Colorado at Boulder.
Step 1: Parts and Materials
Monkeys
The monkeys that we used in this project were purchased from Oriental Trading Company here http://bit.ly/fUu07l in a set of one dozen. You can start with just one monkey. When it works, you can go up to 3 or even more (think of “eat no evil” or “do no evil” for instance 🙂 )
Arduino Uno
To build some logic and control the behaviours, Arduino Uno was used. We recommend using Arduino Mega if you want to use more monkeys and/or devices. The Arduino Uno has built in support for two servos but more can be added if the servo inputs are spliced and placed into the correct pins on the Arduino board. A better description and documentation on the Arduino Uno can be found here http://arduino.cc/en/Main/arduinoBoardUno .
Speaker
The speaker we used for this project was a simple 1½ inch speaker. We used the speaker for the speak no evil monkey. It can be used to play notes or some pre-recorded sounds. We experimented with a smaller speaker but found that anything smaller than 1½ inches did not provide an acceptable output volume.
Fishing Line
We first thought of controlling the movements of the monkeys with gears. We then decided to use fishing lines to make these movements more natural.
Rigid Plastic Tubing
When the fishing line is inserted inside a monkey, there is some resistance to the movement because of the friction. A plastic tube was used to cover the fishing line and to protect its movement.
Wooden Dowels
These will be needed to connect the monkeys to the platform. We won’t give precise instructions for these since they will depend on your monkey. Just make sure the dowel will fit inside the monkey (bottom up!) and that you drill a hole in the top of the platform large enough to accommodate your dowel!
Momentary Switch
This is basically a button that triggers the programmed movements. A touch sensor could also be used in place of a switch.
Resistors (1k and 10k Ohm)
One of each resistance is required for our project. Resistors are necessary to control the behaviour of the electric circuit. The exact placement for these resistors will be explained further in the instructable. Bigger or more ambitious projects will require more or different resistors and different circuits.
Servo x2
For simplicity we only made two monkeys move. Both of these monkey were attached to their own servo. This helps to have the monkeys move independently from each other.
Ladyada Motor Shield
Arduino on its own cannot power itself or the servos without a USB connection or A/C Adapter. To create a more portable automaton we built a Motor Shield as described in http://www.ladyada.net/make/mshield/make.html and we connected it to the Arduino. We then connected an independent power supply and the servos to the Motor Shield.
Battery Pack
During the development phase, the power was supplied through a USB cable connected to a computer. In the production phase, we used a pack of 3 AA batteries.
Platforms
… And a platform to sit the monkeys on! We built our platforms as four sided wooden boxes that were open on the sides. The main platform that housed the Arduino, Motor Shield, and Battery Pack was slightly larger than the other two. It would also be possible to build a single platform for all three monkeys but we felt individual platforms increased the scalability of the project for future additions.
Step 2: Designing the Circuit
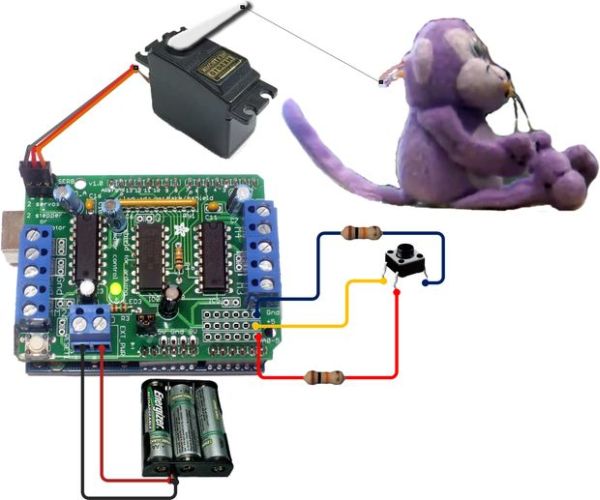
In this diagram we can see the battery pack is connected to the Motor Shield by correctly attaching the +/- outputs to the screw-down terminal. The Motor Shield provides two three-pin connections to attach up to two servos simultaneously.
The circuit for the switch requires three separate wires. The first (yellow) wire is connected to a pin on the switch and to the +5V pin slot on the Motor Shield. The second (red) wire requires an in-line 1k Ohm resistor and is connected to the appropriate input pin (A0 – A5) on the Motor Shield and a pin not associated to the first wire on the switch (remember on switches like this, pins opposite each other are associated). The third (blue) wire requires an in-line 10k Ohm resistor and is connected to a pin on the switch that is associated with the red wire and to the ground (Gnd) on the Motor Shield.
When this switch is in the “off” position the current will run from the +5V on the Motor Shield, through the yellow wire, and back out through the grounded wire. When the button is pushed or switched “on” the current will run from the +5V, through the yellow wire, and choose the path of least resistance through the red wire. This will trigger whatever action we have assigned that particular input to do through our code (we will cover the code in a later step).
Step 3: Making the Monkeys
For each monkey, 2 fishing lines are used to connect the arms to the face (eyes, ears or mouth) through a plastic tube.
A third line is connecting the first two behind the monkeys head. This line is then routed through the top of the platform where the monkey sits and is connected to the servo. When setting up the monkey, platform, and servo some adjustment may have to be made in the length of this third line to get the most realistic movement from the monkey.
To pull the arms down, we added some weight to make use of gravity. The weights we used were tire alignment weights because they were easy to shape but any kind of weight (like fishing weights) would work.
Finally the switch and connecting wires were inserted in the head of the speak no evil monkey and positioned behind the eye. In our project this switch controls all the movements and the speaker. We ended up tearing out the original paper eye that is on the monkey for testing but later replaced the eye with googly eyes on all the monkeys.
For more detail: Monkey Automatons Using Arduino