
Summary of Cycflix: Exercise Powered Entertainment
This project, "Cycflix," connects a stationary exercise bike to an Arduino Nano and a PC to control Netflix streaming based on pedaling speed. When the user's speed drops below a set threshold, Netflix pauses; resuming speed restarts playback. Although initially intended for a Raspberry Pi, the author used a PC due to technical limitations. The system uses Python code to monitor speed via a square wave signal from the bike's display, converting waveform periods into speed data using a custom formula.
Parts used in Cycflix:
- Arduino (any model)
- PC
- USB Cable
- 10K resistor
- Wires
- Copper Strip board
- Stationary Exercise Bike
- 2 Nuts and Bolts
Now that the cheesy title has pulled you (Fitflix was taken and I didn’t want to be sued) I’ll tell you about the project, it uses a stationary exercise bike connected to an Arduino Nano to control the streaming of Netflix on a PC, I started this project hoping I could get it working on just a Raspberry Pi but ran into a few problems I couldn’t overcome which I’ll discuss at the end. But the main gist of the project at the click of a button and some user input, Firefox will open and play Netflix and monitor your speed for the Workout routine you designed, if you are going below the speed for too long, Netflix will be paused until you get back up to speed. If you want to use some other streaming service, it’ll only take a few changes.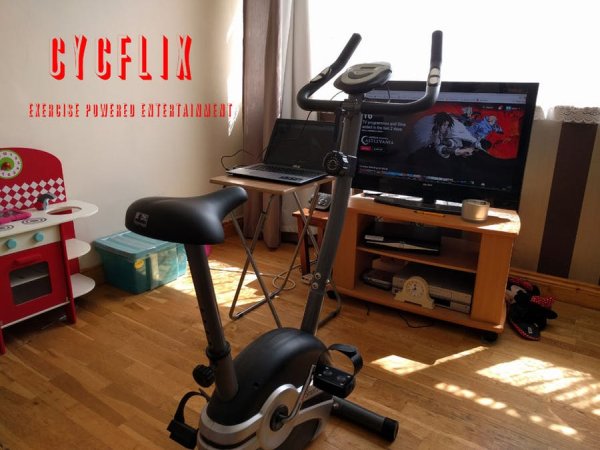
The main reason I did this project was to learn some python and finally use my Raspberry Pi (which didn’t get used in the end) so the code won’t be perfect as I was learning as I went but thought I might as well publish the project.
Components:
- Arduino (any)
- PC
- USB Cable
- 10K resistor
- Wires
- Copper Strip board
- Stationary Exercise Bike (can’t guarantee this will work with your bike)
- 2 Nuts and Bolts
Step 1: Speed Calculation
Before I started this project, I’ve never tried to hack into an exercise bike but I assumed it would output a variable frequency square wave or an analog voltage proportional to the speed, well it looks like my first guess was correct. But I thought it would be a rotary encoder which would be a high frequency due to the number of slots on the encoder but from my testing which I’ll describe below, the frequency of the square wave was very slow, at slower speeds the period of the wave was greater than a second. Either this is a very low resolution encoder, high gear ratio or something else, but it doesn’t really matter whats in the black box once we know how to use it .
I found out the output was a square wave with varying frequency from hooking up my Bitscope to the speed input of the display(which the manufacturers were nice enough to clearly label) and started pedaling. With the help of a friend, I took multiple screenshots of the waveforms at different speeds. To get the period of the square wave, measure the time between two rising or two falling edges(use TB in bottom left of window not Time/Div). From these waveforms, I found a formula to convert period of waveform to speed on the bike(these pictures are shown above). I did this by plotting the points on a graph and getting the equation from the treadline. You of course draw your own line of best fit, pick two point off the graph and solve:
y = m*x+C
Where y = Speed(Km), m is slope(Km/ms), x is Period(ms) and C is the offset (Km).
I rounded the slope and offset to this: Speed=Period*-0.0384+60.372
I did run into a problem that I couldn’t recorded the lower speed (around 10Km) because the frequency was so slow that the Bitscope couldn’t display the whole period. From my testing it looks accurate enough between 20Km and 40Km but below and above can be inaccurate making me think either the output is none linear, the display isn’t accurate or my formula is accurate. But it gives me close enough answers to the real value for most speeds, if I took more points, the equation would be more accurate but this will do.
Step 2: Circuit and Code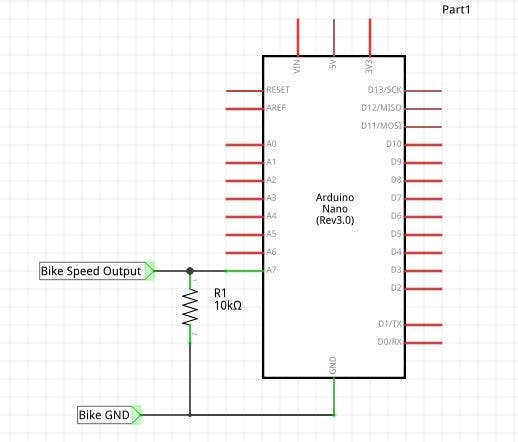
Circuit
The circuit is very simple, its just a pull down resistor and two wires connecting to the speed input and ground of the bike circuit. There was four holes already in the back of the casing so I soldered my circuit to some copper strip board, drilled two holes in it and attached it to the casing with two nuts and bolts. If you do use copper strip board, make sure the traces are cut in between the Arduino pins and that the bolt doesn’t touch and of the copper.
For more detail: Cycflix: Exercise Powered Entertainment
-
What is the main purpose of the Cycflix project?
The project uses a stationary exercise bike connected to an Arduino and PC to control Netflix streaming by pausing playback if the user slows down. -
Why was the Raspberry Pi not used in the final build?
The author started with the intention of using a Raspberry Pi but encountered problems they could not overcome. -
How does the system determine the bike's speed?
It measures the period of a variable frequency square wave output from the bike's speed input and converts it using a specific formula. -
What happens if the user pedals below the required speed?
Netflix will be paused until the user returns to the designated speed for their workout routine. -
Can this setup work with other streaming services besides Netflix?
Yes, using a different streaming service requires only a few changes to the code. -
What formula is used to calculate speed from the waveform?
The author rounded the equation to Speed = Period * -0.0384 + 60.372. -
Is the speed calculation accurate at very low speeds?
No, the accuracy is questionable below 20 Km because the frequency is too slow for the Bitscope to display the full period. -
How was the circuit physically mounted on the bike?
The circuit was soldered to a copper strip board and attached to the bike casing using two nuts and bolts.
