Summary of Create Interactive Electronic Instruments with MaxMSP
This article is the third part of an Intro to MaxMSP series, focusing on interfacing MaxMSP with hardware. It details connecting MaxMSP to ReacTIVision for tracking paper markers via webcam, explaining the setup process, TUIO client usage, and message parsing (addObject, updateObject, removeObject) to control audio synthesis parameters like pitch and frequency modulation based on marker position and rotation.
Parts used in the Interfacing MaxMSP with Hardware Project:
- MaxMSP software
- ReacTIVision vision engine
- ReacTIVision TUIO client for MaxMSP
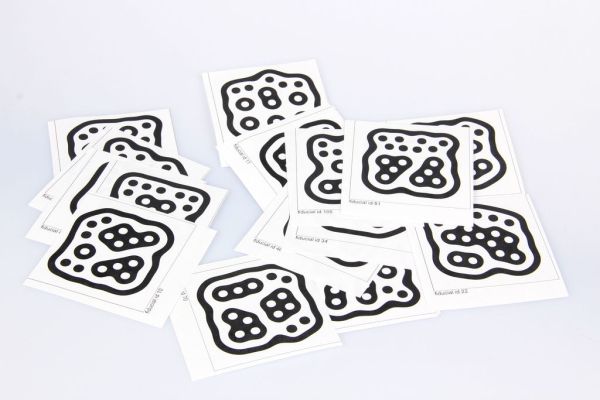
- Fiducial markers (paper)
- Webcam
- TuioDump.pat file
- frequency modulated synth patch
- scale object
This Instructable is part 3 in an Intro to MaxMSP series I’ve just finished teaching atWomen’s Audio Mission in San Francisco. Part 1 is an introduction to MaxMSP and MIDI, part 2 is intermediate Max and Audio, and this Instructable is all about interfacing MaxMSP with hardware.
 I recommend at least skimming over my last two instructables before diving into this one, many of the example patches I use in this instructable are derived from patches built in the last two classes. In this Ible, I’ll be going over how to get MaxMSP connected to Reactivision, Kinect, Arduino, MaKey MaKey, and the Novation Launchpad. The last step has some useful links and ideas for more ways to extend Max.
Step 1: ReacTIVision and MaxMSP
ReacTIVision is a free, open source tool that communicates with MaxMSP and allows you to track objects with a camera by attaching small paper markers to them. The software tracks x and y position and rotation and it’s great for incorporating real world objects into your MaxMSP patch or making table top interfaces. It was originally written for the ReacTable, a table top multitouch instrument:
Here’s how to do it:
– Download the ReacTIVision vision engine
– Download the ReacTIVision TUIO client for MaxMSP
– Print out some of the fiducial markers (look in your ReacTIVision vision engine download, under symbols>>default.pdf)
– Run the ReacTIVision application and hold up the markers to your webcam – you should see the number of the fiducial track with it as you move it around the screen. You may need to adjust your lighting to help reacTIVision see the markers.
By default ReacTIVision uses background subtraction to help it with tracking, in some cases this can be a hindrance. Use the ‘E’ key to toggle in and out of background subtraction mode and use the spacebar to recalculate the background until you find a setting that best tracks the fiducials. Pressing the ‘S’ key will show to the original source image. Pressing ‘T’ will show the binary tresholded image, and pressing the ‘N’ key will turn the display off, which reduces the CPU usage. The thresholder gradient gate can be adjusted by hitting the ‘G’ key, lowering the value can improve the thresholder performance in low light conditions with insufficient finger contrast for example. You can gradually lower the value just before noise appears in the image. The camera options can be adjusted by pressing the ‘O’ key. You can read more on the reacTIVision website and the README.txt (comes with the ReacTIVision vision engine) about the optimal lighting, camera, and background setup for the software.
– TUIOClient.help/mxe/and mxo are the files that allow you to pull in data from the ReacTIVision vision engine into Max. You must include these files in the same folder as any patch that requires them You can also add them into a directory that Max knows to look for external objects.
First open the file TuioDump.pat in Max (find it in the TUIO_MaxMSP folder), open up the Max window to see the logged output (Command + M / Ctrl + M).
----------begin_max5_patcher----------
489.3ocyTFraaCCCF9r8SgfNmMD45llzaC8TOsKcmFFFjsYRXgrjgjbm2J56
9josic2pSSCFJ1EZqeJSS9QJ8XbDOyz.NN6Z1WYQQOFGEQRsBQ8qi3kxlbkz
QaiqgeXxtmunykGZ7jbkE09A0JoOeOp28cKj66Bd5xOtbAayUs1jUsVQ3c12
5+BrfhRHxePLDksFsWKKAxymrnTM0iC+E4YSHVcp55RTq.OkmhQQSsePcYq3
SwwslEmXAmU68F8QJsq1Pk1Zpntbv9RkVB+XoZWd5+YEzEWdlTuieHNOuRDm
QkLSq6tZzbiBgSn+ktYzNW+6h+o8u+BJJzExyiCmjy.N4lxxIH3.cbXYkBXP
ijdRng42K8LZj2EdGXnN74Afwt6K29YVI3bxcPvkg7lazNiBFBsB0PtoVSwO
YdjKRRIZS1jTA8XJz2Z2kQS0GP3j1P5+YGilku.PPZOnp5o6VikjFGLIoRis
kzaM7WkYqESXl3jY1kuSLixFZN3Ot5kpnV8mCRmo1lOb.n+LFSbnlJ.mG0RO
FtlZbOgKaXi08drn.H2C4bA5jYJnX9F5aIaV9JYi3LylNTIqpd.rt9PRIRX5
5disc4pEzRT2sjvO2BOfC6+BRQZCCK9vjRssqu1rdEOt8+7T7uQCg2J3
-----------end_max5_patcher-----------
Here is how the TUIOClient sends messages into Max:
When an object comes into view an addObject message is sent:
addObject session_id symbol_id
session_id is the number of the current session, we don’t need to worry about that for most applications. symbol_id is the number of the symbol that came onscreen – these can be found on the defaults.pdf that you printed out.
As the marker is tracked around the screen, an updateObject message is sent for each frame (my computer runs at about a 15fps frame rate, your machine may differ depending on how hard it is working):
updateObject session_id symbol_id xpos ypos angle xspeed yspeed rspeed maccel raccel
session_id and symbol_id are the same as the addObject message
xpos, ypos, and angle are the x position, yposition, and angle of rotation of the marker
xspeed, yspeed, and rspeed are the x, y, and rotational velocities of the marker
maccel is the acceleration of the marker across the screen
raccel is the rotational acceleration of the marker
you may find that you need just one or all of these pieces of information, but usually symbol_id, xpos, ypos, and rotation are the most useful
And when the marker is removed a removeObject is sent:
removeObject session_id symbol_id
session_id and symbol_id are the same as the addObject message
Use the patch below to read in and parse add, update, and remove messages for marker id, xpos, ypos, and rotation. Be sure to save it in the same folder as the TUIO objects you just downloaded.
----------begin_max5_patcher----------
905.3oc0XlsbaCBEF9Z6mBM5pzNNdDKZw8tN8An2z65zICxhjPhLRCBk3zL4
cuBzRTVjQdC6NwQKGvvOebNGv77zItwYqoEtNey42NSl77zISzlTFlz79D2U
j0KSIE5p4tLa0JJW5NqtLIcsTaWPWk8.8mw2QW1UXNQt7VF+lqDJi5NADFM2
alCLxScaAP+R0yN+o46bs3lXUUUkWagkn6fr36tD521zWmwkbxJptnuKXjz9
kTv9qtD.rqUxEzhJcSjrLde8DAq0CRcyq4RmZ3kqX7TpTO1AuZLqT1Z0SY7k
oSUWlsmPjjjXjfXud.LHZKAHdmAnkQgHqdtx4BuKgeMm8k1Zjx3zkYkbc0fC
yIebnlM99pa954WDZzfBbn8zvAf4g9JMDbN3psNOqvgvSbdR8vEwT4iTJ2wS
aCr0zFi.y86nMvKrYrNZd6cv4Mpl2vP74.uWQD2SENUcPLUrszEEhpGK6lyL
Xw4VT+0oYUMhq4nW3B8.16Co45O7BMO7xIhJ6Rp3JJmDmpqg2N4W4CqECxa7
tU0zR9TNstMTieRkOhiaLgeia+ubOvBOFfEGsXNzerjMvljE2rZFL7+Sx1jB
bTf0+n.1SLhhKkxL9FPDBDzKpFCZu9oHB5tY2EDnNEABrGtKaBAfc.AuM+9l
RkOJ2DjMi+PAG.fx3GEWKN8wJf7gUUK44jk2Wsqkp+lW+wr6GHp1Kz.6OvaU
dHR0bqKn7cOL.C8OFgms+3rwDdtvPzYaasWKSZ8nSHLZ7a6vylAmsJau34oJ
3zrOWSLYvhMR7C9OJqq2C2epptYyESaNHfwDrF4ddG1svazQcAmvMNcFF9T6
DLpnGe6sd1wGNhplk5zcdYN8O9Qmx7DhjNxSRC.0rCiPaBdGnMCfGBdJx08+
.3CeLxhDoOQgvNOmgQ.5DmD4ycD9UIK6GordG4xfyzHcR9.7FWh4HGjjxJ1p
bH5pnOmn2cJ85Qox9aQVQVoXYam0tMVGbWOkPKjLtdYv9UJrpRuxiaYIITd+
zlIrBUlzjgOumsROHS5Ivt5AZRO91UO.S5AYW83YROPqomQMcgspbLNaAr2r
EXL5wyt5wj2yBqIG+QnlHqpFSyUAV0S1DarXZvQnFrUUioYpcMkb8J7j77Gn
hhllTKjps+bWlP8ZvL8qLd8q5MW3JnOvZqORagHp12irZSOkh5ssrNJvcppe
dY5+.7jck4O
-----------end_max5_patcher-----------
Try wiring up the data from updateObject to the frequency modulated synth from the last Instructable. See if you can get the rotation of a fiducial to control the rate of frequency modulation. Or use the y position to change the pitch of the main oscillator. Hint: you’ll need to use a scale object to scale your range of values to something appropriate for the synth. In case you get stuck:
----------begin_max5_patcher----------
1285.3oc4ZsrbahDEcs7WQWrJiihp9MP1kZ9.lMytoRMEB53PhDnRBMwNoh+
1GnaPF4BCWkft5gqxFjZ0Bctm649na3G2Lwad98lMdj2S9GxjI+3lISrCUMv
j52OwaYz8wKh1Xml2mVjmsco2T2GU9xzrElB6mwdZv7sEMixqG8S4YEaR+tw
NS9LZ8vtYV7vJiCEU+.QEdSIdyixtyi7w54sJpH9yoY28uqMwEtoFP0kWFhv
mUcRQqNxKOt66jlXgb97u7NI0qENxhVZ+479v5znEdUevOu4lpCSARCYluUd
YatlEl6sXxaSbzBCgNivlUBEJQRoy5jqzcxUrCjq.QOhfpSLlpW9gMt7yYjL
IjGZ0Gb9vxDNlpjR6y2oUNURjZpQFXOEF1G03OtTylEoIl0Gf.g86XgB+cp+
R6LnaKjELh93aerSaiOJN0Mo2kUR68F8y7m4qJ06AVYufOS8x9VM+pM52mJr
ddgb3neAC8hDzYLB6DVjngdnLWQBduYGCuHyATaiA7gSAHnGC+rdFOv5oEmv
tAD9VOrKBfw5MWOO3pMePCOD3Cna.wHmOX6x4l0GRgA9uVggoMLxNqZYdho8
ErbhUukt6R0AUoUgsZfTo6kpznj571GKigNsEV8czAOzlwTzebj+qZAjefUy
HU17ug8JfD3z58aerZMYmXEjzQKtxRxfdokW2ofB7soo497gSAIjnnfheHdg
4wRXyOwM36Jjw4VUjt2U2KTGCUzQrddZFrp4ZVcFF.aAjP+5tZtipTJIfPoQ
ttk46IQwGBS0WJApU2qEbmmu4Xm1Qv3G3Kkm5xG00Mb0S08W9XjWwVb9xklp
XymwMqMKy+OyeM+KUnDdZAZ+rSGFOKzsd0Pqe20C1K18kBGiOJIAAKWoZY38
604Rj754EQEo4Yj2PeG+1Uo+QyLVjlYhy2lU7r.ii.qncqp22l520nY0V8zI
svvgVteU9FRTVB4gpW7l4lhuYLYDpcL1IfjjkMbp1QRLpamAeQZhhCMsLZ8W
MqI62KAdjhHHvRCfjNrvq1MDoIBRBXCRY9Wuz.UNiqfxC5qVdnIWAHZXjKvN
eaQQd1XrevCZlBAqkpWxZN1oYxunWiztDcfboBTVD81rUQwesrjHsZ+ws+c.
Lk5WiopOsKV3Yu.hbwcaR3CvgxK1vhl1qgDVDdQGUvkB3k8nHGTb74mpSPDB
NAut2c4lwtX060KpBhbO3hVtynJvxc8qN0dsL.hXWgB4rtzRLjcar.o89qP1
tJIp3v2rE4gd6jm15+gYOVc3iPz6yY1kaoQp6IGP9zSQvKtqainR3u2ll+mK
Ras.58rR5nDl.zEqrqTTK6sX.LGr8qZWs+yd5Ss+3UiuOUsIe653F3V+3nQd
B.IlMEoY1Mip0b36MmOmljXxZSZKSSVkWlanFBjO1oaCJhzb.PRDblhIFZXR
A.R3xRp8r+tQjFUDU833NHIUciHvDSTHZIApZII.HovkkJ+03CfHlDcHMj7l
wPERU2WpAcbZ94GlD93hIMDLEhKlfj.WHO+vDGYem3Lz2ABSHG2wf56vqth.
RsNNt9NNn7S3lGmG.gmD3hIen8oblgINt8XxAkK.2tm3PaK.uTALHRbbqrv.
olvcMTLHcpHwM6jsOa4Pc95iOlDCgIM9XZvEsnvGSCtpEA9XZHMNC2tmXP5d
JDeHMnqC2Mu.z9ofNhFhj9cj2ku4m27+.Mt0nqC
-----------end_max5_patcher-----------


For more detail:Create Interactive Electronic Instruments with MaxMSP- How do I track real-world objects in MaxMSP?
Use ReacTIVision to track objects by attaching small paper markers to them and viewing them through a webcam. - What files are required to pull data from ReacTIVision into Max?
You must include the TUIOClient.help/mxe and mxo files in the same folder as your patch or add them to a directory Max knows to look for. - Which key toggles background subtraction mode in ReacTIVision?
Pressing the 'E' key toggles in and out of background subtraction mode. - What information does the updateObject message send?
It sends session_id, symbol_id, xpos, ypos, angle, xspeed, yspeed, rspeed, maccel, and raccel. - Can I use marker rotation to control sound?
Yes, you can wire the rotation data to a frequency modulated synth to control the rate of frequency modulation. - How can I adjust the thresholder gradient gate?
Hitting the 'G' key allows you to adjust the value to improve performance in low light conditions. - What is the purpose of the scale object mentioned in the tutorial?
The scale object is needed to scale the range of values from the marker tracking to something appropriate for the synth. - Does the frame rate affect the updateObject messages?
Yes, an updateObject message is sent for each frame, so the rate depends on how hard the machine is working.