I just want to say hello to everybody, this is my first time writing an instructable project. English is not my native language so I will try to make short and as clear as possible.
Controlling devices with voice command is not a strange thing anymore, you can buy the controller from Google or Amazon. Those devices provide a lot of functions and capabilities. But making your own one is something else, it’s more fun and cheap too. So, in this project, I will show you how to control devices with your voice using a NodeMCU and smartphone app.
Step 1: Introduction
I have searched and read many projects, each of them provide a bit of useful information. So I put all of them together, plus my own tiny part, to create this project. Basically, you will need to run an Android app on your phone and control other devices with it. In this app, you can turn on or off devices using buttons and/or voice command.
Step 2: Materials
Things you will need are listed below. I bought all of them from Aliexpress but you can get it anywhere you want.
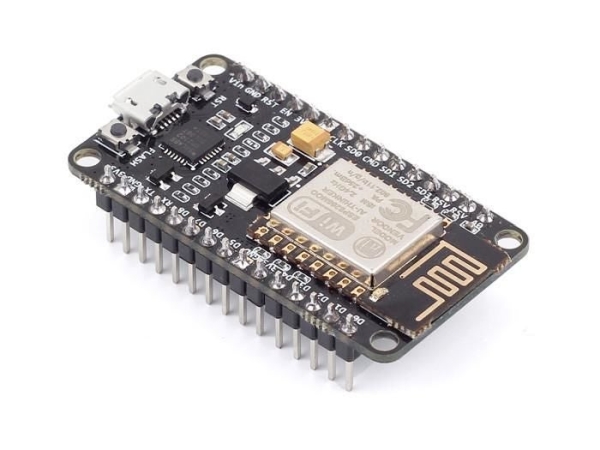
- NodeMcu V3 ESP8266 chinese version LoL1n v3
- A Relay module with 8 relays (or separated relay modules)
- And last one is an Android smartphone 🙂
That’s it. We are good to go.
Step 3: Hardware Details
If you are familiar with Arduino (or NodeMCU) and relays then you can skip this step. For those who are not, I will try to explain how these stuffs work briefly.
First, NodeMCU can be considered a microcontroller with Wifi ability thanks to its ESP8266 chip. I will show you how we can use Arduino IDE to work with NodeMCU in next step.
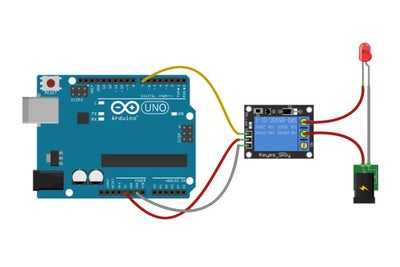
Second, a relay module is used to separate low DC voltage control signal from NodeMCU and your AC line. There are 3 output pins for each relay. Normally, the COM pin are connected to the NC (normally close) pin. When a control signal is presented, the relay coil will flip so COM pin are connected to NO pin.
On the relay module, opto-transistors are used to protect the NodeMCU from unwanted shock from AC line when relay switching. A logic LOW of an input on relay module will activate its corresponding relay. Reversely, logic HIGH will deactivate the relay.
You need to remove the jumper between VCC and JDVCC on relay board to separate power source.
Step 4: Software Preparation
First, the NodeMCU I bought is from China so they use USB chip CH341. We need to install the driver for it. The driver is attached so you can download it, extract and install on your computer.
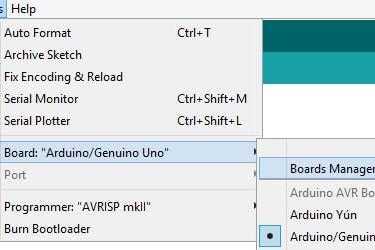
Next, for using with Arduino IDE, we need to add board library. Open Arduino IDE:
- Tools –> Board –> Board manager
- Search esp8266 by ESP8266 Community and install
- Files –> Preferences
- Fill in the box Additional Board Manager URL with this (remove ” ” character)
“http://arduino.esp8266.com/stable/package_esp8266com_index.json” - Tools –> Board –> NodeMCU 1.0
In the attached Arduino file, change parameters accordingly:
- SSID to your Wifi name
- password to your Wifi password
- You can also change the control pin on NodeMCU as you need but you have to double check with the app later
Let’s move the next step.
Step 5: Smartphone App
I use MIT App Inventor to create the app for android phone. You can sign up for free by a gmail account. If you just want to use the app, download the zip file, unzip and install home3.apk on your phone. The command for each output pin is very simple
- turn on red / turn off red
- turn on green / turn off green
- turn on blue / turn off blue
- turn on yellow / turn off yellow
- turn on orange / turn off orange
- turn on brown / turn off brown
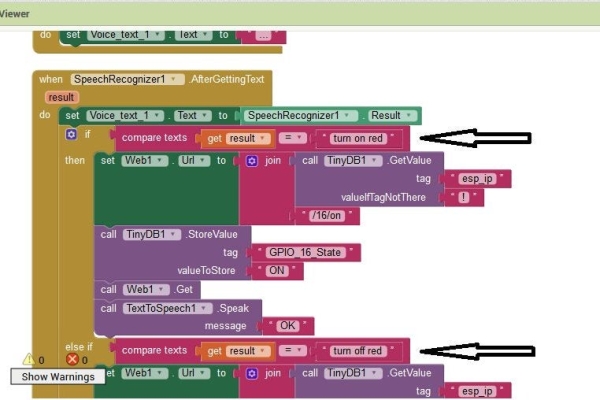
And if you want to change to command, sign in MIT App Inventor and modify my home3.aiaas you can see in the picture
- Project –> Import project (.aia)
- Switch to Block and modify command
- After modification, select Build –> App (save .apk)
- Install your app
So everything is set, let’s put things together.
Step 6: Hardware Connection
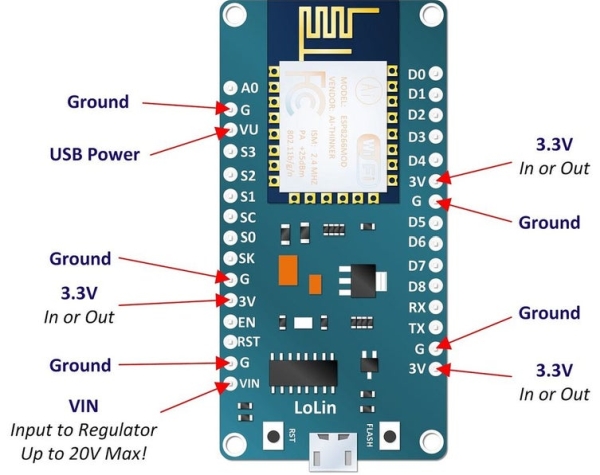
As you can see in the picture, NodeMCU operates with 3.3V. So it has a voltage regulator on board. You can power it through USB port to provide 5V DC or connect NodeMCU VIN pin to a power source with range from 6 to 20V maximum.
On the relay board, remove the jumper between VCC – JDVCC. Because the relay is 5V so you need to supply it with 5V or lower, but not below 3.3V. If not, the relay won’t activate.
First scenario, 5V external power source is used. It needs to have at least 1.5A in order to run NodeMCU and all relays at once.
- Connect the power source to JD-VCC and GND pin on the relay board.
- Connect the power source to VIN and GND of NodeMCU
- Connect output pins from NodeMCU to relay board ( D0 D1 D2 D5 D6 D7)
- Connect 3.3V of NodeMCU to VCC of relay board (for me it works but in some cases, 3.3V is not enough to activate relays. You may use VIN of NodeMCU to VCC of relay board but the power separation is no longer available. This won’t be a problem if you only use relay to control light bulb)
Second scenario, NodeMCU is powered via USB cable from a power bank. External power source is used for relay board
- Instead of 3.3V, you can connect VIN of NodeMCU to VCC of relay board
So our system is good to go.
Step 7: Final Touch
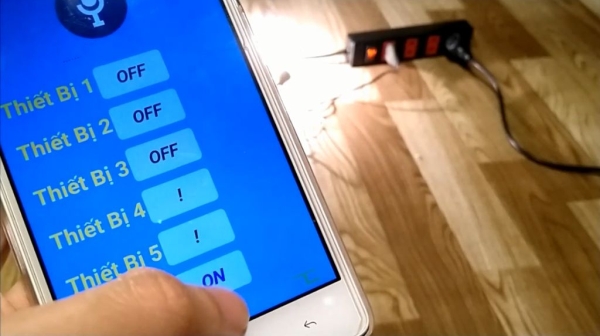
Open the app you just install on the smartphone. I named it Home DL. You can change that silly name later with your MIT App Inventor.
- Open the program in Arduino IDE
- Change Wifi ssid and password to yours
- Upload it to NodeMCU
- Open Serial Monitor and wait for the local IP, note it.
- While the app on your phone is open, click on Set IP button
- Write down the IP in the text box and click Save
- Restart the app
- Now you can click on any button to control corresponding devices
- Or click on the speaker icon and speak your command (May the force is with you :))
I made a video for this in Vietnamese with English note so you can get the idea easily. If you like this project, please support by voting for me as First time maker and/or subscribe to my Youtube channel. Thanks.
Source: