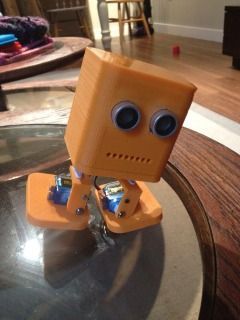
Summary of BoB the BiPed
BoB is an affordable, 4-servo mini biped robot designed for beginners and classrooms. Built using 3D-printed parts and micro servos, it offers a low-cost entry into robotics with expandable features like optional ping sensors. The project emphasizes hands-on learning, encouraging users to sand printed components for fitment and mount small controllers like Arduino Nano.
Parts used in the BoB the Biped Robot:
- Printed parts set
- 4 9g micro servos
- 4xAAA battery pack or suitable power source
- Parallax ping sensor (optional)
- Microcontroller of choice (smaller size recommended)
- Phillips head screw driver
- Nail file or sand paper
Did you buy an arduino after seeing all the cool instructables and now you tired of just making LEDs blink? Are you envious of all the cool walking robots people are building but don’t have the experience or cash for all of those servos and expensive brackets? Here is your solution meet BoB the 4 servo mini biped robot. Bob is both easy to build and very cheap to assemble and yet is loaded with personality and endless expansion capabilities.
So how did BoB come to be?
After wanting and drooling over all the 3d printers(still don’t have one) and cool stuff being built. i was offered and opportunity to design a robot and have it printed for me and so bob was born.
What are future plans for BoB?
First i would like to explain a bit about my school experience. When i was younger i dreaded school in fact the only thing that got me through the day was my tech classes. They made school enjoyable and let me into the robotics hobby i actively participate in today. Using BoB i would like to give back. The first BoB was created due to a very generous offer and since i have made many improvements. But without a printer to test each design they are just untested files. My long term Goal is to make BoB into a cheap and easy to assemble class room activity to help children get their feet wet in the world of robotics, to give those hands-on kids like me something to look forward to, and to give them an introduction to new technology that is making waves and if the future in many fields. so my next goal is to attempt to obtain a printer be it by winning it, building it over a period of time (my funds are very tight i have a child of my own) or raising the money to continue my work.
so are you ready to build?
Step 1: Collect your parts!
the printed parts for bob can be found HERE
and the original build page HERE
the parts are currently at version 2.0 while they look different then the prototype pieces in this instructable. Assembly will be the same as only cosmetic changes were made. I will update with the newer version if and when i get a printer.
Printed parts set (settings used to print proto pieces can be found on thingiverse page)
4 9g micro servos
4xAAA battery pack (or any suitable power source)
parallax ping sensor(optional, also updating files for cheaper alternative)
micro controller of choice (smaller is better)
phillips head screw driver
nail file or sand paper
Step 2: Assemble the legs.
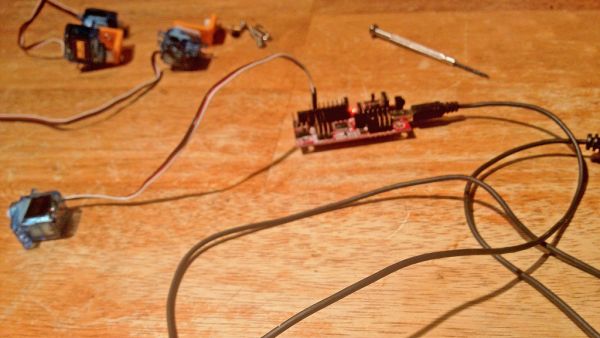
my robot was already assembled and taken apart for this instructable..this is where i fail and couldnt find my small screw driver to fully take down the legs. i have provided as many pictures as i can.
step 1: center the servos!
for arduino connect the servo signal cable to D9 and the servo pos and neg to 5V and Gnd on the arduino.
open up the arduino IDE and type this in
#include <Servo.h>
Servo servo;
void setup()
{
servo.attach(9); // attaches the servo to digital pin 9
}
void loop()
{
myservo.write(90); //tells the servo to go to the center position
}
do that for each leg servo and assemble like in the pictures
Step 3: Time to get sandy!
even the best 3d printers make parts that need a little fit work so…Get sanding!
i personally use a nail file, course side first, finer grit after. sand some then test fit and keep doing so until it all fits together nice.
the two areas that will need work are shown below…the holes for the servo and ping sensor (if your using one)
after all your parts are fitted slide them in and secure..i made mine fit without the use of screws (but the screw holes are there to use!)
Step 4: Mount his brain!
where you mount the micro controller is entirely up to you. the one i chose to use was a bit to big to fit internally a small controller like an arduino nano or pro mini will have no problem fitting in the head. my solution was to drill two holes and mount the board on standoffs to the back of the head
For more detail: BoB the BiPed
- What are the major components needed to build BoB?
You need a printed parts set, four 9g micro servos, a 4xAAA battery pack, an optional Parallax ping sensor, and a microcontroller. - How do I center the servos on the Arduino?
Connect the servo signal cable to digital pin 9 and the power cables to 5V and Gnd, then use code to write the value 90 to the servo. - Which microcontroller is best for fitting inside BoB's head?
A smaller controller like an Arduino Nano or Pro Mini fits easily, whereas larger boards may require external mounting. - Can I assemble BoB without using screws?
Yes, the author made their robot fit securely without screws, though screw holes are provided if you choose to use them. - Why might I need to sand the printed parts?
Sanding is required because even the best 3D printers create parts that need fit work, specifically around servo and sensor holes. - What tools are necessary for the assembly process?
The essential tools listed are a Phillips head screw driver and a nail file or sand paper. - Is the current version of the printed parts different from the prototype?
Yes, the parts are at version 2.0 and look different cosmetically from the prototype, but the assembly remains the same. - What is the long-term goal for the BoB project?
The goal is to make BoB a cheap classroom activity to introduce children to robotics and new technology.