Summary of Arduino Melody
This tutorial guides users through creating a simple Arduino project that plays a short melody using a built-in IDE program. The setup requires only an Arduino Uno, a 100-ohm resistor, and an 8-ohm loudspeaker connected to pin 8 and ground. By loading the "toneMelody" example, the device produces sound immediately upon reset.
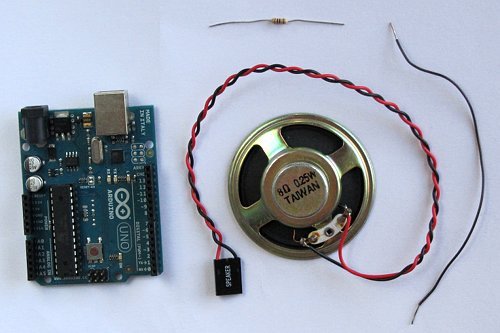
Parts used in the Arduino Melody Project:
- Arduino Uno
- Wire link
- 100 ohm resistor (brown - black - brown)
- 8 ohm loudspeaker
A very easy tutorial that uses only two components. The Arduino plays a short melody on a loudspeaker. The program to load to the Arduino is one of the programs that is built into the Arduino IDE.
Prerequisites
Complete tutorial 3 – Starting with Arduino and its prerequisites before attempting this tutorial.
Components
Besides an Arduino Uno and wire link, you will need:
| Qty | Part | Designator | Notes | Type |
|---|---|---|---|---|
| 1 | 100 ohm (brown – black – brown) | R1 | 1/4W, 5% or better | Resistors |
| 1 | 8 ohm loudspeaker | SP1 | Transducer |
The required components are shown in this photo:
Circuit Diagram
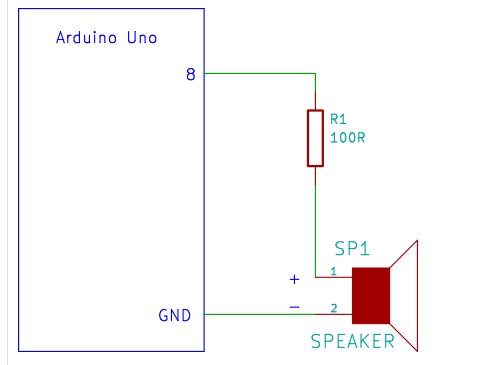
The circuit diagram shows that the positive terminal of the speaker is connected through a 100 ohm resistor to pin 8 of the Arduino. The negative terminal of the speaker is connected to one of the Arduino GND pins.
Building the Circuit
Start by connecting the negative speaker terminal (black wire) to a GND pin on the Arduino. Note that it is not necessary to use a breadboard when using a speaker that is taken from an old PC as it has a connector that a single core wire can be plugged into.
Loading the Program
The program to load is one of the built-in Arduino programs. Open it from within the Arduino IDE under:
File → Examples → 2.Digital → toneMelody.
Load the program to the Arduino and the melody will play immediately after loading. To play the melody again, press the reset button on the Arduino.
This project can be found on the Arduino website.
← Go back to Tutorial 6: Rising Pitch Siren
For more detail: Arduino Melody
- What components are required for this project?
You need an Arduino Uno, wire links, a 100 ohm resistor, and an 8 ohm loudspeaker. - How do I connect the speaker to the Arduino?
The positive terminal connects through a 100 ohm resistor to pin 8, while the negative terminal connects to a GND pin. - Can I use a breadboard for this circuit?
No, it is not necessary to use a breadboard if the speaker has a connector suitable for single core wires. - Where can I find the program to load onto the Arduino?
The program is located under File → Examples → 2.Digital → toneMelody within the Arduino IDE. - Does the melody play automatically after loading?
Yes, the melody will play immediately after the program is loaded to the Arduino. - How can I replay the melody?
Press the reset button on the Arduino to play the melody again. - What type of resistor is specified for this project?
The project specifies a 1/4W, 5% or better 100 ohm resistor. - Are there prerequisites before attempting this tutorial?
Yes, you must complete tutorial 3 and its prerequisites first.