
Summary of Step-by-step guide for making a very simple temperature and humidity meter
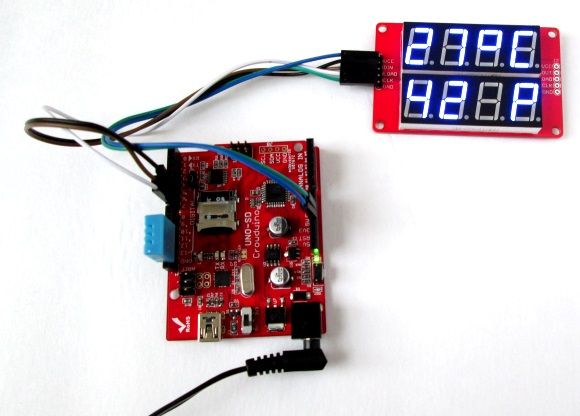
This article gives step-by-step instructions to build a simple indoor temperature and relative humidity meter using an Arduino Uno (or compatible), a DHT11 sensor, and a MAX7219-based 8-digit serial 7-segment LED display, showing temperature in °C and humidity in %.
Parts used in the Temperature and Humidity Meter:
- Arduino Uno board (or compatible, e.g., Crowduino Uno SD)
- DHT11 temperature and humidity sensor
- MAX7219-based 8-digit serial 7-segment LED display (SPI7SEGDISP8.56-2R)
- Wiring/jumper cables
- Optional: micro USB cable (for Crowduino) or USB cable for Arduino power
Things required to build this project
Arduino Uno board
I am using Crowduino Uno SD board, which is manufactured by Elecrow and is fully compatible with Arduino Uno board. Crowduino has the following additional features that the standard Arduino Uno board doesn’t have.
1 Reset button is placed on the left side edge, and thus more convenient to access.
2 Improved power supply circuit with selectable 3.3V and 5.0V for operation.
3 Uses the mini USB connector to avoid the potential risk of connecting to the shield plugged in.
4 Micro SD card slot on board, which makes this board useful for data logging applications.
DHT11 sensor
DHT11 is an ultra low cost digital sensor for measuring temperature and relative humidity. It operates from 3.0-5.0V and provides calibrated digital outputs for temperature (in degree Celsius) and humidity through a single wire serial interface. It can measure humidity ranging from 20-80% with 5% accuracy, and temperature ranging from 0-50 degree Celsius with 2% accuracy. When it is active, the maximum current consumption is 2.5mA. The sensor has 4 pins with 0.1” spacing as shown below.
MAX7219-based seven segment display
The next thing required to do this project is two rows of 4-digit seven segment LED displays for displaying temperature and humidity simultaneously. This project uses SPI7SEGDISP8.56-2R display module, which is MAX7219 driven and allows you to control all 8 digits through a 3-wire serial interface. The display brightness can also be adjusted through software commands. In addition, library routines are available for interfacing the SPI7SEGDISP8.56-2R module to Arduino. This project, in particular, uses the LedControl library.
For more detail: Step-by-step guide for making a very simple temperature and humidity meter
- What components are required to build the meter?
An Arduino Uno or compatible board, a DHT11 sensor, and a MAX7219-based 8-digit serial 7-segment LED display are required. - Can I use a board other than the standard Arduino Uno?
Yes, the article uses a Crowduino Uno SD board, which is compatible with Arduino Uno. - How is temperature displayed?
Temperature is displayed in degree Celsius on the 7-segment display. - How is relative humidity displayed?
Relative humidity is displayed as a percentage on the 7-segment display. - What interface does the DHT11 use?
The DHT11 provides calibrated digital outputs for temperature and humidity through a single-wire serial interface. - What range and accuracy does the DHT11 offer?
DHT11 measures humidity from 20–80% with ±5% accuracy and temperature from 0–50 °C with ±2% accuracy. - What driver and library are used for the 7-segment display?
The display is MAX7219-driven (SPI7SEGDISP8.56-2R) and the project uses the LedControl library. - Can the display brightness be adjusted?
Yes, the MAX7219-based display brightness can be adjusted via software commands. - What voltage does the DHT11 operate at?
DHT11 operates from 3.0 to 5.0 V. - Does the Crowduino board offer extra features?
Yes, Crowduino Uno SD has a convenient reset button on the edge, selectable 3.3V/5V power, a mini USB connector, and a micro SD card slot.
