
Summary of Arduino Lilypad Controlled NeoPixel Earrings
This article guides you through building Arduino Lilypad Controlled Neopixel Earrings that feature dynamic light animations for parties. The project involves programming a Lilypad board with Adafruit libraries, connecting it to a 12-LED NeoPixel ring, and powering the system with a 3.7V Lipo battery. Key steps include soldering components, sewing the electronics together for flexibility, attaching earring hooks, and securing the battery with tape or silicon.
Parts used in the Arduino Lilypad Controlled Neopixel Earrings:
- Arduino Lilypad (x1)
- NeoPixel Ring - 12 (x1)
- USB Serial Converter (x1)
- 3.7V Lipo Battery (x1)
- USB Mini-B Cable (x1)
- JST 2-Pin Battery Connector Plug Female - Male (x1)
- Female/Female Jumper Wires (x6)
- Earring Hooks
Hello everyone,
Don’t you want to have such a nice and cool earring when you go out at night or for parties? I would like to have it, that’s why I made Arduino Lilypad Controlled Neopixel Earrings. 🙂 These earrings don’t just light up. They have several different animations and colors.
Step 1: Required Materials:
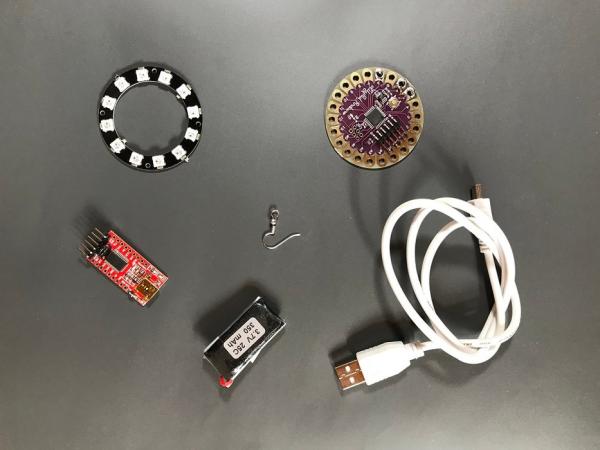
- Arduino Lilypad (x1)
- NeoPixel Ring – 12: (x1)
- USB Serial Converter(x1)
- 3.7V Lipo Battery (x1)
- USB Mini-B Cable (x1)
- JST 2-Pin Battery Connector Plug Female – Male (x1)
- Female/Female Jumper Wires (x6)
- Earring Hooks
Step 2: Circuit Diagram
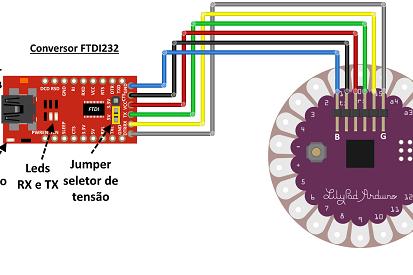
We will start the project by loading code into Lilypad first. In order to program the card, we need a Female/Female Jumper Cable and a USB Serial Converter. After installing the code, we will not have any work with USB Serial.
- Make the connection between Lilypad and the USB Serial Converter, as in the picture.
- Then, connect the Lilypad with your computer using Micro USB.
Step 3: Programming the Arduino
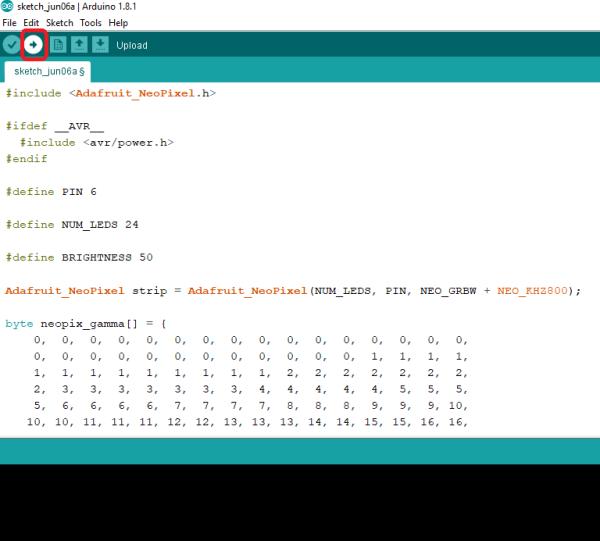
- Open the Arduino software. Under Tools-Boards, select the Lilypad main board. You need to make sure that the correct board is selected.
- Select your port number. It might be a different port for you.
- Upload the code to Lilypad main board.
You can copy the Neopixel code from Adafruit’s Github page. Here is the link: NeopixelEarring
Create a new project in the Arduino IDE. Copy the whole code and paste the code you copied here. Then click the “Upload” button and upload the code to Lilypad.
**If you don’t work with Adafruit libraries before, you might need to add up the Adafruit libraries.
The code loading process is over, no more work with USB Serial Converter.
Step 4: Neopixel & Lilypad Connection
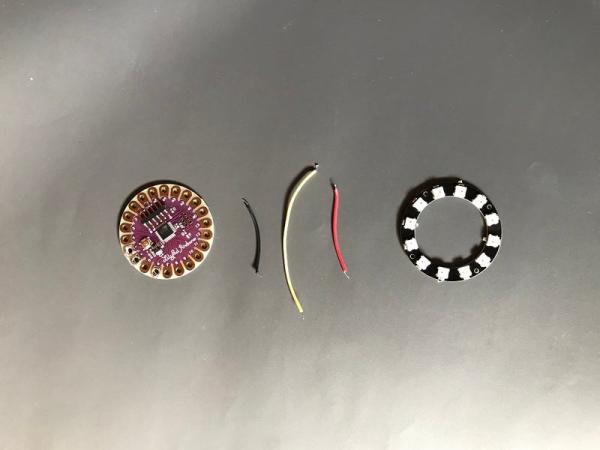
It’s time to make the Lilypad and Neopixel connection.
First, we are wiring our cables to the GND, 5V and Input inputs on the Neopixel. Then we will combine this with Lilypad.
The earring will be like this: We’ll make connections to the Neopixel ring with Lilypad on it. After soldering, the wires will leave some space between Lilypad and Neopixel. So you do not have to worry about the connections.
The NeoPixel-Lilypad connection looks like this:
The Neopixel Ring’s Data In pin will be soldered to the Lilypad’s D6 pin, GND’s to the (-) and 5V’s to the (+) of the Lilypad.
Step 5: Lipo Battery & Arduino Lilypad Connection
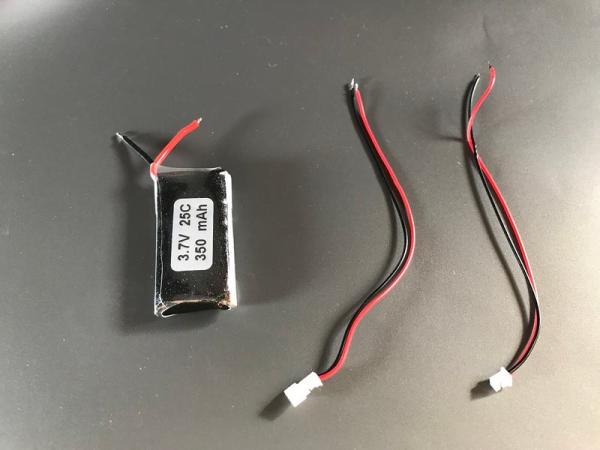
I used these because I had these Lipo batteries. But, smaller Lipo batteries are available. You can also apply a smaller Lipo batteries to the process described below.
In this section, we will perform a small operation of the Lipo battery 🙂
- Cut off the tip of Lipo battery. JST 2-Pin Battery Connector Plug Male’s red wire to the Lipo battery’s red wire, soldering the black wire to the Lipo’s black wire.
- JST Lipo Battery Connector Plug Female’s red wire to the Lilypad’s (+), soldering the black wire to the Lilypad’s (-)
- The final state will look like the picture above. If you connect the LilyPad to the Lipo Battery, Neopixels will start giving light for the LilyPad is powered. Because we loaded the code in the first place.
Step 6: Seam Neopixel With Lilypad
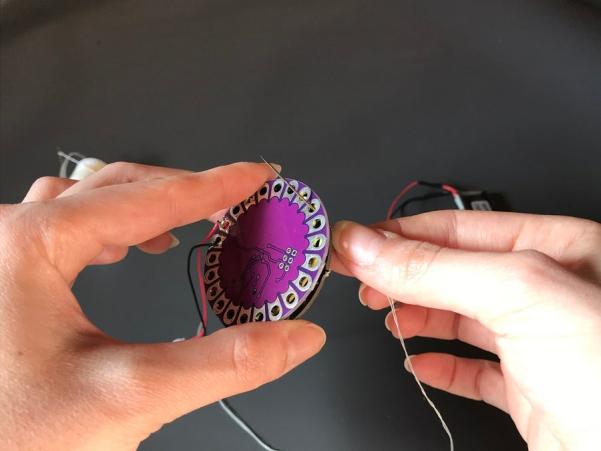
I sew NeoPixel and Lilypad together using needles and rope from 3 different places. There are enough holes in both. You can get out of there from anywhere.
Then, stick the Lipo Battery with a double-sided tape on the back of the Lilypad.
Finally, you can cover up the connections with the electrical tape or silicon.
Step 7: Tighten Earring Clips
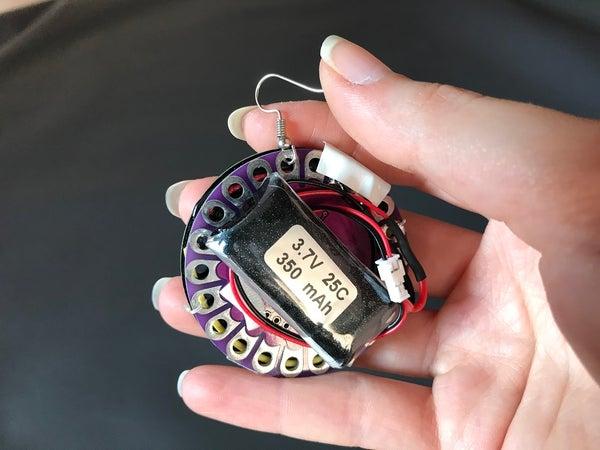
It’s all set. Finally, let’s put the Earring Clip on one of Lilypad’s holes.
And our earrings is ready ! We’re ready for the party. Neopixel are working great !
Good fun with your earrings. 🙂
I expect your comments for the project. You can comment your questions or contact me.
Source: Arduino Lilypad Controlled NeoPixel Earrings
- What materials are required to build these earrings?
You need an Arduino Lilypad, a 12-LED NeoPixel ring, a USB serial converter, a 3.7V Lipo battery, a USB Mini-B cable, JST connectors, jumper wires, and earring hooks. - How do I program the Arduino Lilypad board?
Select the Lilypad main board under Tools-Boards in Arduino software, choose your port number, and upload code copied from Adafruit's Github page. - Which pins connect the NeoPixel to the Lilypad?
The NeoPixel Data In pin connects to Lilypad D6, GND connects to the negative terminal, and 5V connects to the positive terminal. - Can I use a smaller Lipo battery for this project?
Yes, the author notes that smaller Lipo batteries are available and can be applied using the same process described. - How should I secure the battery to the circuit?
Stick the Lipo battery with double-sided tape on the back of the Lilypad after sewing the components together. - What is the best way to protect the connections?
Cover the connections with electrical tape or silicon to protect them once the project is assembled. - How do I attach the earring clip?
Put the Earring Clip on one of the holes in the Lilypad to finish the assembly. - Do I need to keep the USB serial converter connected during use?
No, once the code is loaded, no more work is needed with the USB serial converter.
