
Summary of One Button to Rule Them All
This article demonstrates connecting a JavaScript web app to Arduino Cloud using an Arduino MKR1000 and a SparkFun button. The project involves configuring the hardware with Arduino Web Editor, setting up credentials in Arduino Cloud, and writing sketches for both the microcontroller and the browser-based client. The system uses MQTT protocols to toggle a status indicator on a webpage when the physical button is pressed, enabling seamless interaction between physical inputs and web interfaces via the cloud.
Parts used in the One Button to Rule Them All:
- Arduino MKR1000
- SparkFun big dome red button
- Arduino Web Editor
- Arduino Cloud
Learn how to connect a simple web app written in JavaScript to Arduino Cloud.
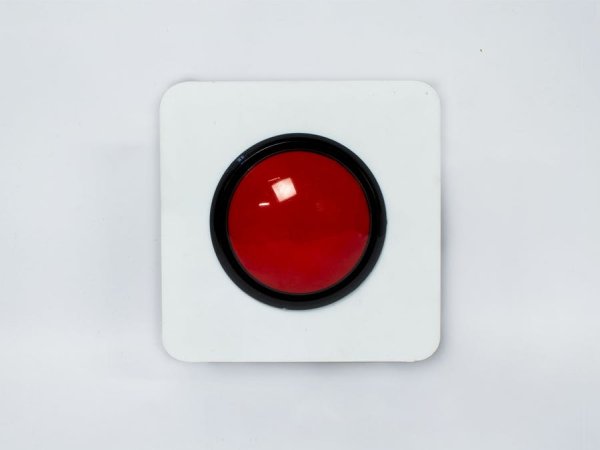
Things used in this project
Hardware components |
||||||
 |
|
× | 1 | |||
|
× | 1 | ||||
Software apps and online services |
||||||
 |
|
|||||
 |
|
|||||
Story
Following this tutorial you are going to learn how to make your Arduino or Genuino MKR1000 or WiFi Shield 101 interact with a simple webpage hosted in a browser via Arduino Cloud.
Connect to Arduino Cloud
If this is the first time you are using Arduino Cloud we highly encourage to follow the getting started guide.
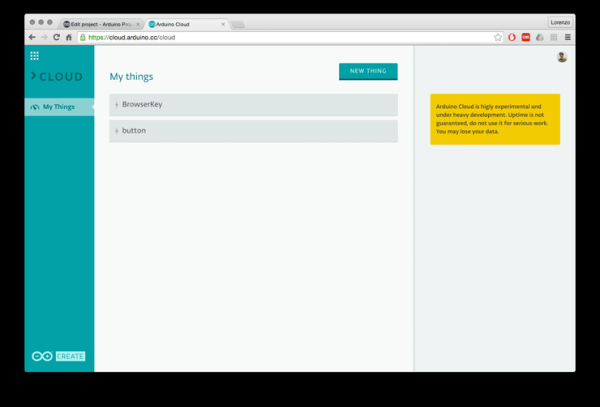
Start by creating a new thing, we are going to call this thing “button”!
 caption(option)
Once created, take note of the credentials, you will need to insert those in the Arduino Sketch.

Now you have to create a second set of credentials that are going to be used by the browser to connect to Arduino Cloud.
The Arduino Sketch
If you followed the Arduino Cloud getting started flow, you can start coding the Arduino sketch using the one you downloaded as a starting point.
Otherwise just copy-paste the one down here and start filling in the data required to connect to your wifi and your device credential.
#include <SPI.h>
#include <WiFi101.h>
#include <WiFiSSLClient.h>
#include <MQTTClient.h>
const char ssid[] = "***";
const char pass[] = "***";
const char server[] = "mqtt.arduino.cc";
const char userName[] = "***";
const char deviceName[] = "button";
const char deviceId[] = "**************************";
const char devicePsw[] = "**************************";
MQTTClient client;
WiFiSSLClient net;
int ledPin = LED_BUILTIN;
void setup() {
 Serial.begin(9600);
 pinMode(ledPin, OUTPUT);
 Serial.print("Attempting to connect to WPA SSID: ");
 Serial.println(ssid);
 // Connect to WPA/WPA2 network:
 while (WiFi.begin(ssid, pass) != WL_CONNECTED) {
   Serial.print("failed ... ");
   delay(4000);
   Serial.print("retrying ... ");
 }
 client.begin(server, 8883, net);
 connect();;
}
void connect() {
 Serial.println("connecting...");
 while (!client.connect(deviceName, deviceId, devicePsw)) {
   Serial.print(".");
 }
 Serial.println("connected!");
}
void loop() {
 client.loop();
 client.publish("/<username>/<devicename>/blink", "on");
 Serial.println("publishing up");
 digitalWrite(ledPin, HIGH);
 delay(1000);
 client.publish("/<username>/<devicename>/blink", "off");
 Serial.println("publishing low");
 digitalWrite(ledPin, LOW);
 delay(1000);
}
void messageReceived(String topic, String payload, char * bytes, unsigned int length) {
 Serial.print("incoming: ");
 Serial.print(topic);
 Serial.print(" - ");
 Serial.print(payload);
 Serial.println();
}
In this example sketch we are using the function client.publish() to send messages to the Arduino Cloud. To be more specific, we are sending MQTT messages to the topic at this address:
/<username>/<devicename>/blink
Devices can send value to a topic while other devices can subscribe to that same topic and listen to it.
Because of how Arduino Cloud is configured, each thing can just publish messages to a topic after /<username>/<devicename>/ . Therefore two devices cannot publish to the same topic.
Every device, however, can subscribe to all the topic after /<username>/ , thus allowing each device to listen to all the messages coming from devices under the same user account.
We are going to simply modify this sketch to send a message to the topic /pressed every time the button connected to the Arduino board will be pressed.
Attaching here the resulting modified sketch.
#include <WiFi101.h>
#include <WiFiSSLClient.h>
#include <MQTTClient.h>
int status = WL_IDLE_STATUS;
MQTTClient client;
WiFiSSLClient net;
int buttonPin = 2;
boolean buttonState = false;
boolean oldButtonState = false;
boolean lightStatus=false;
const char* ssid  = "***";     //  your network SSID (name)
const char* password = "***";  // your network password
const char* userName = "***";
const char* deviceName = "button";
const char* deviceId = "*****************************";
const char* devicePsw = "*****************************";
void setup() {
 Serial.begin(9600);
 WiFi.begin(ssid, password);
 client.begin("mqtt.arduino.cc", 8883, net);
 connect();
 pinMode(2, INPUT);
}
void connect() {
 Serial.print("checking wifi...");
 while ( status != WL_CONNECTED) {
   Serial.print("Attempting to connect to WPA SSID: ");
   Serial.println(ssid);
   // Connect to WPA/WPA2 network:
   status = WiFi.begin(ssid, password);
   // wait 10 seconds for connection:
   delay(4000);
 }
 Serial.println("connecting...");
 while (!client.connect(deviceName, deviceId, devicePsw)) {
   Serial.print(".");
 }
 Serial.println("connected!");
}
void loop() {
 client.loop();
 buttonState = digitalRead(buttonPin);
 if (!buttonState && oldButtonState) {
   lightStatus = !lightStatus;
   if (lightStatus) {
     client.publish("/<username>/button/status", "on");
     Serial.println("publishing on");
   } else {
     client.publish("/<username>/button/status", "off");
     Serial.println("publishing off");
   }
 }
 oldButtonState = buttonState;
 delay(50);
}
void messageReceived(String topic, String payload, char * bytes, unsigned int length) {
 Serial.print("incoming: ");
 Serial.print(topic);
 Serial.print(" - ");
 Serial.print(payload);
 Serial.println();
}
Now it is time to create our single webpage that respond whenever we click the button.
Start by downloading the base web-app sketch from Github.
In order to test the server locally on your computer you will need to use a local web-server.
You can use Python SimpleHTTPServer for this. Just move to the folder “baseWebApp” inside the repo you downloaded and launch the server:
python -m SimpleHTTPServer 8080
If everything goes fine, you should be able to see the page in a browser at this address: http://0.0.0.0:8080.

Fill in the required fields in the top of the web page with the browser credential you got from cloud.arduino.cc.
It’s important that in the topic field you write the device name you want to subscribe to, followed by the topic. In our case: button/status.


If you press the big button you should see the “on” box turning red and green again according to the “status” of the button.

The basic sketch is based on paho mqtt js client. Check out the code of the myScript.js to see how you can connect to Arduino Cloud from a browser.
var mqttBrokerURI = "wss://mqtt.arduino.cc:9002/";
var userName = "";
var deviceName = "";
var deviceId = "";
var devicePsw = "";
var topic="";
$(document).ready(function() {
 console.log (localStorage.getItem("userName"));
 $("input[name=userName]").val(localStorage.getItem("userName"));
 $("input[name=deviceName]").val(localStorage.getItem("deviceName"));
 $("input[name=deviceId]").val(localStorage.getItem("deviceId"));
 $("input[name=devicePsw]").val(localStorage.getItem("devicePsw"));
 $("input[name=topic]").val(localStorage.getItem("topic"));
 $(".monitor").click(function() {
   if ($(".monitor .messages").hasClass("hidden")) {
     $(".monitor .messages").removeClass("hidden");
   } else {
     $(".monitor .messages").addClass("hidden");
   }
 });
});
function connect() {
 setProperties();
 client = new Paho.MQTT.Client(mqttBrokerURI, deviceName);
 // set callback handlers
 client.onConnectionLost = onConnectionLost;
 client.onMessageArrived = onMessageArrived;
 // connect the client
 client.connect({
   userName: deviceId,
   password: devicePsw,
   onSuccess: onConnect,
   onFailure: onConnectionFail
 });
}
function setProperties() {
 userName = $("input[name=userName]").val();
 deviceName = $("input[name=deviceName]").val();
 deviceId = $("input[name=deviceId]").val();
 devicePsw = $("input[name=devicePsw]").val();
 topic = $("input[name=topic]").val();
 localStorage.setItem("userName", userName);
 localStorage.setItem("deviceName", deviceName);
 localStorage.setItem("deviceId", deviceId);
 localStorage.setItem("devicePsw", devicePsw);
 localStorage.setItem("topic", topic);
console.log(localStorage.getItem("userName"));
console.log(localStorage.getItem("deviceName"));
console.log(localStorage.getItem("deviceId"));
console.log(localStorage.getItem("devicePsw"));
}
// Create a client instance
// called when the client connects
function onConnect() {
 // Once a connection has been made, make a subscription and send a message.
 console.log("connected");
 client.subscribe("/"+userName+"/"+topic);
 console.log("subscribing to "+topic);
}
function onConnectionFail(response) {
 // Once a connection has been made, make a subscription and send a message.
 console.log("Impossible to connect");
 console.log(response);
}
// called when the client loses its connection
function onConnectionLost(responseObject) {
 if (responseObject.errorCode !== 0) {
   console.log("onConnectionLost:" + responseObject.errorMessage);
 }
}
// called when a message arrives
function onMessageArrived(message) {
 console.log(message);
 $('.messages tr:first').after("<tr><td>" + message.destinationName + "</td><td>" + message.payloadString + "</td></tr>");
 $('.megabutton').removeClass('on');
 $('.megabutton').removeClass('off');
 $('.megabutton').addClass(''+message.payloadString);
 $('.megabutton').text(''+message.payloadString);
}
function sendMessage(topic, val) {
 console.log("sending " + val + " to " + deviceName + "/" + topic);
 message = new Paho.MQTT.Message(val);
 message.destinationName = deviceName + "/" + topic;
 message.payloadString = val;
 client.send(message);
}
Code
Source : One Button to Rule Them All
- How do I connect my Arduino device to Arduino Cloud?
You must create a new thing named "button" in the cloud interface and note the generated credentials to insert into your Arduino sketch. - What software is required to write the code for this project?
The tutorial requires using the Arduino Web Editor to write and upload the sketch to the board. - Can multiple devices publish to the same topic under one user account?
No, each device can only publish messages to a specific topic after its unique username and device name prefix. - How does the web page know when the button is pressed?
The web application subscribes to the /username/button/status topic to receive messages sent by the Arduino when the button state changes. - What command is used to start the local web server for testing?
You should run python -m SimpleHTTPServer 8080 from the baseWebApp folder to launch the local server. - Which library is the basic web sketch based on?
The basic sketch is based on the paho mqtt js client library found in the myScript.js file. - What port number is used for the MQTT broker connection in the code?
The code connects to the server at port 8883 for the Arduino side and port 9002 for the WebSocket connection in the browser. - How do you handle the button press logic in the loop function?
The code checks if the current button state differs from the old state to trigger a status update and publish a message.
