
Summary of Wallbots: Autonomous Magnetic Robots that Traverse Vertical Surfaces using arduino
This article details the construction of magnetic robots capable of traversing vertical metallic surfaces like elevators and whiteboards. Using an Arduino Mini, modified continuous-rotation servos, and light sensors, the project creates three distinct robot personalities (Red, Green, Yellow) that react to human interaction. The guide covers material gathering, modifying servos for continuous movement, reversing motor direction, and assembly.
Parts used in Magnetic Robots:
- 2 servo motors
- 4 light sensors
- 4 2.2 K resistors
- 4 10K resistors
- 1 100 ohm resistor
- 1 Arduino Mini
- 6 magnetic disks
- 1 RGB LED
- 1 lightweight Battery
- Hard wire
- Electric Tape
- Wire
- Shrink Tubing
- Cardboard or paper
- Hot glue or epoxy
This Instructable will teach you how to create magnetic robots that traverse vertical surfaces. These robots can move on any metallic walls, including elevators, whiteboards, refrigerators or metal doors.
The robots are outfitted with several light sensors, allowing them to respond to simple user interactions. My implementation supports 3 robot ‘personalities’, which can be changed by covering the topmost light sensor:
Red robots move fast, going towards objects (such as human hands or other robots)
Green robots move slower, turning away from objects
Yellow robots move the slowest, and stop completely when motion or objects are detected
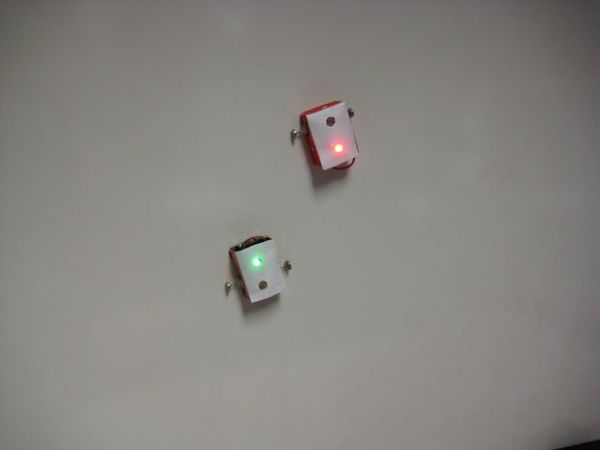
This instructable details my first prototype. In the future I plan to build in more complex, autonomous behaviors. I will use these robots to engage people in public spaces such as elevators or hallways. In doing so, I hope to facilitate creative interaction between people and technology in mundane, everyday settings.
Stacey Kuznetsov
[email protected]
Human Computer Interaction Institute
Carnegie Mellon University
for Making Things Interactive, Spring ’09
*** UPDATE ***
I recently made another version of this project using continuous servo’s from sparkfun and a custom-cut PCB. The new robot is much much sturdier:
Step 1: Gather Materials
To make one robot, you will need:
2 servo motors http://www.rctoys.com/rc-toys-and-parts/DF-SRV-6G/RC-PARTS-DRAGANFLY-SERVOS.html?utm_source=googlebase_froogle&utm_medium=US&utm_term=DF-SRV-6G
4 light sensors http://www.goldmine-elec-products.com/prodinfo.asp?number=G14025
4 2.2 K resistors
4 10K resistors
1 100 ohm resistors
1 Arduino Mini http://www.arduino.cc/en/Main/ArduinoBoardMini
6 magnetic disks http://www.kjmagnetics.com/proddetail.asp?prod=R8201
1 RGB LED http://www.superbrightleds.com/pdfs/RGB-1WS.pdf
1 lightweight Battery http://www.sparkfun.com/commerce/product_info.php?products_id=731
Some hard wire (not easily bendable)
Electric Tape
Wire
Shrink Tubing
Cardboard or paper
Hot glue or epoxy
You will also need access to:
Soldering Iron
Hot glue gun (or epoxy)
Scissors
Wire Cutters
Exacto Knife
Step 2: Hack the Servo Motors to Allow for Continuous Rotation (Part 1)
Off-the shelf servos allow for fixed motion. We want continuous rotation in order to control robot movement. You will need to make 2 simple modifications to each servo: remove the physical rotation barriers, and hack the potentiometer into always receiving a constant signal.
The black part of the motor is designed to stop movement after 180 degrees. This is done physically- there are two plastic knobs that prevent continuous movement.
1. Pry open the servo case
2. Take apart the gears
3. Cut the wires off from the black casing (the next step explains what to do with them)
4. Clip off the small plastic bearings that hinder continuos rotation
Step 3: Hack the Servo Motors to Allow for Continuous Rotation (Part 2)
Now ‘trick’ the potentiometer into always getting continuous signal
1. Cut the red, green and yellow wires from the black casing (you should have done this in the previous step)
2. Solder a 2.2K resistor between the green wire and yellow wire.
3. Solder a 2.2K resistor between the red wire and the yellow wire.
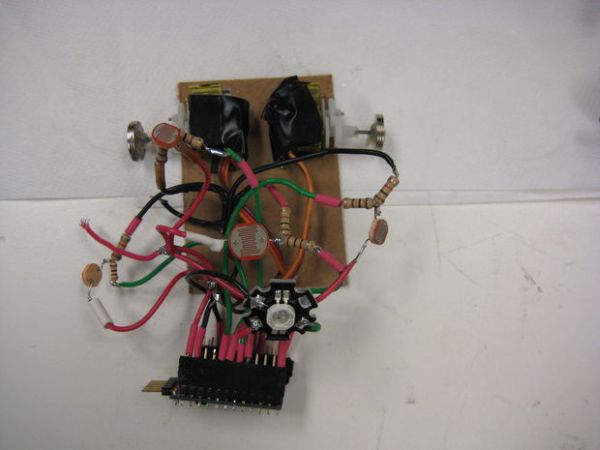
Step 4: Flip the rotation of one of the motors
Servos usually rotate in the same direction given the same analog signal. We’ll need to arrange them symmetrically on the robot, so we’ll have to reverse one of them. This can be done in code or hardware (I did hardware b/c I’m lazy with code).
To do a hardware direction reverse:
1. cut the red and blue wires that go from the motor to the motor’s board
2. solder the red to the blue, and the blue to the red (criss-cross the wires)
Step 5: Re-assemble the motors back together
This step is easy! Gently tuck the wires back into the case of the servos as much as you can and re-assemble the gears. I couldn’t get the casing to fit after I added the resistors, so I taped everything back with electric tape.
For more detail: Wallbots: Autonomous Magnetic Robots that Traverse Vertical Surfaces
-
What surfaces can these robots move on?
The robots can move on any metallic walls, including elevators, whiteboards, refrigerators, or metal doors. -
How do you change the robot's personality?
You can change between the three personalities by covering the topmost light sensor. -
What happens when a Red robot detects an object?
Red robots move fast and go towards objects such as human hands or other robots. -
How do Green robots behave when they detect motion?
Green robots move slower and turn away from objects. -
What is the behavior of a Yellow robot upon detecting motion?
Yellow robots move the slowest and stop completely when motion or objects are detected. -
Why must the servo motors be hacked for this project?
Off-the-shelf servos allow for fixed motion, but continuous rotation is required to control robot movement. -
How do you reverse the rotation direction of one motor?
You can reverse the direction by cutting the red and blue wires going to the board and soldering them cross-wise. -
What tools are needed to hack the servo motors?
You need a soldering iron, hot glue gun or epoxy, scissors, wire cutters, and an Exacto knife.
