Summary of MIDI Linear Actuator
Summary (under 100 words): This project uses MIDI Volume (Control Change CC7) to operate a Firgelli linear actuator via relays controlled by an Arduino-based microcontroller. CC7 values map to three states: stop (mid value), extend (above threshold), and retract (below threshold). The system includes MIDI IN/OUT, channel selection via DIP switch, LED indicators, and requires a 12 V DC supply. MIDI sequences can be played live or recorded for repeatable actuator motion.
Parts used in the MIDI Linear Actuator:
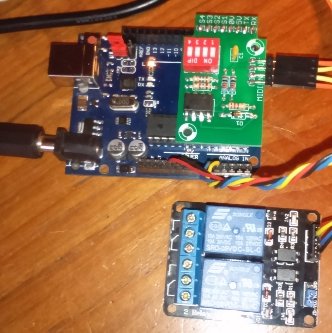
- Arduino board with pre-programmed Atmega microcontroller
- 2.1 mm power socket
- Power LED (associated with power socket)
- Firgelli Automations linear actuator (no feedback)
- 2-relay board
- MIDI IN/OUT board
- MIDI 5-pin DIN input socket
- MIDI 5-pin DIN output socket
- 4-way DIP switch for MIDI channel selection
- 12 V DC power source
- LED indicators (LED1, LED2, and Arduino Pin 13 LED)
This project uses relays to control a Firgelli Automations linear actuator without feedback. The relays are controlled by the MIDI Volume (Control Change number CC7) command which is read by the microcontroller and converted into one of the only 3 states of operation:
1) The Linear Actuator is stopped,
2) The Linear Actuator is extending,
3) The Linear Actuator is retracting.
Using the MIDI Volume CC7 command allows the user to automate the control of the linear actuator, either in real-time or the MIDI data can be recorded into a MIDI sequencer and then played back to repeat the sequence as required.
The MIDI Linear Actuator unit utilizes:
- An Arduino Board including a suitable pre-programmed Atmega microcontroller,
- A 2.1mm power socket, and associated LED,
- MIDI Control Change (CC7) Volume control value is used to control the Linear Actuator, but may be pre-programmed to any value,
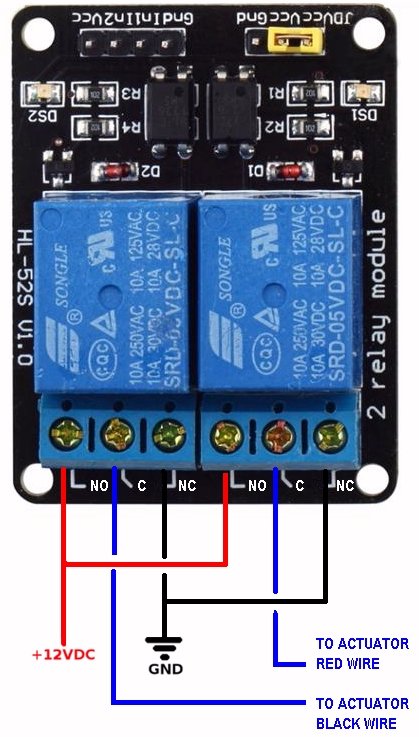
- A 2 relay board, to extend or retract the Linear Actuator,
- A MIDI IN/OUT Board,
- A MIDI 5-pin DIN input socket,
- A MIDI 5-pin DIN output socket,
- MIDI channel is selectable via a 4-way DIP switch.
The MIDI Linear Actuator also requires:
- A 12v DC power source
Circuit Schematic:
A circuit schematic of the Arduino/MIDI board shows the Input/Output connections for both units. The relay board circuit schematic is also available.
Operation:
At power-on (or reset) the software waits for the Volume Control (CC7) Change command to approximately reach mid-position, which is signified by turning On the LED connected to Pin 13 on the Arduino board.
Now the main program reads the Volume Control (CC7) Change value and if it remains in the mid-position then both relays are Off and the Linear Actuator is stopped.
if the Volume Control (CC7) Change value increases above a certain threshold Relay 1 is switched On, (Relay 2 is Off), and the Linear Actuator starts extending. This also lights LED1 (LED2 is Off). Also the LED connected to Pin 13 on the Arduino board is now Off.
If the Volume Control (CC7) Change value decreases below a certain threshold Relay 2 is switched On, (Relay 1 is Off), and the Linear Actuator starts retracting. This also lights LED2 (LED1 is Off). Also the LED connected to Pin 13 on the Arduino board is now Off.
If the Volume Control (CC7) Change value returns to the mid-position then both relays are Off and the Linear Actuator is stopped.
For more detail: MIDI Linear Actuator
- How does the MIDI Linear Actuator determine stop, extend, or retract?
The Arduino reads MIDI CC7 values: mid-position stops (both relays off), values above a threshold activate Relay 1 to extend, and values below a threshold activate Relay 2 to retract. - Can I automate the actuator movements with MIDI sequences?
Yes. MIDI data can be recorded into a MIDI sequencer and played back to repeat the sequence. - What MIDI control is used to drive the actuator?
MIDI Control Change CC7 (Volume) is used, though it may be pre-programmed to another control value. - Does the system require a specific power supply?
Yes. The MIDI Linear Actuator requires a 12 V DC power source. - How is the MIDI channel selected?
The MIDI channel is selectable via a 4-way DIP switch. - What indicators show the actuator state?
LED1 lights when extending, LED2 lights when retracting, and the Arduino Pin 13 LED is on at startup waiting for mid-position and turns off when motion occurs. - Are relays used for controlling direction?
Yes. A 2-relay board is used: Relay 1 for extending and Relay 2 for retracting; both off stops the actuator. - Is there a schematic available for the project?
Yes. A circuit schematic of the Arduino/MIDI board and a relay board schematic are available.