Summary of 60 seconds Voice Record – Playback module
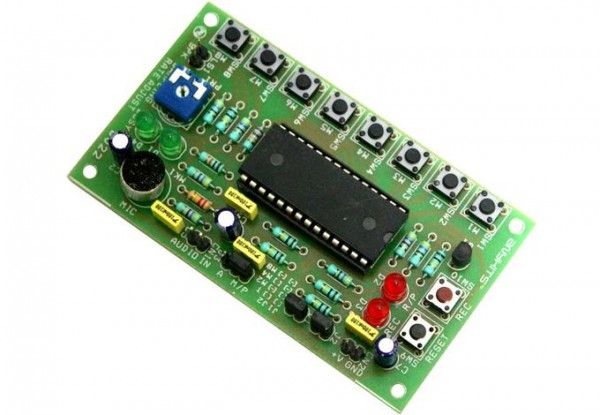
The 60 Second Voice Module is a compact circuit based on the APR9600 IC, enabling up to 60 seconds of voice recording and playback. It supports four modes: eight segments (MOD8), four segments (MOD4), two segments (MOD2), or a single continuous shot (Tape Mode). Users can select audio sources via jumpers for either an onboard microphone or external input. The module features tactile switches for control, an LED indicator, adjustable sampling rates, and direct speaker connectivity.
Parts used in the 60 Sec Voice Module:
- APR9600 IC from Aplus
- Onboard microphone
- Tactile switches for Record and Play
- Audio output connector for speaker
- Berg connector for power supply
- LED for Record/Playback status
- Jumpers J1, J2, and J3
- Preset PR1 for sampling rate adjustment
- PCB with mounting holes
Description
Voice Module 60 Sec project will playback and record up to 60 seconds of voice message. This circuit is an excellent choice to add voice to your project.
Specifications:
Up to 60 Seconds of nonvolatile voice storage
Up to eight segments record and play option available
Easy and clear, jumper selectable mode option
Preset for adjusting sampling rate
Tactile switches for Record, Play function trigger
Easy jumper selection for selecting recording source
Onboard microphone for recording message directly onto the chip
Audio output available to drive a speaker
Direct speaker connection via berg connector
LED to display Record/Playback of messages
Berg connector for power supply input
Four mounting holes of 3.2 mm each
PCB dimensions 54 mm x 94 mm
This circuit will help you record and play a 60 seconds voice message stored on it. This circuit is based on APR9600 IC from Aplus.
The project provides four different modes of voice message to be recorded and played, viz i) MOD8 : 60 Seconds is equally dived in 8 equal segments, ii) MOD4 : 60 Seconds is equally divided in four equal segments, iii) MOD2 : 60 Seconds is equally divided in two equal segments and iv) Tape Mode : Entire 60 segment is available in a single shot mode. For MODE selection see MODE selection table.
There are two different ways to record a voice message onto the chip viz. i) CN1 connector on PCB for external audio input or ii) Onboard Microphone. Jumper J3 on the PCB to select audio source. J3-Position A would select the external audio input and J3-Position M/P would select onboard microphone. Onboard preset PR1 will adjust the sampling rate of playback and record option for IC. Important thing to remember is that, if you increase the sampling rate, the duration of message will reduce and vice-versa. For details see resistance values & sampling frequencies table.
Recording a Message:
To record a message, please select the right MODE at Jumper J1 and J2. The MODEs are clearly marked on the PCB and jump or no-jump positions are also marked. Also select the source for recording through CN1 Connector. Keep the sampling rate preset PR1 in the middle position to test a sample of the recorded message. Increasing the sampling rate will decrease the total amount of recording time and vice-versa.
For more detail: 60 seconds Voice Record – Playback module
- What are the available recording modes?
The project offers MOD8 dividing time into eight segments, MOD4 into four segments, MOD2 into two segments, and Tape Mode for a single continuous shot. - How do I select the audio recording source?
Use jumper J3; Position A selects external audio input via CN1, while Position M/P selects the onboard microphone. - Does adjusting the sampling rate affect recording duration?
Yes, increasing the sampling rate reduces the total message duration, while decreasing it increases the duration. - Can this module play back messages directly to a speaker?
Yes, it provides an audio output available to drive a speaker via a direct connection through a berg connector. - How many segments can the module record simultaneously?
The module supports up to eight segments for record and play options depending on the selected mode. - What is the maximum recording time supported?
The circuit supports up to 60 seconds of nonvolatile voice storage. - Is there an indicator for recording status?
Yes, an LED is included to display the Record or Playback state of the messages. - How is the sampling rate adjusted?
The onboard preset PR1 is used to adjust the sampling rate for both playback and record options.