Measuring the consumption of a resource that has units by volume can be more tricky than it sounds. Use of resources such as water, gas, and even electricity is typically measured by gauges that determine either instantaneous flow rate or cumulative volume over time. Both techniques have problems: measuring flow rate at frequent intervals allows you to do time-based reporting and generate a graph of how the flow rate varied over time, but to determine the total consumption by volume across a specific time period you then have to integrate the data and there is the danger of under-reporting usage if your sample rate is slow and usage rapidly fluctuates or spikes.

Measuring cumulative volume makes it easy to determine total consumption across a period and is accurate in terms of total usage but to generate a flow rate graph you then need to calculate the difference between each sample, and if your recording interval isn’t brief enough any short-term spikes in usage will be averaged out across the recording interval and may not show clearly on the graph.
Flow gauges typically output a series of pulses proportional to the instantaneous flow rate which means that to interpret them it’s necessary to implement a simple frequency counter. This is actually the same way many car speedometers work: a wheel sensor outputs a pulse for each rotation of a wheel which means the pulse frequency varies proportionally to the vehicle speed. The speedo then displays a scaled version of the current pulse frequency to show instantaneous speed while the odometer displays a scaled cumulative pulse count to show distance traveled – both pieces of information are based on the same underlying data but they are recorded and displayed in different ways.
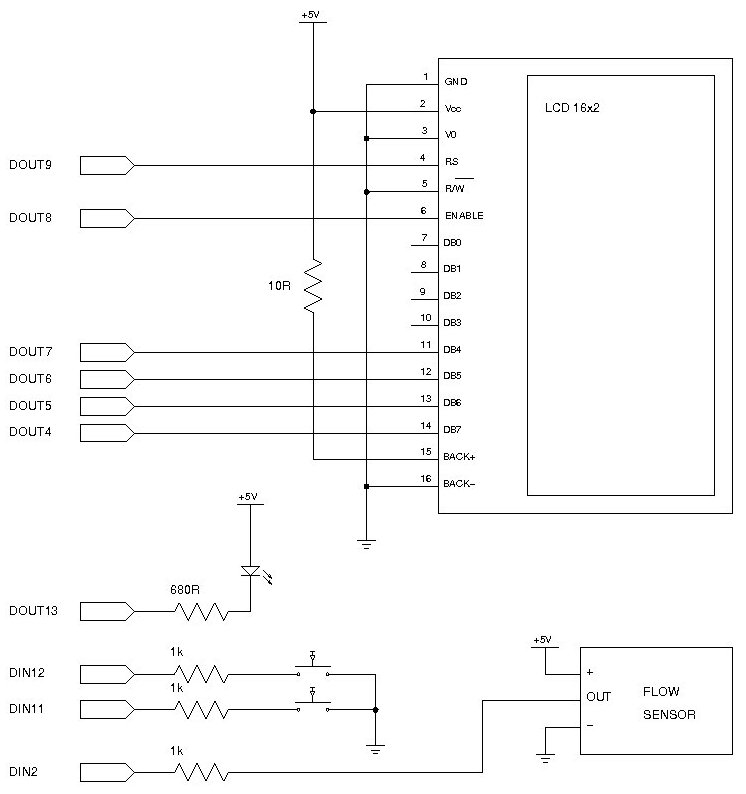
The example program calculates and displays current flow rate, and also maintains two cumulative counters of the volume that has flowed through the sensor. Two pushbuttons allow you to reset the counters independently so you can leave one counter running as a long-term accumulator and reset the other one occasionally prior to measure short-term events, such as the water consumed by filling a bath, running an irrigation system, or running a washing machine.
For more detail: Water Flow Gauge using Arduino

