
Summary of MenZ-DECK
The MenZ-DECK project is a DIY PCDJ controller built by The-MenZ Lab, featuring jog wheels made from hard disk drives and optical mice. The build utilizes an Arduino Uno for control, various sensors, switches, and repurposed computer components to create a functional mixing interface.
Parts used in the MenZ-DECK:
- Arduino Uno
- MUX Shield
- ATX power supply
- Wire (3m/10ft)
- Potentiometer (14 units)
- Slide Pot (3 units)
- Button (14 units)
- LED (9 units)
- CD-ROM drive (3 units)
- Optical mouse (2 units)
- Hard Disk Drive (2 units)
- 74HC595 (2 units)
- 2SC1815 or BC547 transistor (1 unit)
- Mousepad
- Clay
- Hot glue
About a year ago, we drunk beer in The-MenZ Lab.
When Zagan said “I want PCDJ controller, So next project is make controller!”.
The project began at this time.
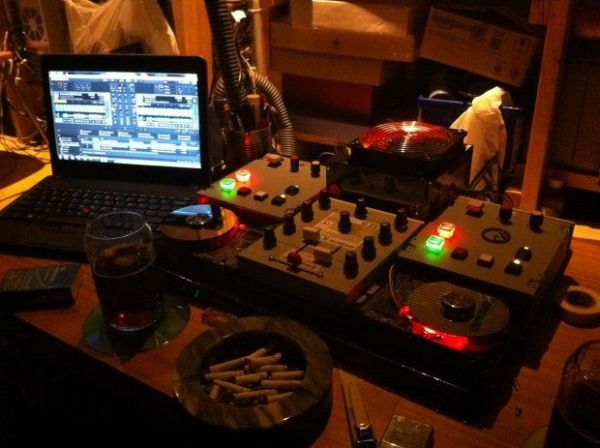
***MenZ-DECK featured by Maker Faire UK Blog.***
http://www.makerfaireuk.com/maker-faire-tokyo/
(Continue with broken English)
Components for make controller:
Arduino Uno — 1qty
MUX Shield — 1qty
https://www.sparkfun.com/products/9832
ATX power supply — 1qty
Wire — 3m(10ft)
Potentiometer — 14pty
Slide Pot — 3pty
Button(As you like, tactile or not) — 14qty
LED(Any color) — 9qty
CD-ROM drive — 3pty
Optical mouse — 2pty
Hard Disk Drive — 2qty
74HC595 — 2qty
2SC1815(BC547) — 1qty
Step 1: Create the jog(scratch) wheel
1.Cut out mousepad using a circle cutter. Diameter is about 5mm smaller than the HDD platter.
2.Next, cut out inside circle. Diameter is about 10mm bigger than the HDD cylinder.
3.Paste mousepad on platter.
Step 2: Create the wheel base and installation optical sensor
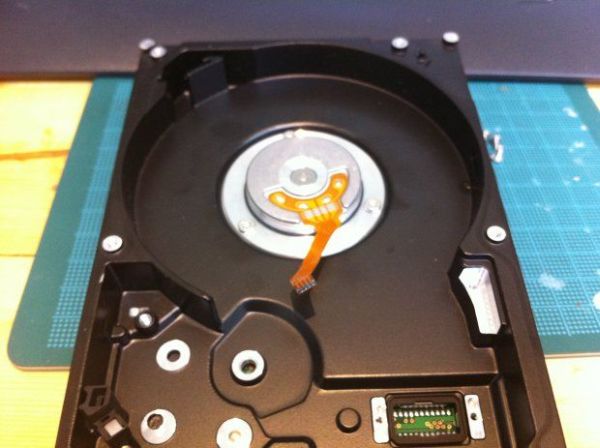
1.Pull out all parts of HDD.
2.Remove cylinder motor, and reassemble at invert direction.
3.Fix optical sensor by clay. After that, installing the platter.
4.Connect to Arduino, And tune the gap between sensor and platter to get the acceleration value from sensor.
Step 3: Miniaturize the sensors
1.Confirmed get the acceleration value, cut the unused pattern of substrate for reduce space.
2.Fix the sensor’s lens using hot glue. And installing wheel base.
3.We heal the tired by eat Sashimi and drink beer.(It is very important process!)
Step 4: Make the switch box and wiring parts
1.Put the parts on case for decide holes position.
2.Dig the holes. After that, installing the parts. And soldering.
3.Soldering and soldering and soldering…..
4.All soldering and no play makes amino a dull boy.
5.All soldering and no play makes amino a dull boy. all soldering and no play makes amino a dull boy. All soldering and no play makes amino a dull boy. All soldering and no play makes amino a dull boy. All soldering and no play makes Amino a dull boy. All soldering and no play makes amino a dull boy. all soldering and no play makes amino a dull boy. All soldering and no play makes amino a dull boy……
For more detail: MenZ-DECK
-
What inspired the creation of the MenZ-DECK?
The project began when Zagan expressed a desire for a PCDJ controller while drinking beer at The-MenZ Lab. -
How is the jog wheel constructed using a Hard Disk Drive?
A mousepad is cut to fit the HDD platter, the cylinder motor is removed and reassembled in reverse, and an optical sensor is fixed with clay. -
Which microcontroller is used to operate the controller?
An Arduino Uno is used as the main controller for the project. -
How are the sensors miniaturized during the build process?
Unused patterns on the substrate are cut to reduce space, and the sensor's lens is fixed using hot glue. -
What specific computer drives are required for this project?
The project requires three CD-ROM drives and two Hard Disk Drives. -
How many potentiometers and buttons are needed for the switch box?
The build requires fourteen potentiometers and fourteen buttons. -
What tool is recommended for cutting the mousepad material?
A circle cutter is used to cut out the mousepad to the correct diameter. -
What is the purpose of tuning the gap between the sensor and platter?
Tuning the gap allows the user to get the acceleration value from the sensor connected to the Arduino.
