
Summary of Arduino Fingerprint Lock
This article details a DIY Arduino fingerprint lock project designed to solve the inconvenience of forgetting keys in a small apartment. The author uses a Crowduino microcontroller, a fingerprint sensor, and a servo motor to unlock a door without replacing existing hardware. The system detects authorized fingerprints via serial communication and activates the servo to retract the latch.
Parts used in the Arduino Fingerprint Lock:
- Crowduino (Arduino compatible microcontroller board)
- Fingerprint Sensor
- Servo motor with sufficient torque
- Glue or adhesive for fixing modules
- 5V USB power supply or 9V DC jack power supply
- Jumper wires
I live in a small apartment in Shenzhen with my wife and baby, 5 months old. Sometimes, I need to go out, for example, to go downstairs to buy candy or diapers for my baby. But always I forget to carry my keys, so I need to knock at the door or call my wife to open the door for me, and, always wake up my baby and begins to cry.
At this time, I am so guilty. So i decide to think of a way to fundamentally solve the problem.
A fingerprint lock would be help for me, and there are plenty of these kinds of locks on the market, as the picture above. But it is not only expensive, and, it is also very troublesome to install. I hope to find a cheap way and do need not change my locks.
After learning Arduino for 2 weeks, I decided to DIY a fingerprint lock, with Arduino.
Step 1: Solution and Module Preparing
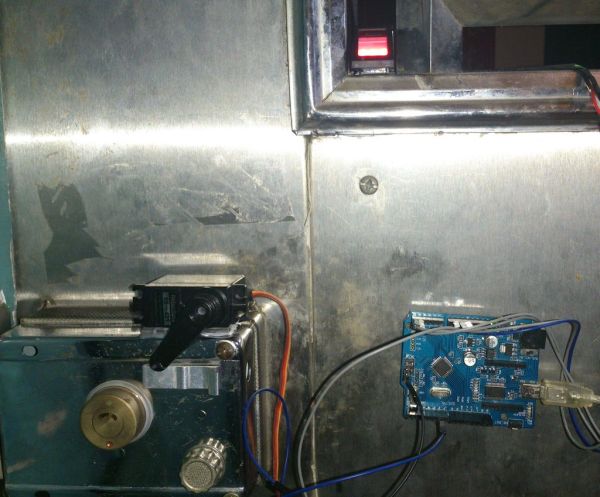
First, I observed the door of my house, as the picture above.
As you can see, as long as the red part of the figure pulled in the direction of the arrow, the door can be unlocked, and of cause, when not pulled, the red part go back to it’s original location to lock the door. So I think, a servo would be OK to accomplish this function.
And, i need a fingerprint sensor, too, when i or my wife press the fingerprint sensor, which can determine whether a person is certified, it outputs instructions to the Arduino, to control servo to open the door.
I use the following modules:
1. Crowduino,this is an Arduino compatible microcontroller boards, i use it because it is cheap enough, and has some upgrading on the design, such as the reset button on the side.
2. FingerPrint Sensor
3. A servo with enough torque.
4. Glue,or anything that can be used to fix these modules
5. 5V USB power supply or 9V DC jack power supply
6. Some jumper wires would be help.
Step 2: Hardware Connection
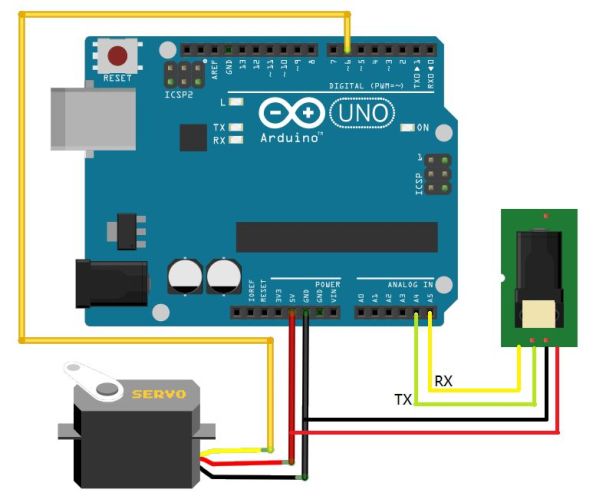
Since only two modules are used in this project, the Hardware connection is relatively simple.
Servo:
Connect the Servo to Crowduino as:
Red wire <—–> 5V power supply
Brown wire <—–> GND
Yellow wire <—–> D6
Fingerprint module:
the fingerprint module communicate with Crowduino using serial communication protocol, but since Crowduino has only one hardware serial port that I need to use for the PC communication, I use Arduino Soft Serial to communicate with fingerprint , using A4 and A5.
Connect the fingerprint to Crowduino as:
Red wire <—–> 5V Power Supply
Brown wire <—–> GND
Purple wire <—–> A4
Yellow wire <—–> A5
You can connect these modules to Crowduino as the picture above , and Note that both the module uses 5V power supply, you can connect one of their power supply to the 5V supply of ISP.
Step 3: Download the codes and install
Download the codes from Here, Here you can find all the codes and libraries.
Open the Arduino IDE, open the File->Preferences, Change the Sketchbook location to the location of your download code( as above picture), and click OK and then restart the Arduino IDE.
For more detail: Arduino Fingerprint Lock
- Why did the author decide to build this lock?
To avoid waking their baby when leaving home without keys and to find a cheaper alternative to commercial locks. - What mechanism does the servo control?
The servo pulls the red part of the door latch to unlock it when activated. - Which microcontroller board is used in this project?
A Crowduino board is used because it is cheap and has design upgrades like a side reset button. - How does the fingerprint module communicate with the Crowduino?
It uses serial communication over pins A4 and A5 using Arduino Soft Serial. - Why can't the hardware serial port be used for the fingerprint sensor?
The single hardware serial port is reserved for PC communication. - What voltage do the modules require for power?
Both the servo and the fingerprint module use a 5V power supply. - Where can the code and libraries for this project be found?
The codes and libraries are available via the links provided in the article text.
