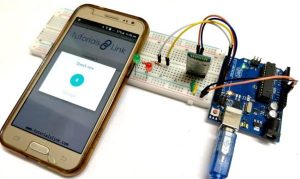
Controlling LEDs with voice command seems to be a difficult task, but it’s easy and you can quickly build it. We just need an Arduino UNO to serially communicate with HC-06 Bluetooth module and a smartphone to send voice command to Bluetooth module HC-06. For receiving voice command we are using “Arduino Bluetooth Voice Controller” android app which you can download from play store (link is given below).
Material Required
- Arduino UNO
- HC-06 Bluetooth Module
- LEDs (Red, and Green)
- Resistor 220 ohm (2 nos.)
- Arduino Bluetooth Voice Controller (Download from play store)
- Breadboard
- Connecting wires
HC-06 Bluetooth Module:
Bluetooth can operate in the following two modes:
- Command Mode
- Operating Mode
In Command Mode we will be able to configure the Bluetooth properties like the name of the Bluetooth signal, its password, the operating baud rate etc. The Operating Mode is the one in which we will be able to send and receive data between the PIC Microcontroller and the Bluetooth module. Hence in this tutorial we will be toying only with the Operating Mode. The Command mode will be left to the default settings. The Device name will be HC-05 (I am using HC-06) and the password will be 0000 or 1234 and most importantly the default baud rate for all Bluetooth modules will be 9600.
The module works on 5V supply and the signal pins operate on 3.3V, hence a 3.3V regulator is present in the module itself. Hence we need not worry about it. Out of the six pins only four will be used in the Operating mode. The pin connection table is shown below
| S.No | Pin on HC-05/HC-06 | Pin name on MCU | Pin number in PIC |
| 1 | Vcc | Vdd | 31st pin |
| 2 | Vcc | Gnd | 32nd pin |
| 3 | Tx | RC6/Tx/CK | 25th pin |
| 4 | Rx | RC7/Rx/DT | 26th pin |
| 5 | State | NC | NC |
|
6 |
EN (Enable) |
NC |
NC |
Check our other projects to learn more about Bluetooth module HC-05 with other microcontrollers:
- Bluetooth Controlled Toy Car using Arduino
- Bluetooth Controlled Home Automation System using 8051
- Voice Controlled Lights using Raspberry Pi
- Smart Phone Controlled FM Radio using Arduino and Processing
- Interfacing Bluetooth Module HC-06 with PIC Microcontroller
- Bluetooth Controlled Servo Motor using Arduino
Circuit Diagram
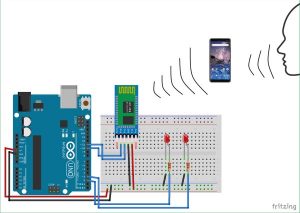
Circuit diagram for this Voice Controlled Lights is given below, while uploading the code in the Arduino UNO disconnect the Rx and Tx pins and connect again after the code is uploaded.
Code and Explanation
The complete Arduino code for Voice controlled LEDs is given at the end. Here we are explaining few parts of code.
Here, in the below code we are defining the pins for Rx and Tx.
int TxD = 11;
int RxD = 10;
Now, set pin 2nd and 3rd of the Arduino as output.
pinMode(2, OUTPUT);
pinMode(3, OUTPUT);
In void loop function, Arduino will be checking the incoming values all the time and controls the LEDs as per the voice command. Arduino will turn on or off the LED according to the given Voice command. We are saving all the received command in variable “Value”
If the value is “all LED turn on” then both the LEDs turns ON, like this we have coded other voice commands for turning on or off the individual LED. Check the complete working and demonstration video later in this article.
Read more: Voice Controlled LEDs using Arduino and Bluetooth


