Summary of Handmade Claw
This article outlines a six-step DIY guide to building a wooden claw machine controlled by an Arduino. The process involves cutting or printing parts, assembling the structure, coding the microcontroller, and wiring components. The project requires specific hardware to operate the claw mechanism effectively using servos and potentiometers for control.
Parts used in the Wooden Claw Machine:
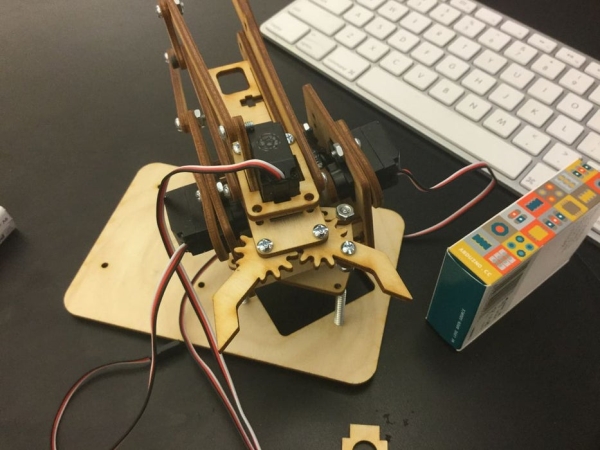
- 4 SG90 servos
- 4 Potentiometers
- Half inch nuts and screws

These 6 easy steps will tell you how to make a wooden claw machine controlled with Arduino.
Step 1: Print All of Your Pieces

Either handcut or laser cut all of your pieces
Step 2: Aquire Your Parts

You will need 4 SG90 servos, 4 Potentiometers, and a box of half inch nuts and screws.
Step 3: Put You Pieces Together

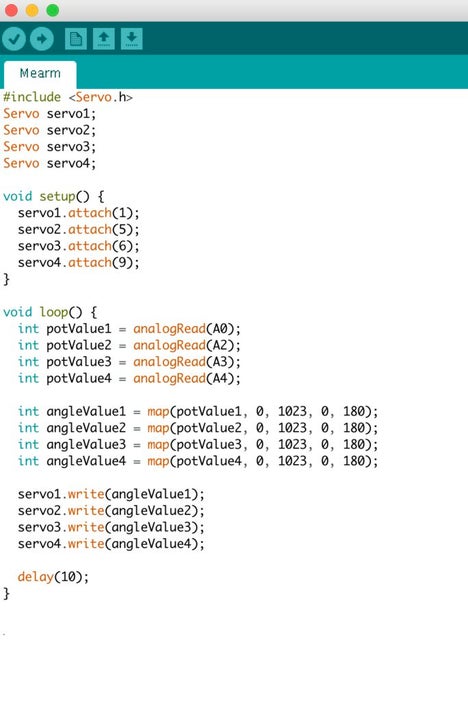
Step 4: Code Arduino
Step 5: Wire

Step 6: Finish!
So the original instructions for this project came from https://www.instructables.com/member/Dzefri/, so go check his page out
Source: Handmade Claw
- How many SG90 servos are needed?
You will need 4 SG90 servos. - What type of pieces should be printed or cut?
You must print or handcut/laser cut all of your pieces before assembly. - Does the project require specific fasteners?
Yes, you need a box of half inch nuts and screws. - Can I use hand-cutting methods instead of laser cutting?
Yes, you can either handcut or laser cut all of your pieces. - What is the final step after wiring?
The final step is to Finish! - Where did the original instructions come from?
The original instructions came from https://www.instructables.com/member/Dzefri/. - Is an Arduino required for this project?
Yes, the machine is controlled with an Arduino. - How many potentiometers are included in the parts list?
You will need 4 Potentiometers.