This instructable will show you how to convert an old toy R/C car from the thrift-store ($1.50) into a bluetooth controlled robot. To make the conversion, you will need an Arduino (any type), an L298N dual 2-amp motor-controller (or similar), and a bluetooth serial adapter from Sparkfun.com.
We will first remove all existing circuitry from the old toy and prepare it for its new brains. Then we will install the Arduino, motor-controller, and bluetooth adapter onto the top of the frame and wire everything up. Lastly, there are a few steps to complete on your computer to pair it with the bluetooth adapter on the robot. The building process is simple and straightforward, using hot-glue to secure each circuit board – which is easily removable later if desired.
To control this bot, I have assigned several keys on the keyboard to carry out various movements from the robot’s motors. By opening a terminal after pairing the Bluetooth-bot to your computer, you can send serial commands by pressing the “i” (forward), “j” (left), “k” (reverse), and “l” (right) keys to command the bot in any direction.
All parts can be purchased at Sparkfun.com, and the motor-controller can either be purchased as a shield (Ardu-moto shield), or built from scratch using the provided PCB layout files. You can download any of the files needed for this project (code and PCB files) from here:
https://sites.google.com/site/arduinorobotics/arduino-robotics/free_project
Tools needed:
- wire stripper/snips
- soldering iron
- small screwdriver
- hot-glue gun
Parts list:
- Arduino
- L298N motor-driver PCB or Ardumoto shield
- Bluetooth Mate Gold (or silver)
- wire
- old R/C toy with working motors (everything else will be scrapped)
This project was left over from my new book titled “Arduino Robotics” from Apress publishing. I decided to add it online for anyone to build. If you like this and want to see more Arduino based projects like it (including the Lawnbot400, ridable Seg-bot, GPS guided robo-boat, and many more), check out the book webpage:
You can also check out some other projects that I have posted online at my website.
Step 1: Toy brain surgery
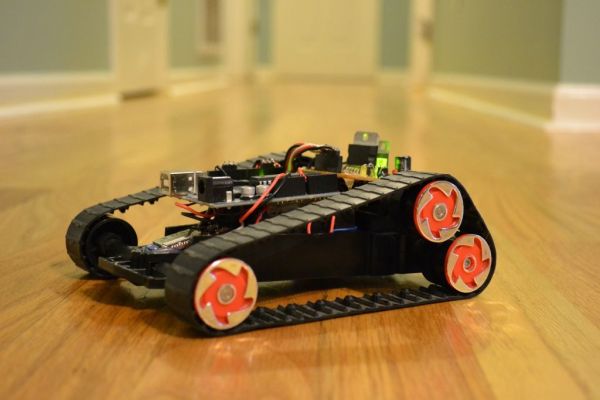
The PCB that came installed in the toy tank/car base had a small crystal for use with a AM radio transmitter and a few transistors to make a small H-bridge circuit for each motor. We will replace the old circuitry with an Arduino, a Bluetooth serial adapter, and an L298n dual motor-controller IC. The Arduino is reprogrammable, so you can obtain a variety of different behaviors with your bot, though I have only set up basic movement commands (fwd, rev, left, right).
First, strip the R/C car you got from the thrift-store, of all its electronic guts. This includes the motor-controller, R/C crystal, and any other PCB’s installed. We will only need two wires to each motor and a set of wires to the battery compartment. The code for this project is intended for use with a “tank-steer” type robot, utilizing one motor on each side of the robot, like a tank. With bi-directional control of each motor, we can turn the robot in a circle without moving forward or reverse (called a “zero-turn radius”). This type of control is extremely effective, especially at slower speeds.
Note: You do not have to have find a toy vehicle with tank tracks, there are many R/C toys at the thrift-store that have wheels, but utilize tank steering – just make sure your vehicle has a drive motor installed on each side. I was able to find several “tracked” tank-steering vehicles at my local thrift-store, with regular visits and a few months time.
Once you remove the old electronic circuits from the toy, we will need a place to mount the Arduino board, the motor-controller PCB, and the small Bluetooth adapter (we will use the battery compartment built in to the toy). If you use an Ardumoto shield for the Arduino, you will only need a place to mount the Arduino. I used a hot-glue gun to add a small blob of glue to the top of the toy base – then mount the Arduino. Using low-temp glue will keep the Arduino securely attached, but also allow you to remove it later without damage if desired.
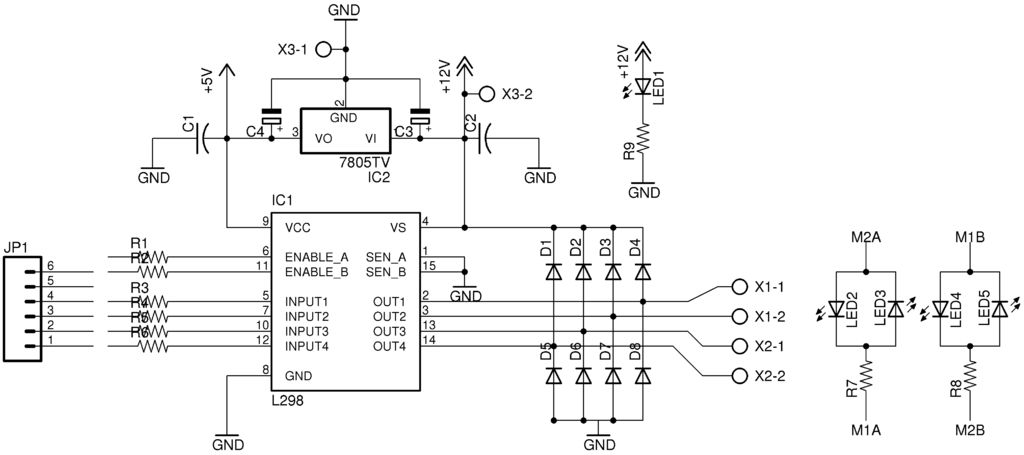
I designed a small PCB that uses an L298N dual motor driver IC to control (2) DC motors in either direction and with full speed control. The PCB files were created using the freeware version of Eagle CAD and can be used to build your own motor-controller. If you would not like to build your own PCB, you can buy the Ardumoto motor-controller from Sparkfun.com which uses a surface mount version of the same L298N IC (control pin reassignment may be required in the code).
Download the Eagle files for the L298N motor-controller and code for this project here:
https://sites.google.com/site/arduinorobotics/arduino-robotics/free_project
Step 2: Wiring connections
To get a robot running using Bluetooth, there are very few connections. (3) wires to control each motor from the Arduino to motor-controller, (2) wires for the Bluetooth serial adapter to Arduino, the (4) motor wires, and a few power wires. I used male-pin headers to make patch cables from the Arduino to the motor-controller PCB (both using female headers). If you are using the Sparkfun Ardumoto shield, you will not need to wire the motor controller to the Arduino, just the Bluetooth adapter and power.
The L298N motor driver IC uses 3 inputs for each motor (input A, input B and Enable) to determine both speed and direction. Speed control is most easily accomplished by setting the inputs A and B to determine the direction and using the Enable pin to apply the PWM speed control signal.
See the provided wiring diagram for specific connections.
- Arduino
- L298N motor-driver PCB or Ardumoto shield
- Bluetooth Mate Gold (or silver)
For more detail: Arduino controlled Bluetooth-bot