Summary of Arduino Control DC Motor via Bluetooth
This article details a project to control a DC motor using an Arduino Uno and a smartphone via Bluetooth. It covers the necessary hardware, wiring schematics (specifically addressing RX/TX connections), and the Arduino code required to interpret commands from the BlueTerm app. The system allows users to turn the motor off or rotate it left and right through simple text commands sent from an Android device.
Parts used in the Control DC Motor with Smartphone via Bluetooth:
- Arduino Uno
- Bluetooth Module (HC-05)
- Smartphone (Android)
- BlueTerm application
- L293D IC
- DC motor
- Breadboard
- Jumper Cables
Hi guys,
In this project we will control a DC motor with a smartphone via bluetooth. This project is great to learn more about:
-DC motor
-Interfacing Arduino with your smartphone
-Bluetooth module
-L293D
you can visit my website for more electronic projects, interesting news and tips:
http://randomnerdtutorials.wordpress.com/
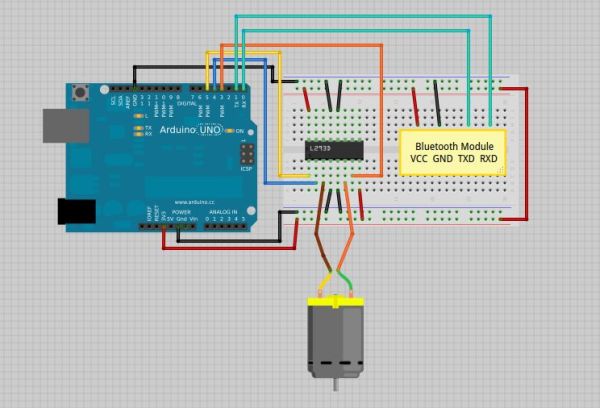
Step 2: Schematics and common mistakes
Two common mistakes:
-You need to remove the RX and TX cables when you’re uploading the sketch to your Arduino.
-Sometimes people connect the TX from the bluetooth module to the TX of the Arduino… that’s wrong and it won’t work. Make sure you connect it properly, the TX into RX and the RX into the TX.
Note:
If the HC-05 Bluetooth Module asks for a password, It’s ‘1234’.
Step 3: Arduino Code
For the android communication with our bluetooth module I’ve used the BlueTerm app, It’s completely free, so you just need to go to “Play store” and download it. Then you just need to connect your smarthphone with the bluetooth module. Remember to remove the TX and RX cables. (you can see in youtube video below how that’s done).
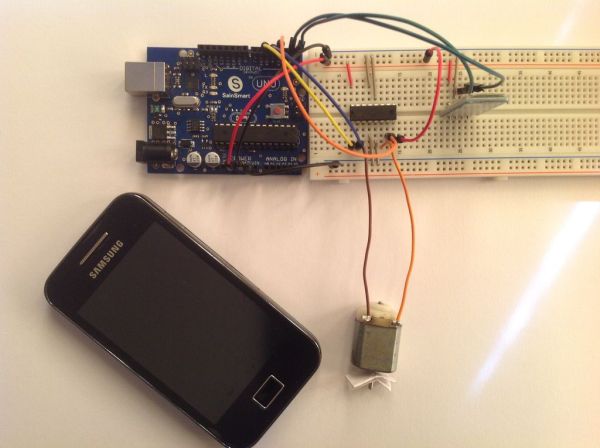
Step 4: Final Product
I’ve only set 3 commands to control the DC motor:
’0′ – Turns off the DC motor
’1′ – DC motor rotates to right
’2′ – DC motor rotates to left
Check this video to see the circuit in action!
you can visit my website for more electronic projects, interesting news and tips:
http://randomnerdtutorials.wordpress.com/
1x Bluetooth Module (for example: HC-05)
1x Smartphone (any Android will work)
BlueTerm application
1x L293D IC
1x DC motor
1x Breadboard
Jumper Cables
For more detail: Arduino Control DC Motor via Bluetooth
- How do I connect the TX and RX cables between the Arduino and Bluetooth module?
You must connect the TX from the Bluetooth module to the RX of the Arduino and the RX from the Bluetooth module to the TX of the Arduino. - What should I do when uploading the sketch to the Arduino?
You need to remove the RX and TX cables before uploading the sketch. - What is the password for the HC-05 Bluetooth Module?
The password is 1234. - Which application is used for Android communication with the Bluetooth module?
The BlueTerm application is used, which is available for free on the Play store. - What command turns off the DC motor?
Sending the character 0 turns off the DC motor. - How does the motor rotate to the right?
The motor rotates to the right when the character 1 is sent. - How does the motor rotate to the left?
The motor rotates to the left when the character 2 is sent. - Can any Android smartphone be used for this project?
Yes, any Android smartphone will work for this project.