Have you ever wished there was a better way to be notified when your laundry was done? Have you ever forgotten a load in the washer because you couldn’t hear the buzzer and your clothes became smelly and moldy from sitting there for too long? Well, I have and decided to solve this problem by building this simple notification system using an Arudino microcontroller. It uses a dual-axis accelerometer to detect motion and vibration coming from the washer (or dryer) and alerts my phone via SMS text message when the machine is no longer vibrating. I tried to build the easiest system I could using parts sourced from a local store and some online tools that help simplify the process of sending these alerts. Follow along as I show you how to put together this simple but useful project.
Step 1: Parts list
As I mentioned in the intro, I bought everything from my local Radio Shack, but you can find all of these parts at many other places. Most of the parts below that do not have a link were taken from a microcontroller pack I had (http://www.radioshack.com/make-ultimate-microcontroller-pack-w-arduino-kit/2770077.html), but these can be sourced from anywhere.

- Arduino Yun
- http://arduino.cc/en/Main/ArduinoBoardYun
- http://www.radioshack.com/arduino-yn-linux-microcontroller-board-with-wi-fi/2760357.html
- The built in WiFi greatly simplifies the process of getting this online
- Memsic 2125 dual-axis accelerometer
- http://www.parallax.com/product/28017
- http://www.radioshack.com/radioshack-memsic-2125-dual-axis-accelerometer/2760029.html
- There are many other options, but I chose this one since it was locally available
- Mini SPST momentary pushbutton switch
- LED
- 10K ohm resistor
- Solderless breadboard
- Jumper wires
- Micro USB wall charger (5V)
- http://www.radioshack.com/radioshack-fixed-micro-usb-5v-1-2a-ac-charger/2302182.html
- You can also use a portable battery pack
- (optional) Arduino case or base
- I used my 3D printer to print one out:
- I used M3x10mm screws with this base
- You can enclose this in a full case for aesthetic reasons, but I just kept it simple
- (optional) Either double sided tape or rubber feet to attach to the base
Step 2: Setting up your Temboo and Twilio accounts
Temboo and Twilio help make the process of getting the Arduino Yun connected to the internet and sending SMS text messages a breeze.
- Sign up for a Temboo account here: https://temboo.com/signup
- Sign up for a Twilio account here: https://www.twilio.com/try-twilio
- From the Temboo Account page, select Applications on the left and record your Account, Application, and Key as shown in the above picture.
- From your Twilio Dashboard page, record your Account SID, Auth Token, and Twilio number as shown in the above picture. For the Auth Token, you have to click on the padlock symbol to display the number.
- You will use these values later when programming the Arduino Yun.
Step 3: Setting up your Arduino Yun on the wireless network
You can either set up your Arduino Yun using a micro USB cable or through WiFi. I chose to set it up through WiFi and these are the steps below:
- Power the Arduino Yun through the micro USB port using the power adapter (or directly connected to your computer).
- When you first power up the Yun, it will automatically act as a wireless access point and create a WiFi network called: Arduino Yun-XXXXXXXXXXXX
- Connect your computer to this network.
- Open a web browser and go to this address: http://arduino.local or http://192.168.240.1
- Enter “arduino” for the PASSWORD and click the LOG IN button.
- Click the CONFIGURE button.
- Give your Yun a unique name and enter it in the YUN NAME field.
- Enter a password in the PASSWORD field.
- Select a timezone from the TIMEZONE dropdown menu.
- Either select a wireless network listed in the DETECTED WIRELESS NETWORKS dropdown menu or enter a wireless name in the WIRELESS NAME field, select the security type in the SECURITY dropdown menu, and enter the password in the PASSWORD field.
- Click the CONFIGURE & RESTART button.
- After you click the button, the Arduino will reset itself and join the specified network.
- Connect your computer back to this specified network.
Now that the Arduino Yun is connected to your wireless network, now you can program the Yun over the wireless network instead of through a USB cable.
If you have any trouble with this, please see this link: http://arduino.cc/en/Guide/ArduinoYun
Step 4: Setting up the Arduino programming environment
- Download the Arduino software from: http://arduino.cc/en/Main/Software
- As of this writing, you must download Arduino version 1.5.8 BETA that has support for Arduino Yun and not the version 1.0.6 that is listed first on the page.
- After installing, open the Arduino software.
- Go to Tools -> Board and select the Arduino Yun.
- Go to Tools -> Port and select the Arduino Yun. It should have the name you gave it before as well as the IP address.
- To test that everything is working, go to File -> Examples -> 01.Basics -> Blink
- Click the Upload button.
- You should be prompted for a password. Enter the password you chose earlier in the configuration webpage and and click Upload.
- After it is done uploading, you should see the small red LED on the Arduino board blinking that is connected to pin 13 (it says L13).
- If you get any errors, make sure again that the correct board and port is selected from the Tools menu and try again. Sometimes I have to click upload a few times to get it to go through.
If you have any trouble with this, please see this link: http://arduino.cc/en/Guide/ArduinoYun
Step 5: Programming the Arduino Yun
-
- Download the file WasherDryerAlarm.ino and open it in the Arduino software.
- Enter the values you saved before in the define statements for the Temboo Account, Application, and Key and for the Twilio Account SID, Auth Token, and Phone Number.
- Enter the number where the SMS text messages should be sent in the RECIPIENT_NUMBER define statement.
- If you change any of the pins, you must update the code in the constant variable statements to reflect these changes.
- Also, there are a few constant variables that you might want to adjust depending on your situation:
 The “waitTime” is approximately how many minutes the system will wait until it send an SMS text message. This is to account for when the machine is either filling up water or sitting idle during its cycle and not vibrating. 5 minutes worked in my case, but you may need to adjust this. Also, please note that the timing isn’t exact and was just an approximation.
-
- The “sensitivityX” and “sensitivityY” are values that tell the system how sensitive it should be to the vibration changes of the machine. Right now it declares a 0.5% change as movement by the machine. Anything below this and the system assumes that the machine hasn’t moved since the last time it checked. You can adjust this to meet your own needs.
- Click the Upload button. Once again, I noticed that the wireless upload isn’t that reliable so just keep clicking the upload button until it goes through if it fails the first time.
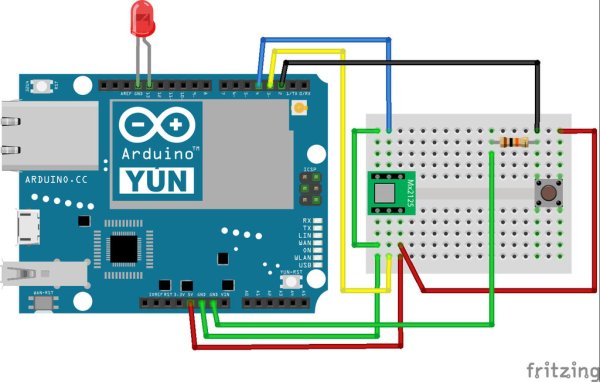
Step 6: Assembling the system
- Disconnect the power from the Arduino Yun.
- Wire up the system as show in the pictures.
- If using an case or base, mount the Arduino to the case or base using screws. I just used double sided tape to mount the base to the washer (or dryer). You could also attach rubber feet either to the base or directly to the bottom of the Arduino. That way you could move it around as needed.
For more detail: Washer Dryer Laundry Alarm using Arudino & SMS Text Messaging Alerts