The intention behind this guide is to furnish valuable insights into the typical sensors employed in the RAD SLDP. It’s worth noting that sensors produced by various manufacturers might have slight variations compared to the ones outlined in this guide, but comprehensive documentation for all these sensors can be easily accessed online. If you require further details on Arduino coding, we recommend consulting the Arduino Coding Guide.
Gas Sensor
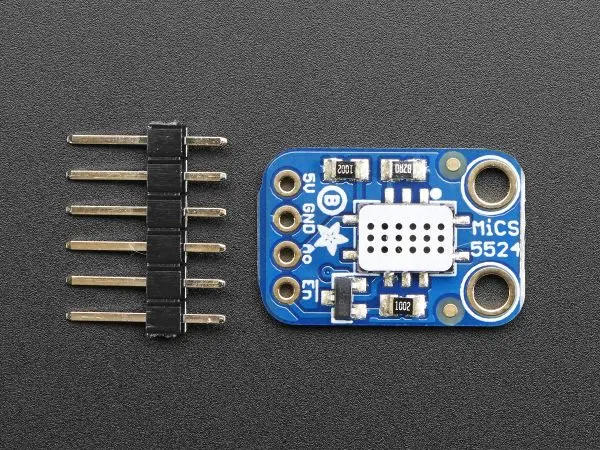
EG1004 includes an Adafruit Gas Sensor that exhibits an increase in its analog voltage when it detects gas. While this sensor is capable of detecting various gases, it cannot differentiate or identify the specific gas it has detected.
Wiring
Please be aware that while the LED in the circuit is optional, it can be useful for testing purposes.

Pin Configuration:
– VCC: Connect to 5V
– Signal: Attach to A0 (or any available analog pin)
– GND: Ground connection
Programming:
Since the Adafruit Gas Sensor operates as an analog sensor, we will utilize the analogRead() function to obtain the analog voltage reading from the sensor.

To view the sensor’s readings, incorporate a print statement within the loop section of your code. Ensure that you activate the serial monitor by initializing it with the command “Serial.begin(9600)” in the setup section of your code.

UV Sensor (GUVA-S12SD)
EG1004 offers a GUVA-S12SD UV Light Sensor Breakout, which employs a UV photodiode to generate an analog voltage output that can subsequently be translated into the UV Index. The UV Index scale, established by the EPA, serves as a reference for sun exposure guidance. In Figure 1, you can observe the UV Index scale, and Figure 2 illustrates the connection between voltage, analog values, and the UV Index.
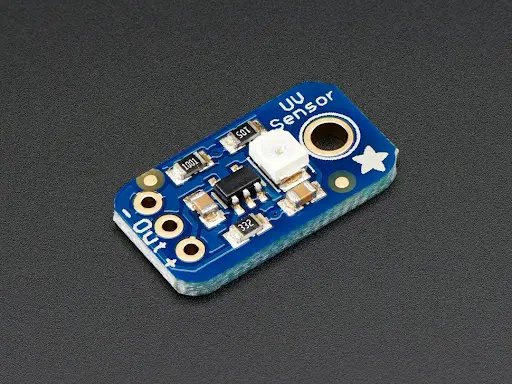
Spectral Detection Range: 240nm to 370nm Power Supply: 2.7V to 5.5V
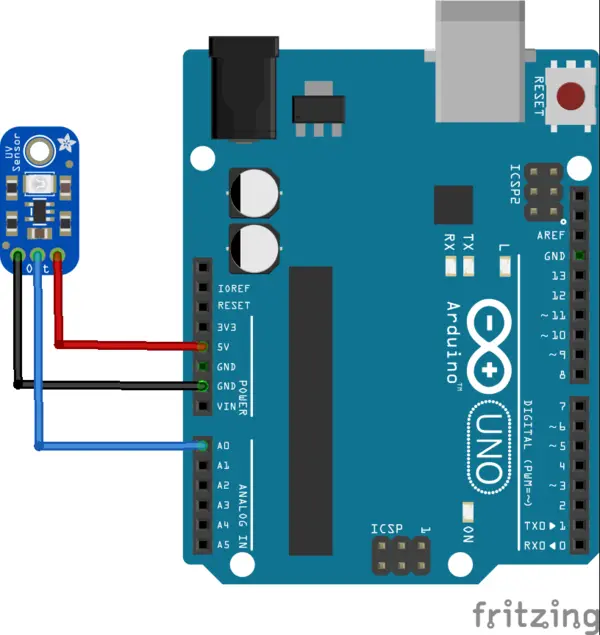
Wiring
Important: You have the flexibility to connect the sensor to either a 5V or 3.3V power source.
Important: You have the flexibility to connect the sensor to either a 5V or 3.3V power source.
Pin Configuration:
– Positive (+): Connect to either 5V or 3.3V.
– Output (OUT): Link to A0 (or any other analog pin of your choice).
– Negative (-): Ground connection.
Programming:
Because the GUVA-S12SD is an analog sensor, you’ll employ the analogRead() function to retrieve the voltage reading from the sensor.
![]()
The initial reading needs to be transformed into a voltage value, and the formula for this conversion varies based on whether you are using a 3.3V or 5V power supply.
For a 3.3V power supply, you can use the following formula: Voltage (V) = Reading * (3.3/1024.0)
If you are working with a 5V power supply, the formula is as follows: Voltage (V) = Reading * (5.0/1024.0)
Please keep in mind that it’s crucial to work with decimal numbers in the formula to ensure accurate voltage values.
![]()
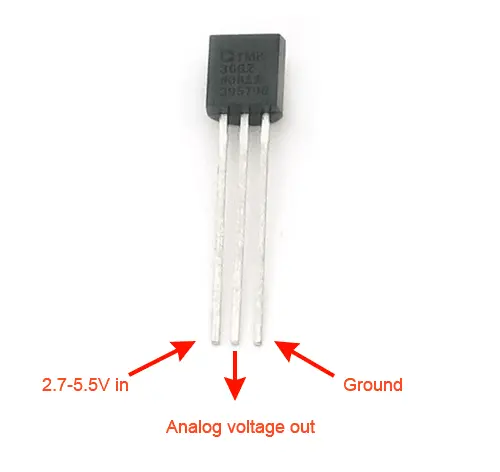
Temperature Sensor (TMP36)
The EG1004 module includes an Analog TMP36 temperature sensor. These sensors generate an analog signal based on the voltage variation, which is directly related to temperature. The TMP36 sensors are capable of measuring temperatures within a range spanning from -40°C to 150°F and operate with a power supply voltage in the range of 2.7V to 5.5V.
Wiring Instructions:
Please note that you can connect the sensor to either the 5V or 3.3V power pins.
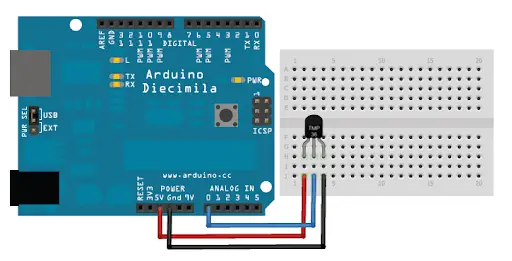
Pins
- VCC: 3.3V or 5V
- Signal: A0 (or any analog pin)
- GND: ground
Code
Given that the TMP36 is an analog sensor, we’ll utilize the analogRead() function to retrieve the voltage reading from the sensor.
![]()
The initial reading obtained needs to be transformed into voltage, and the specific formula for this conversion depends on whether you are utilizing a 3.3V or 5V power supply.
For a 3.3V power supply, you can use the formula: Voltage (mV) = reading * (3300.0/1024.0)
For a 5V power supply, the formula is: Voltage (mV) = reading * (5000.0/1024.0)
Here’s an illustrative example of how to code this formula for a 5V power supply. It’s crucial to note that the numbers should be in decimal form to ensure accurate temperature values.
![]()
To conclude, you’ll need to convert this voltage value into Celsius using the formula below:
Temperature (Celsius) = (Voltage (mV) – 500.0) / 10.0
Here’s an example of implementing this formula in code. Once more, please observe the use of decimal formatting for the numerical values.
![]()
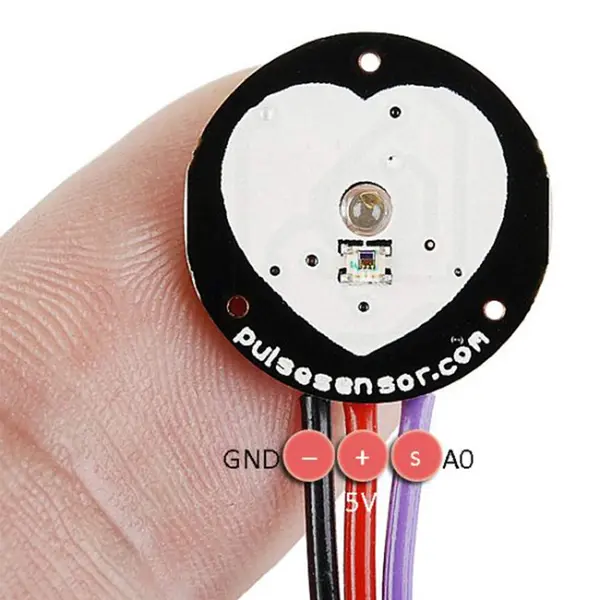
Pulse Sensor
EG1004 includes an ANMBEST Pulse Sensor, which is an optical heart rate sensor (PPG) specifically created for use with Arduino. This sensor utilizes an ambient light sensor to detect variations in reflected light caused by the movement of blood through tissue. By establishing a predefined threshold, the Arduino can monitor the analog signal coming from the sensor.
Once the signal surpasses the threshold, it signifies the detection of a heartbeat. After the signal falls below the threshold, the Arduino will remain in a state of readiness for the signal to once more exceed the threshold, signifying the presence of another heartbeat.
Voltage Range: 3V to 5V
Wiring
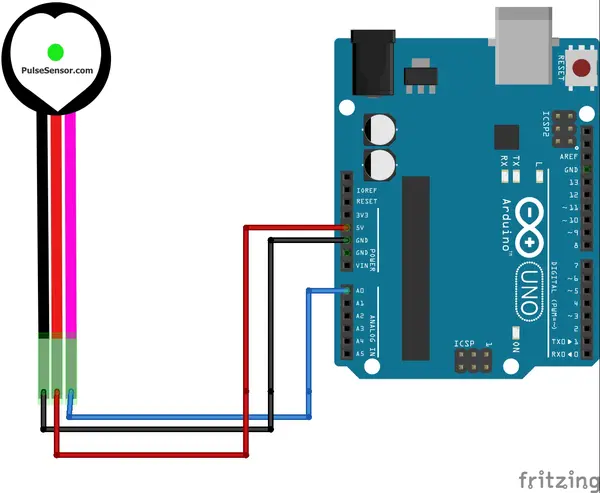
Pins
– GND (black wire): Corresponds to Ground
– VCC (red wire): Operates at 5V
– Signal (purple/pink wire): Connected to A0 (or any other analog pin)
Code
Library Installation
To make use of the sensor, you need to install the PulseSensorPlayground Library in the Arduino IDE. Here’s how to get the library:
1. Launch the Arduino IDE.
2. Navigate to Tools >> Manage Libraries.
3. Search for “PulseSensor Playground.”
4. Click on “Install.”
Library Inclusion
The PulseSensor Playground library supplies all the necessary functions and methods for sensor interaction. To access these functions, you must include the library at the beginning of your Arduino code. This can be achieved with the following code snippet: