Summary of Remote Controlled lunaring with Arduino
This article details a DIY project to modify a toy moon night-light so it displays lunar phases based on the actual calendar date rather than an infrared remote. The build involves replacing the original controller with an Arduino and a DS1307 Real Time Clock module, enabling accurate timekeeping even during power outages. A C# application allows users to sync the device's clock via USB serial communication.
Parts used in the Modified Moon Night-Light:
- Arduino board
- DS1307 Real Time Clock Module
- 100k potentiometer (variable resistor)
- Light-dependent resistor (LDR)
- LED lights (Red through Purple)
- Coin cell battery backup
- Power switch
- PC running C# application for date updates
Nothing puts the fun back into coding like watching your very own creations come to life in the physical world. Luckily, with the current glut of high-tech toys and electronic gadgets on the market, it’s never been easier to experience the thrill of designing your own hardware by modifying what’s already available. A great way to get into the hobby is to wander the isles of your local toy store or browse the pages of an online novelty shop and just let your imagination run wild. I try to go through the toy department with a certain child-like wonderment. I look at everything on every shelf and try to imagine what might be done to improve upon the design, to make it more interesting, or just plain more fun.
In this article, we’ll take a quick look at this hobby by exploring one of my most well received projects to date. We’ll take a simple night-light that cycles through the phases of the moon based on input from an infrared remote control and modify it so that it displays the phases of the moon based off the actual calendar date instead.
Gathering the materials
Let’s take a moment to think about what is needed in order for our project to work.
Obviously, we need some way to keep track of the current date, and preferably retain that date even when the batteries run out. We also need some means of controlling the LEDs on the device and to calculate the current lunar phase based on that date. In addition, it would be nice to have some user-friendly method by which we could update the stored date, should it start to drift over time.
As it happens, everything we need to get our prototype off the ground is readily available – and for a reasonable price.
Arduino: The Arduino is an open source electronics prototyping platform designed to help artists and designers rapidly prototype their ideas; it allows designers to write their programs in a highly abstracted form of the C programming language that hides a lot of the technical underpinnings of microcontroller programming. Because it is open source, the Arduino comes in many varieties. You can even build one yourself. A pre-built Arduino typically runs around $30 or less, but building one yourself can be significantly cheaper.
DS1307 Real Time Clock Module: While the Arduino offers a powerful and flexible platform on which to build our project, we still need some way to keep track of the date. For this, we will use a DS1307 real time clock module. I opted to go with the offering from SparkFun Electronics, a Colorado-based company that specialies in providing drop-in solutions for hobbyists and prototypes. This DS1307 module comes pre-configured with an oscillator, coin cell battery backup, and ready to communicate with the Arduino using a standard I2C two-wire bus.
I also chose to add a standard 100k potentiometer (variable resistor) in-line with the existing Light-dependent resistor (LDR) so that we can easily tweak the moon’s sensitivity to light in different environments.
Finally, in order to update the DS1307 clock, I wrote a very simple C# application that simply queries the system date of your PC and passes that to the Arduino which in turn uses the I2C bus to set the date on the DS1307.
Getting Started
If you’ve ever peered into the mysterious inner workings of an electronic device, then you’ll appreciate how extremely straightforward this moon really is.
The video below will give you a basic overview of the hardware that we’re using.
Essentially, all we’ve done here is to remove the existing controller from the moon and replace it with our Arduino controller, which is in-turn connected to the DS1307 RTC.
If you’re unfamiliar with how to read electronic schematic diagrams, the table below explains how the parts are interconnected.
| Arduino pin: | Connected to: |
| Digital pin 3 | Center leg of potentiometer |
| Digital pins 7-12 | LED lights (Red 7 … Purple 12) |
| Analog pin 5 | DS1307 SCL pin |
| Analog pin 4 | DS1307 SDA pin |
| GND | GND of DS1307 |
| GND | (-) Negative battery Terminal |
| GND | Outside leg of potentiometer |
| GND | GND (Brown) wire from LED panel |
| 5V | One leg of LDR |
| 5V | 5V of DS1307 |
| VIN | Center leg of power switch. |
Also connect:
| Unused leg of LDR | Unused leg of potentiometer |
| Outside leg of power switch | (+) Positive battery terminal |
If it all sounds too complicated. It isn’t. Once you have the components in your hands, you can easily identify the parts listed above and put everything together by simply using the table above as a checklist.
The Code
The code for interfacing the Arduino with the DS1307 module is available in the Arduino playground. The Arduino playground is a fantastic resource of community-contributed code samples that you can use in your own projects to interact with a remarkable array of hardware devices and software platforms.
Once we retrieve the date from the DS1307, we can calculate the phase of the moon in our Arduino program:
// Adapted from Stephen R. Schmitt's Lunar phase computation program.
// Originally written for the Zeno programming language.
// http://home.att.net/~srschmitt/lunarphasecalc.html
byte getPhase(int Y, int M, int D) {
double AG, IP;
byte phase;
long YY, MM, K1, K2, K3, JD;
YY = Y - floor((12 - M) / 10);
MM = M + 9;
if(MM >= 12)
MM = MM - 12;
K1 = floor(365.25 * (YY + 4712));
K2 = floor(30.6 * MM + 0.5);
K3 = floor(floor((YY / 100) + 49) * 0.75) - 38;
JD = K1 + K2 + D + 59;
if(JD > 2299160)
JD = JD -K3;
IP = normalize((JD - 2451550.1) / 29.530588853);
AG = IP*29.53;
if(AG < 1.20369)
phase = B00000000;
else if(AG < 3.61108)
phase = B00000001;
else if(AG < 6.01846)
phase = B00000011;
else if(AG < 8.42595)
phase = B00000111;
else if(AG < 10.83323)
phase = B00001111;
else if(AG < 13.24062)
phase = B00011111;
else if(AG < 15.64800)
phase = B00111111;
else if(AG < 18.05539)
phase = B00111110;
else if(AG < 20.46277)
phase = B00111100;
else if(AG < 22.87016)
phase = B00111000;
else if(AG < 25.27754)
phase = B00110000;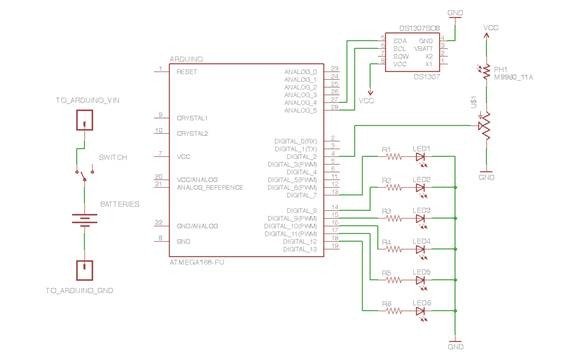 else if(AG < 27.68493)
phase = B00100000;
else
phase = 0;
return phase;
}
else if(AG < 27.68493)
phase = B00100000;
else
phase = 0;
return phase;
}
Fi
nally, the Arduino is capable of communicating with a PC via standard serial communication thanks to the FTDI USB-to-serial controller that comes standard with many Arduino boards.
C#:
// Use a button Click event to send data to the Arduino.
 //The following example is intended to be a very basic example
//of writing the date to the serial port. A more robust application
// would use a protocol and CRC to ensure that the data being transmitted
// was valid. private void updateButton_Click(object sender, EventArgs e)
 { byte[] result = new byte[7]; DateTime currTime = DateTime.Now; serialPort.PortName = “COM4”; serialPort.BaudRate = 19200; serialPort.DataBits = 8;
serialPort.Parity = Parity.None;
 serialPort.StopBits = StopBits.One;
 try { serialPort.Open();
 }
 catch (IOException ioe)
 { // Handle your exceptions.
 }
 // Some Arduino models reboot automatically when the serial
// port is open. Allow a small delay to account for this. Thread.Sleep(10000);
For more deatil: Remote Controlled lunaring with Arduino
- How does the modified moon night-light determine the current lunar phase?
The device calculates the lunar phase by retrieving the current date from a DS1307 Real Time Clock module. - Can the stored date be updated if it starts to drift over time?
Yes, the date can be updated using a simple C# application that queries the PC system date and sends it to the Arduino via the I2C bus. - What component is used to keep track of the date while retaining it when batteries run out?
A DS1307 real time clock module with a coin cell battery backup is used to maintain the date. - Does the project require building an Arduino from scratch?
No, a pre-built Arduino typically runs around $30 or less, though building one yourself is possible and significantly cheaper. - How can you tweak the moon's sensitivity to light in different environments?
A standard 100k potentiometer is added in-line with the existing Light-dependent resistor to easily adjust light sensitivity. - What programming language is used to write the code for the Arduino platform?
The Arduino allows designers to write programs in a highly abstracted form of the C programming language. - Which pins on the Arduino are connected to the LED lights?
Digital pins 7 through 12 are connected to the LED lights, ranging from Red on pin 7 to Purple on pin 12. - How does the Arduino communicate with the PC to update the clock?
The Arduino communicates with a PC via standard serial communication using an FTDI USB-to-serial controller.