i’m MrWaffelXD and today I want you to show how to make a motion controlled Pong game.
In this guide you learn, how to programm your own Pong and how to make a distance-controller, which you can use by moving your hand.
But first: What is Pong?
“Pong is one of the earliest arcade video games. It is a table tennis sports game featuring simple two-dimensional graphics. The game was originally manufactured by Atari, which released it in 1972. Allan Alcorn created Pong as a training exercise assigned to him by Atari co-founder Nolan Bushnell. Bushnell based the idea on an electronic ping-pong game included in the Magnavox Odyssey; Magnavox later sued Atari for patent infringement. Bushnell and Atari co-founder Ted Dabney were surprised by the quality of Alcorn’s work and decided to manufacture the game.”[Wikipedia: Pong – Source:https://en.wikipedia.org/wiki/Pong (visited:01.08.2019)]
But now let’s begin and have fun!
Supplies:
Hardware
– Arduino Pro Micro or Arduino Leonardo(Recommended: Arduino Leonardo, because I had a lot of trouble with the Pro Micro)
– UltrasonicSensor (HC-SR04)
– Breadboard
– 4 Jumper Wire (Male/Male)
– USB-Cable (Type B micro)
– PC
Software
– Arduino IDE (Online or Software)
– Python IDLEor a programming environment of your choice
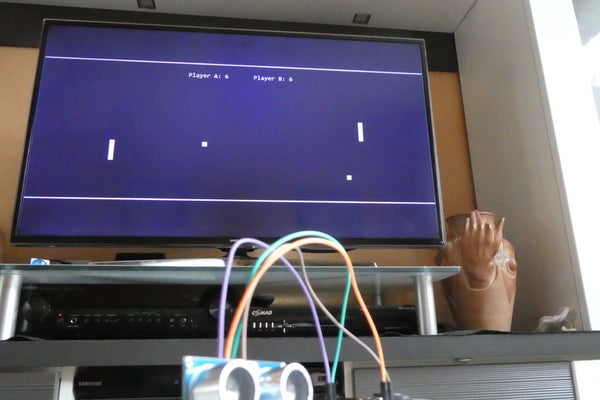
Step 1: Programming the Game

Okay, first you need a playable Pong game. You can use an existing Version of Pong, like https://www.ponggame.org/ but I think, that it is boring to use a exsisting game.
Furthermore you can’t use custom rules like more balls or a diffrent paddle speed.
But if you want to use an exsisting Pong game, just skip this step.
Basically you can use every programming language you like, but I used Python to make the game.
Since this is not supposed to be a Python tutorial, of which there are thousands out there, I will simply insert my source code (2 balls).
I’m sorry for the damn bad formatting on Instractables.
#pong for two players with 2 balls
import turtle
#Window wn = turtle.Screen() wn.title(“Pong by MrWaffelXD @ 1280×720”) wn.bgcolor(“black”) wn.setup(width=1280, height=720) wn.tracer(0)
#visual border
v_border = turtle.Turtle() v_border.speed(0) v_border.shape(“square”) v_border.color(“white”) v_border.shapesize(stretch_wid=0.2, stretch_len=100) v_border.penup() v_border.goto(0, 360)
v_border = turtle.Turtle() v_border.speed(0) v_border.shape(“square”) v_border.color(“white”) v_border.shapesize(stretch_wid=0.2, stretch_len=100) v_border.penup() v_border.goto(0, -360) #score score_a = 0 score_b = 0
#paddle a
paddle_a = turtle.Turtle() paddle_a.speed(0) paddle_a.shape(“square”) paddle_a.color(“white”) paddle_a.shapesize(stretch_wid=5, stretch_len=1) paddle_a.penup() paddle_a.goto(-600, 0)
#paddle b paddle_b = turtle.Turtle() paddle_b.speed(0) paddle_b.shape(“square”) paddle_b.color(“white”) paddle_b.shapesize(stretch_wid=5, stretch_len=1) paddle_b.penup() paddle_b.goto(600, 0)
#ball a ball_a = turtle.Turtle() ball_a.speed(0) ball_a.shape(“square”) ball_a.color(“white”) ball_a.penup() ball_a.goto(0, -15) ball_a.dx = 1 ball_a.dy = 1
#ball b
ball_b = turtle.Turtle() ball_b.speed(0) ball_b.shape(“square”) ball_b.color(“white”) ball_b.penup() ball_b.goto(0, 15) ball_b.dx = -1 ball_b.dy = -1
#pen pen = turtle.Turtle() pen.speed(0) pen.color(“white”) pen.penup() pen.hideturtle() pen.goto(0, 275)
pen.write(“Player A: {} Player B: {}”.format(score_a, score_b), align=”center”, font=(“Consolas”, 24, “normal”))
#function
#paddle a def paddle_a_up(): y = paddle_a.ycor() y += 10 paddle_a.sety(y)
def paddle_a_down(): y = paddle_a.ycor() y -= 10 paddle_a.sety(y)
#paddle b def paddle_b_up(): y = paddle_b.ycor() y += 10 paddle_b.sety(y)
def paddle_b_down(): y = paddle_b.ycor() y -= 10 paddle_b.sety(y)
#keybord binding
wn.listen() wn.onkeypress(paddle_a_up, “w”) wn.onkeypress(paddle_a_down, “s”)
wn.onkeypress(paddle_b_up, “Up”) wn.onkeypress(paddle_b_down, “Down”)
#main game loop while True: wn.update()
#move the balls ball_a.setx(ball_a.xcor() + ball_a.dx) ball_a.sety(ball_a.ycor() + ball_a.dy)
ball_b.setx(ball_b.xcor() + ball_b.dx) ball_b.sety(ball_b.ycor() + ball_b.dy)
#border if ball_a.ycor() > 360: ball_a.sety(360) ball_a.dy *= -1 if ball_a.ycor() < -360: ball_a.sety(-360) ball_a.dy *= -1
if ball_a.xcor() > 640: ball_a.goto(0, -15) ball_a.dx *= -1 score_a += 1 pen.clear() pen.write(“Player A: {} Player B: {}”.format(score_a, score_b), align=”center”, font=(“Consolas”, 24, “normal”)) if ball_a.xcor() < -640: ball_a.goto(0, -15) ball_a.dx *= -0.1 score_b += 1 pen.clear() pen.write(“Player A: {} Player B: {}”.format(score_a, score_b), align=”center”, font=(“Consolas”, 24, “normal”))
if ball_b.ycor() > 350: ball_b.sety(350) ball_b.dy *= -0.75 if ball_b.ycor() < -350: ball_b.sety(-350) ball_b.dy *= -1 if ball_b.xcor() > 640: ball_b.goto(0, 15) ball_b.dx *= -1 pen.clear() score_a += 1 pen.write(“Player A: {} Player B: {}”.format(score_a, score_b), align=”center”, font=(“Consolas”, 24, “normal”))
if ball_b.xcor() < -640: ball_b.goto(0, 15) ball_b.dx *= -1 pen.clear() score_b += 1 pen.write(“Player A: {} Player B: {}”.format(score_a, score_b), align=”center”, font=(“Consolas”, 24, “normal”))
#paddle colision if ball_a.xcor() < -600 and (ball_a.ycor() < paddle_a.ycor() + 50 and ball_a.ycor() > paddle_a.ycor() -50 ): ball_a.dx *= -1
if ball_a.xcor() > 600 and (ball_a.ycor() < paddle_b.ycor() + 50 and ball_a.ycor() > paddle_b.ycor() -50 ): ball_a.dx *= -1
if ball_b.xcor() < -600 and (ball_b.ycor() < paddle_a.ycor() + 50 and ball_b.ycor() > paddle_a.ycor() -50 ): ball_b.dx *= -1
if ball_b.xcor() > 600 and (ball_b.ycor() < paddle_b.ycor() + 50 and ball_b.ycor() > paddle_b.ycor() -50 ): ball_b.dx *= -1
If you want to have more detailed information about programming, just have a look at my Playlist with YouTube videos about Pong programming in different languages.(I think, that the first Video in this playlist was the one I used)
https://www.youtube.com/playlist?list=PLxOpxipLSwW…
Notice: Just choose some random keys for your control. The keys doesn’t matter.
Step 2: Using the Arduino IDE

Congratulations, if you’ve made it this far, you’ve either programmed your own pong or simply used an existing one (boring).
Now that you have to control your game somehow and are here to do it in a very special way, it’s time to build the required controller!
To do this, you must first program the Arduino mentioned in the material list. For this you use the Arduino IDE. You can install the program without registration on your PC or you can, with registration, use the web interface.
Using the Webinterface
To use the web interface simply click on the link, log in or create a new account.
Then click on “Arduino Web Editor”, then on “New Sketch”.
You will now see a white field on the right, containing void setup() and void loop().Here you write your source code later.
But before you can get started, you have to press “Select Board or Port” and select Arduino Leonardo ()even if you are using a Pro micro. Of course, you connect it to your PC with a USB cable beforehand.
If you need further information feel free to click on the link to visit the official “Getting Started”:
https://create.arduino.cc/projecthub/Arduino_Genui…
Now it’s time to write the source code into the white field (next step).
Using the Programm
To use the Arduino program, you must first download and install it from the official Arduino website. Please use the following link.
https://www.arduino.cc/en/Main/Software
After the installation the program looks like in the picture above.
Now connect the Arduino to your PC and press “tools” and choose the right port and board.
Now you can write the code in the field and then press the arrow in the upper left corner to upload the program to your Arduino.
Step 3: Programming the Arduino
After you have correctly configured the software or the web interface, you are now ready to write the program. But what exactly is the program supposed to do?
Well, there’s a simple solution.
The program should detect the distance to the next object by means of the ultrasonic sensor and simulate a key entry accordingly.
That’s exactly why we need an Arduino with an ATmega32u4 processor, an Arduino Pro Micro or an Arduino Leonardo. Since other Arduino’s also have other processors installed and these are built differently, it is unfortunately not possible with other Arduino’s to simulate a keyboard input (at least with the keyboard library).
Here is my Arduino Source code:
#include <Keyboard.h>
int trigger = 7;
int echo = 6;
long duration = 0;
long distance = 0;
int led = 5;
void setup()
{
//delay is really important (See below for more information)
delay(1000);
//Starting Serial monitor
Serial.begin (9600);
pinMode(trigger, OUTPUT);
pinMode(echo, INPUT);
pinMode(led, OUTPUT);
}
void loop()
{
digitalWrite(trigger, LOW);
delay(5);
digitalWrite(trigger, HIGH);
delay(10);
digitalWrite(trigger, LOW);
duration = pulseIn(echo, HIGH);
//Calculate distance in centimeters
distance = (duration / 2) * 0.03432;
if (distance >= 500 || distance <= 0)
{
//Serial Error Screen
Serial.println(“No measured value “);
}
else
{
//Serial Output of the distance in Centimeter
Serial.print(distance);
Serial.println(” cm”);
}
if (distance <= 10) // If value 10 or equal then Key (W) and LED ON
{
digitalWrite(led, HIGH);
Keyboard.begin();
Keyboard.press(‘w’);
}
else if (distance >= 11) // If value 11 or equal then Key (S) and LED OFF
{
digitalWrite(led, LOW);
Keyboard.press(‘s’);
}
else {
digitalWrite(led, LOW);
}
delay(50); }
You can use this Code if you want to.
As you may have already noticed, I use an LED in this source code to indicate whether the distance is below or above 10 cm. This LED is optional and can be omitted as the distance is displayed on the serial monitor anyway. To open it, simply press “Tools”; in the software and then Serial Monitor. A window opens in which the distance is to be displayed. If this is not the case, then briefly reset the Arduino by pressing the small button on the Arduino or briefly disconnect and reconnect the cable. If then still nothing happens, then please check the speed adjustment below right.
The above source code can of course be modified. For example, I have set the W key to be pressed at a distance of 10 centimeters or less. Here you can enter the correct key and the desired distance.
I also recommend to be in a comment area with the cursor when the Arduino is put into operation, otherwise the Arduino will write into the source code, which can be extremely annoying.
Therefore I recommend to program a delay of at least 1 second at the beginning of the program, so that you don’t have any problems to change the source code of the Arduino later on.
Read more: Motion Controlled Pong Video Game