Introduction
In my first article using the Arduino 2009 board, I described a simple temperature sensor interfaced using Visual Basic.
I have developed the board and Visual Basic code to give a fairly usable indoor weather station.
Overall Operation
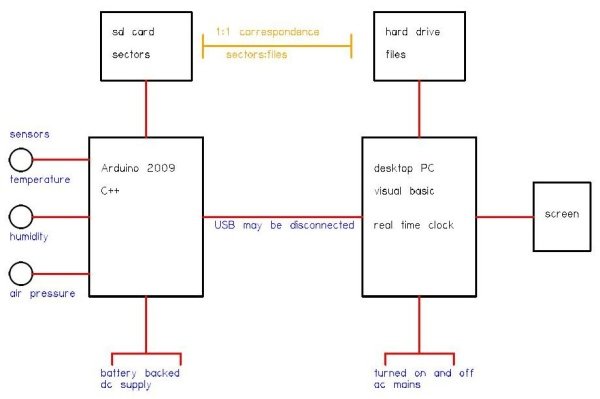
The Arduino 2009 acts as a standalone weather station. It does not display the data. It can operate independently for months. It samples the sensors until the RAM is full. The RAM samples are stored on a sector of an SD card. Eventually, a year’s weather samples could be stored on the SD card.
Each time the PC is connected, any unstored sectors are uploaded to files on the PC’s hard drive. It can then be displayed using all the facilities of the PC’s display.
The central idea is that the PCc has a file copy of each SD card sector stamped with the date time it was recorded.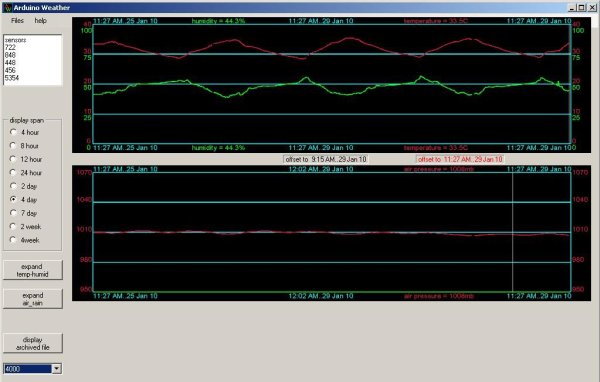
Arduino Indoor Weather Station
The activity diagram for the program:
The Arduino IDE uses C++, and the actual program for this activity diagram is straightforward.
The SD card current sector is held in EEPROM so that during power off or reset, it can be reused. The Arduino has a class EEPROM which only allows read and write of bytes. To read a long (32 bytes in Arduino) requires some work:
inline void ready()
{
  unsigned long lastblock = 0;  //the last block number saved in the sd card
  unsigned long tempblock = 0;
  tempblock = EEPROM.read(0);  // remember the LSB of the last saved block
  lastblock |= tempblock;
  tempblock = EEPROM.read(1);  // remember the next LSB of the last saved block
  lastblock |= tempblock << 8;
  tempblock = EEPROM.read(2);  // remember the next LSB of the last saved block
  lastblock |= tempblock << 16;
  tempblock = EEPROM.read(3);  // remember the next MSB of the last saved block
  lastblock |= tempblock << 24;
  Serial.println("ready");  //send computer the ready to reset message
  Serial.println(lastblock);  //send computer the last saved block number
  delay(10000);  //every 10 seconds
}//end of ready
The Arduino does not have a class to read and write to SD cards, so I wrote my own. This is the .h file:
/* Card type: Ver2.00 or later Standard Capacity SD Memory Card
              1.0 and 2.0 GB cards purchased in 2009 work well.
   Usage:  Must have global variable.
              volatile unsigned char buffer[512];
           Function calls.
              unsigned char error = SDCARD.readblock(unsigned long n);
              unsigned char error = SDCARD.writeblock(unsigned long n);
            error is 0 for correct operation
            read copies the 512 bytes from sector n to buffer.
            write copies the 512 bytes from buffer to the sector n.
   References: SD Specifications. Part 1. Physical Layer Simplified Specification
               Version 2.00 September 25, 2006 SD Group.
               home
   Code examples:  http://www.sensor-networks.org/index.php?page=0827727742
                   http://www.avrfreaks.net   search "sd card"
   Operation:  The code reads/writes direct to the sectors on the sd card.
               It does not use a FAT. If the card has been formatted the
               FAT at the lowest sectors and files at the higher sectors
               can be written over.
               The card is not damaged but will need to be reformatted at
               the lowest level to be used by windows/linux.
   Timing:  readblock or writeblock takes 44 msec.
   Improvement: Could initialize so that can use version 1 sd and hc sd.
                Instead of CMD1 need to use CMD8, CMD58 and CMD41.
*/
#ifndef SDCARD_h
#define SDCARD_h
#define setupSPI SPCR = 0x53; //Master mode, MSB first,
                              //SCK phase low, SCK idle low, clock/64
#define deselectSPI SPCR = 0x00;  //deselect SPI after read write block
#define clearSPI  SPSR = 0x00; // clear SPI interrupt bit
#define setupDDRB DDRB |= 0x2c;  //set SS as output for cs
#define selectSDCARD PORTB &= ~0x04;  //set the SS to 0 to select the sd card
#define deselectSDCARD PORTB |= 0x04;  //set the SS to 1 to deselect the sd card
#include "WProgram.h"
class SDCARDclass
{
public:
    unsigned char readblock(unsigned long Rstartblock);
    unsigned char writeblock(unsigned long Wstartblock);
private:
    unsigned char SD_reset(void);
    unsigned char SD_sendCommand(unsigned char cmd, unsigned long arg);
    unsigned char SPI_transmit(unsigned char data);
};//end of class SDCARDclass
extern SDCARDclass SDCARD;
#endif
So, when we need to save a sector of data, we do:
inline void lastblocksave()
{
   unsigned int e = 0;  //the error code from the sd card
   e = SDCARD.writeblock(currentblock);  //save this 256 block of integer data
   while (e != 0)   //cant continue if sd card not working
   {
       Serial.println("writesderror");  //send computer sd card error
       Serial.println(e);  //send computer the error number
       digitalWrite(8, HIGH);  //turn led on to show sd card error
       delay(10000);  //every 10 seconds
   }//end of sd card not working
   currentblock +=1;  //go to the next block in sd card
   EEPROM.write(0,currentblock);  //write the LSB of saved block to EEPROM
   EEPROM.write(1,currentblock >> 8);  //write the next LSB of saved block to EEPROM
   EEPROM.write(2,currentblock >> 16);  //write the next LSB of saved block to EEPROM
   EEPROM.write(3,currentblock >> 24);  //write the MSB of saved block to EEPROM
   ramaddress = 0;   //we can now start again to save samples in RAM
}//end of sd save
PC Program Startup
The PC program was written using Microsoft’s Visual Basic Express IDE.
When the display program loads and before it is activated, we create a startup form which has all the routines to upload the data samples.
Private Sub ArduinoWeather_Load(ByVal sender As System.Object, _
            ByVal e As System.EventArgs) Handles MyBase.Load
    Dim f As New showstart
    f.ShowDialog()  'startup form to connect to arduino
    While My.Computer.FileSystem.FileExists(cd & "\" & last_sector)
        last_sector += 1 'find the next block
    End While
    If My.Computer.FileSystem.FileExists(cd & "\archive") Then
        Dim st As Stream = File.Open(cd & "\archive", FileMode.Open, FileAccess.Read)
        Dim br As New BinaryReader(st)  'to get samples from stream
        Try
            Dim n As Integer = 0  'a counter
            Do
                archived(n) = br.ReadInt64()
                archivedisplay.Items.Add(archived(n))
                If archived(n) > lastblock Then lastblock = archived(n)
                n += 1  'we get the largest archive block
                If n = 100 Then Exit Do 'no more room
            Loop
        Catch ex As Exception  'exception of none left
        Finally
            br.Close()   'must close
            st.Close()
        End Try  'exit try when all read
    End If
    fill_buffers() 'get all the samples into thir buffers
    If overflow.Text = "" Then  'enable displays
        Try
            com8 = My.Computer.Ports.OpenSerialPort("com8", 9600)
            readthread = New Threading.Thread(AddressOf read)
            readthread.Start()  'thread runs for whole program
                                'to get samples every 10 sec
        Catch ex As Exception
            comdisplay.Text = "no connection" & vbNewLine & _
                              "or" & vbNewLine & "no communication"
            display_noconnect.Enabled = True  'just use a timer to display
        End Try
    End If
End Sub
Loop
Catch ex As Exception 'exception of none left
Finally
br.Close() 'must close
st.Close()
End Try 'exit try when all read
End If
fill_buffers() 'get all the samples into thir buffers
If overflow.Text = "" Then 'enable displays
Try
com8 = My.Computer.Ports.OpenSerialPort("com8", 9600)
readthread = New Threading.Thread(AddressOf read)
readthread.Start() 'thread runs for whole program
'to get samples every 10 sec
Catch ex As Exception
comdisplay.Text = "no connection" & vbNewLine & _
"or" & vbNewLine & "no communication"
display_noconnect.Enabled = True 'just use a timer to display
End Try
End If
End Sub
The activity diagram for the start form is shown here:
The whole purpose of this startup is to ensure that every sector on the SD card is recorded on the hard drive with its real sample time. I start a thread which is used to upload any required data. This following code is the core of the procedure,
For more detail: Indoor Weather Station using Arduino