Summary of HydroBuddy
HydroBuddy is a passive hydration tracker for desk-bound users, monitoring water intake against a 2-liter daily goal. It uses a load cell and LED strip to detect bottle placement and consumption, providing visual reminders via color-coded lights. The project involves designing a custom case with laser-cut wood and acrylic, soldering electronics, and programming an Arduino Uno to manage weight detection and user feedback loops.
Parts used in the HydroBuddy:
- Arduino Uno R3 (or compatible variant)
- USB-B cable
- HX711 weighing scale
- SK6812 LED strip
- Multi-coloured wire
- 470Ω resistor
- Four 30x50cm sheets of 4mm MDF
- One 30x28cm sheet of 4mm acrylic
- Alternative 30x15cm sheet of 5-6mm acrylic
- About 30cm of 1mm-thin load wire
HydroBuddy is a hydration-promoting device, designed for people who spend most of their day in one place (such as behind a desktop) and tend to forget about hydrating themselves.
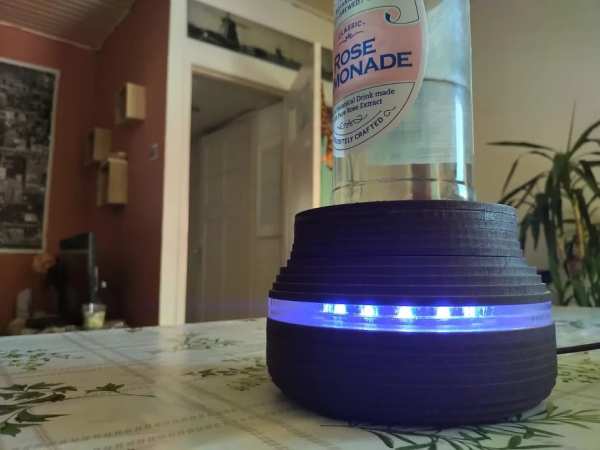
Once set up, it passively tracks how much water you drink, gently reminding you to drink up when it notices you’re hydrating yourself too little for the recommended 2 liters per day.
A demonstration video can be found at the bottom of this page!
Warning: Side effects of using this product may include more frequent bathroom visits, potentially hampering your productivity.
Supplies
Hardware:
- Arduino Uno R3 (or a compatible variant)
- USB-B cable
- HX711 weighing scale
- SK6812 LED strip
- About a handful of (multi-coloured) wire
- One 470Ω resistor
Materials:
- Four 30x50cm sheets of 4mm MDF
- One 30x28cm sheet of 4mm acryl
- Alternatively, a 30x15cm sheet of 5-6mm acryl will work, too
- You may also choose not to use acryl, though this will of course give a different result
- About 30cm of 1mm-thin load wire
Tools:
- A lasercutting machine
- A soldering kit
- A pair of stripping pliers (or a scissor)
- A pair of cutting pliers
- Some transparent glue that works for both wood and plastics (I used this one)
Step 1: Setting Up the Arduino Project
Libraries
First off, download the HX711_ADC and SK6812 libraries as .ZIP files, and save them somewhere on your computer. These libraries will communicate with your weighing scale and LED strip, respectively.
Open a new project in your Arduino IDE and import the libraries you just downloaded, by locating them through Sketch > Include Library > Add .ZIP library. This should automatically add the following lines to the top of your sketch:
#include <HX711_ADC.h>
#include <SK6812.h>
Code
Next, copy and paste the following code into your project:
#include <HX711_ADC.h>
#include <SK6812.h>
// component variables
HX711_ADC loadCell(4, 5);
SK6812 LED(14);
int ledStripPin = 6;
// setup variables
const long updateInterval = 500;
const float calibrationFactor = 416.0;
const float minBottleWeight = 15;
const float accuracyMargin = 5;
const int maxPermittedWeight = 2000; /* While the scale can hold up to 5000 grams,
the frame probably can't... */
const float weightStabilizationFactor = 1.0f;
const int amtOfLeds = 14;
const int ledIntensity = 255;
const long hydrationCheckInterval = 30000;
const int targetHydrationPerHour = 200;
/* With values of 30000/200, the device will measure your hydration every 30 seconds
* and help you drink 200ml per hour (2L per 10-hour day).
* For testing purposes, you may want to adjust the above two variables to
* artificially trigger the hydration reminders more quickly/frequently.
*/
// runtime variables
enum State
{
Calibrating = 'C',
WaitingForBottle = 'W',
DeterminingWeight = 'N',
BottleReturned = 'R',
Default = 'D',
TooMuchWeight = 'T',
HydrationCheck = 'M'
};
State state = Calibrating;
long time_LastUpdateCycle = -1;
long time_LastStateChange = -1;
long time_LastHydrationCheck = -1;
long time_LastBottleReturn = -1;
float currentWeight;
float previousWeight;
float lastMeasuredStableWeight;
float lastMeasuredFilledWeight;
// user statistics
float hydrationBalance = 0;
float totalWeightDrank; /* This variable is used for debugging in the Serial Monitor. */
void setup() {
LED.set_output(ledStripPin);
Serial.begin(9600);
calibrateScale();
}
void calibrateScale() {
Serial.println("Calibrating - please keep the scale free of any weight...");
changeState(Calibrating);
showCalibrationLEDGlow();
loadCell.begin();
loadCell.start(2000);
loadCell.setCalFactor(calibrationFactor);
loadCell.tare();
Serial.println("Calibration complete! Please place your bottle on the scale.");
changeState(WaitingForBottle);
}
void loop() {
loadCell.update();
if (millis() >= time_LastUpdateCycle + updateInterval) {
updateScale();
if (millis() >= time_LastHydrationCheck + hydrationCheckInterval) {
checkHydration();
}
if (state != Default) {
if (state == WaitingForBottle) {
tryDetectBottleReturn();
} else if (state == DeterminingWeight) {
determineFilledBottleWeight();
} else if (state == BottleReturned && millis() - time_LastBottleReturn > updateInterval * 1.5f) {
/* When the scale successfully determines a recently placed/returned
* bottle's weight, it will blink green for 1 second, then switch back
* to the Default state.
*/
changeState(Default);
} else if (state == HydrationCheck && millis() - time_LastHydrationCheck > updateInterval * 1.5f) {
/* When the scale successfully determines a recently placed/returned
* bottle's weight, it will blink green for 1 second, then switch back
* to the Default state.
*/
Serial.print(millis());
Serial.print(" / ");
Serial.println(time_LastHydrationCheck);
changeState(Default);
} else if (state == TooMuchWeight && currentWeight < maxPermittedWeight) {
/* When there is too much weight on the scale, the LED strip flashes
* bright red until the weight drops to an acceptable level again.
*/
changeState(DeterminingWeight);
}
}
}
updateLedStrip();
}
void updateScale() {
previousWeight = currentWeight;
currentWeight = loadCell.getData();
float weightDiff = currentWeight - previousWeight;
Serial.println(currentWeight);
time_LastUpdateCycle = millis();
if (currentWeight < -accuracyMargin && state != Calibrating) {
/* If the weight on the scale is negative, it recalibrates.
*/
calibrateScale();
}
else if (currentWeight > maxPermittedWeight) {
/* If the weight on the scale is too high, the user is warned.
*/
changeState(TooMuchWeight);
}
else if (abs(weightDiff) > accuracyMargin && lastMeasuredStableWeight == -1) {
/* If the weight on the scale drops steeply, the device will know that
* the bottle was removed. Likewise, if the weight increases steeply,
* it means that additional weight was added, like the pressure of the
* user's hand.
*/
changeState (weightDiff < -accuracyMargin ? WaitingForBottle : DeterminingWeight);
lastMeasuredStableWeight = previousWeight;
lastMeasuredFilledWeight = -1;
Serial.print("Bottle removed or extra weight added - last measured stable weight is ");
Serial.print(lastMeasuredStableWeight);
Serial.println(" grams.");
}
}
void checkHydration() {
time_LastHydrationCheck = millis();
hydrationBalance -= (targetHydrationPerHour * (hydrationCheckInterval / 3600000.0f));
Serial.print("Checking hydration... (balance: ");
Serial.print(hydrationBalance);
Serial.println(")");
if (state == Default && hydrationBalance > -50) {
/* When hydration is measured, briefly blink blue to
* show the user that the device is still on.
*/
changeState(HydrationCheck);
}
}
void tryDetectBottleReturn() {
if (previousWeight > -accuracyMargin
&& currentWeight - previousWeight > minBottleWeight + accuracyMargin) {
changeState(DeterminingWeight);
}
}
void determineFilledBottleWeight() {
if (currentWeight >= minBottleWeight + accuracyMargin + weightStabilizationFactor) {
/* If this if-statement is entered, the device has determined that
* there is indeed a bottle placed on its scale.
*/
float temp = lastMeasuredFilledWeight;
lastMeasuredFilledWeight = currentWeight;
if (abs(lastMeasuredFilledWeight - temp) <= weightStabilizationFactor) {
/* If this if-statement is entered, it means that the past two consecutive
* weight measurements were close enough to each other to conclude that
* it is the bottle's final weight.
*/
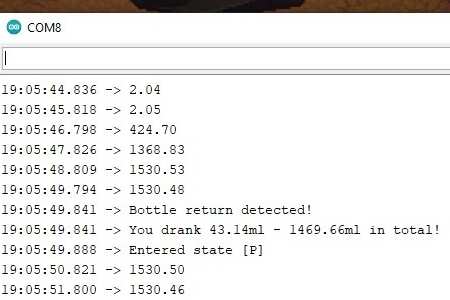
Serial.println("Bottle (or normal weight) returned!");
time_LastBottleReturn = millis();
changeState(BottleReturned);
determineWeightDiff();
lastMeasuredStableWeight = -1;
}
}
}
void determineWeightDiff() {
/* By determining the weight difference between the bottle before and
* after it was removed from the scale, the device can determine
* how much ml of water had been drank.
*/
float weightDiff = lastMeasuredStableWeight - lastMeasuredFilledWeight;
if(weightDiff >= accuracyMargin) {
Serial.print("You drank ");
Serial.print(weightDiff);
Serial.print("ml - ");
hydrationBalance += weightDiff;
totalWeightDrank += weightDiff;
Serial.print(totalWeightDrank);
Serial.print("ml in total (balance: ");
Serial.print(hydrationBalance);
Serial.println(")");
}
else {
Serial.println("Bottle refill detected!");
}
}
void changeState(State newState) {
resetLedStrip();
state = newState;
Serial.print("Entered state [");
Serial.print((char) newState);
Serial.println("]");
time_LastStateChange = millis();
}
void updateLedStrip() {
long ledTime = millis() - time_LastStateChange;
/* By setting ledTime to 0 after each state change, each cycle
* of the LED strip starts with a value of 0, which helps to
* make the display of the LEDs more fluid.
*/
if (state == Default) {
/* If your hydration balance is too low, the LEDs glow blue in
* a rotating fashion with 1-4 waves. By default, the first
* hydration reminder occurs 15 minutes after startup.
*/
if (hydrationBalance <= -50) {
float glowSpeed = 0.002f;
if (hydrationBalance <= -150) {
glowSpeed *= 2.0f;
} else if (hydrationBalance <= -100) {
glowSpeed *= 1.5f;
}
float str = ledIntensity * sin(-PI / 2 + ledTime * glowSpeed);
if (str < 0) {
str = 0;
}
float offStr = 0.15f * str;
for (int i = 0; i < amtOfLeds; i++) {
LED.set_rgbw(i, {offStr, offStr, str, 0});
}
LED.sync();
}
} else if (state == WaitingForBottle) {
/* If the bottle is missing from the scale, i.e. after being
* picked up, all LEDs glow pink simultaneously.
*/
float str = ledIntensity * sin(-PI / 2 + ledTime * 0.002f);
if (str < 0) {
str = 0;
}
float offStr = 0.15f * str;
for (int i = 0; i < amtOfLeds; i++) {
LED.set_rgbw(i, {offStr, str, offStr, 0});
}
LED.sync();
} else if (state == DeterminingWeight) {
/* While the scale determines your bottle's weight, the
* LEDs glow pink in a rotating fashion with 4 waves.
*/
for (int i = 0; i < amtOfLeds; i++) {
float str = -ledIntensity + (ledIntensity * 2) * sin(((ledTime * 0.002f) + (1000 / amtOfLeds) * i) * 4);
if (str < 0) {
str = 0;
}
float offStr = 0.15f * str;
LED.set_rgbw(i, {offStr, str, offStr, 0});
}
LED.sync();
} else if (state == HydrationCheck) {
/* When the device performs its periodic hydration check,
* a blue light cycles through the LEDs to show the user
* that the device is still working as intended.
*/
float offStr = 0.15f * ledIntensity;
int targetIndex = abs(floor((amtOfLeds / 1000.0f) * ledTime) - 14);
for (int i = 0; i < amtOfLeds; i++) {
if (i == targetIndex) {
LED.set_rgbw((i + 5) % amtOfLeds, {offStr, offStr, ledIntensity, 0});
} else {
LED.set_rgbw((i + 5) % amtOfLeds, {0, 0, 0, 0});
}
}
LED.sync();
} else if (state == BottleReturned) {
/* Once the scale has successfully determined your bottle's
* weight, it briefly flashes green.
*/
if (ledTime % 1000 < 500) {
float str = ledTime % 250 < 125 ? (ledIntensity * 0.25f) : 0;
float offStr = 0.15f * str;
for (int i = 0; i < amtOfLeds; i++) {
LED.set_rgbw(i, {str, offStr, offStr, 0});
}
LED.sync();
}
} else if (state == TooMuchWeight) {
/* If there is too much weight on the scale, the LEDs flash
* bright red, notifying the user that they should clear
* the scale of any excess weight.
*/
float str = ledTime % 500 < 250 ? (ledIntensity * 2) : 0;
for (int i = 0; i < amtOfLeds; i++) {
LED.set_rgbw(i, {0, str, 0, 0});
}
LED.sync();
}
}
void showMeasuringLEDBlink() {
float str = ledIntensity * 0.25f;
float offStr = 0.15f * str;
}
void showCalibrationLEDGlow() {
float offStr = 0.15f * ledIntensity;
for (int i = 0; i < amtOfLeds; i++) {
LED.set_rgbw(i, {offStr, ledIntensity, offStr, 0});
}
LED.sync();
}
void resetLedStrip() {
for (int i = 0; i < amtOfLeds; i++) {
LED.set_rgbw(i, {0, 0, 0, 0});
}
LED.sync();
}
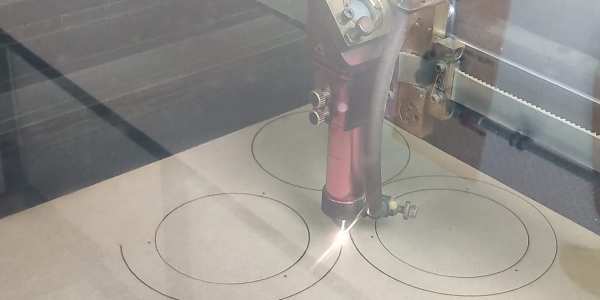
Step 2: Lasercutting
If you’re NOT using acryl
Using a vector graphics editor (like Adobe Illustrator or Inkscape), convert all .svg files attached below to the .dxf format, excluding acryl-rings.svg.
If you’re using acryl
Despite my recommendation for 4mm acryl, a thickness of 5-6mm will do just fine; I personally used 5mm. If you’re also using 5-6mm acryl, remove the bottom ring of acryl-rings.svg using the vector graphics editor of your choice.
Using that same vector graphics editor, convert all .svg files attached below to the .dxf format, excluding mdf-optional-tinylegs.svg.
In either case, bring the five .dxf files to a lasercutting machine, and follow the instructions for cutting the shapes into your MDF and acryl sheets.
Step 3: Building the Case
The base part
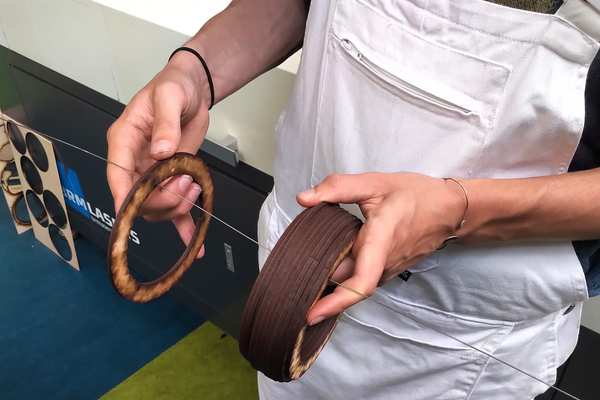
As accurately centered as you can, glue the bottom layer (1) to ring 2; be sure not to accidentally glue the three alignment holes shut. Place a weight on top of the two, then let the glue dry.
Using your cutting pliers, cut your load wire into three segments of ~10cm length each. Pin them through the three alignment holes in ring 3.
Using the load wire segments for exact alignment, slide rings 2 through 10 on top of each other, adding a thin, evenly spread layer of glue between each of them. After the glue has settled a little, take out the load wire, place something heavy on top of the rings, and let the glue dry.
If you’re using acryl, stack the acryl rings and glue them together. When the glue between them has dried, glue the stack of acryl rings on top of ring 10.
If you’re not using acryl, instead use the shapes of the mdf-optional-tinylegs.svg file to make three glued-together stacks of three tiny legs each. Glue these stacks on top of ring 10, once again using the load wire for alignment.
The top part
Similarly to how you glued the base part together, glue together layers 14 through 23, then layers R11 through R13. Once the glue between both stacks has dried up, glue layer R13 to layer 14.
By now, you should be able to slide the top part neatly on top of the base part! Slide the load wire segments into the alignment holes from top to bottom, and cut any leftover load wire (should be ~1.5cm) off of each segment.
Finally, glue layer 24 on top of layer 23.
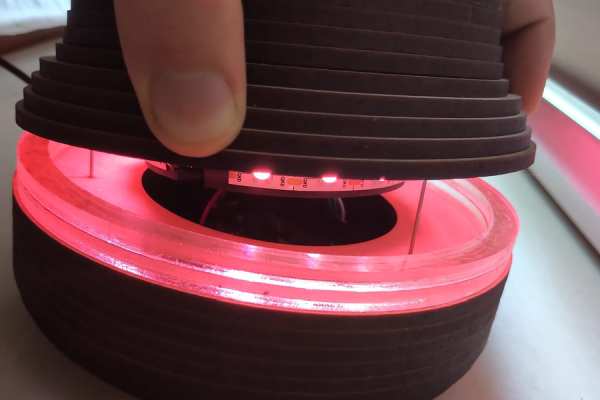
Integrating the LED strip
Cut your LED strip by the bronze intersecting points to create a smaller strip of 14 LEDs long. Peel off the layer at the back of the strip to expose its sticky backside, then wrap it around the bottom of the top part (R11-R13), leaving the hole on the side of the ring free for cables.
Step 4: Putting It All Together
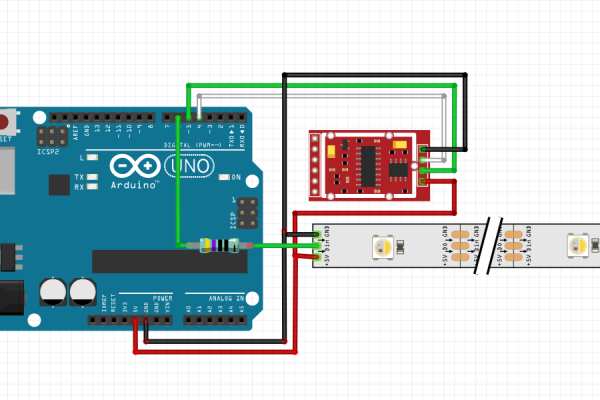
Now that the case is complete, you can start plugging and soldering everything together!
Once you’ve followed the diagram and example photos above and everything is connected, lower the Arduino into the base part. Then, place the top part and the weighing scale on top, while making sure that the cables connecting the different hardware components are neatly guided through the designated holes.
Finally, plug your USB-B cable into the designated hole at the base to power the Arduino, and upload your Arduino IDE sketch to the Arduino!
Step 5: The Result
As my first ever fully-fledged Arduino project, this project has been a challenge in many aspects. I’ve learned how to design (and write code for) a physical device with user experience as a priority, how to solder hardware components together, and how to use a vector graphics editor and lasercutting machine to make a compact, tight-fit case.
Some iterations, of which some are shown in images above:
- Simplified the case’s design from a turtle shell to a more ambiguous, futuristic shape (I was new to vector graphics, after all)
- Replaced a system with two separate LEDs (one for system warnings/confirmations, one for hydration reminders) with a multi-purpose LED strip
- Removed the need for a circuit board entirely, by soldering all 5V and ground cables together
- Moved the LED strip from outside of the case to neatly integrated inside, behind an acryl window
- Added a signal to warn the user when there’s too much weight on the scale
- Made both signals where the device asks something from the user (“hey, drink some water” and “place your bottle”) use the same fade-in, fade-out glowing pattern
- Before, the “hey drink some water” signal used to cycle through the LED strip, which could be interpreted as the device processing something instead (like the “calculating bottle weight” signal)
- Added a periodic, subtle glow while the device passively keeps track of your hydration, to show that the device is still working as intended
Source: HydroBuddy
- How does the device track water consumption?
The device passively tracks water by using a load cell to measure the weight difference of a bottle before and after it is removed from the scale. - Can I use a different thickness for the acrylic sheets?
Yes, a 5-6mm sheet of acrylic can be used instead of the recommended 4mm, though you may need to remove the bottom ring from the design file. - What libraries are required for the Arduino project?
You must download and import the HX711_ADC library and the SK6812 library into your Arduino IDE. - Does the device warn if too much weight is placed on it?
Yes, if the weight exceeds the permitted limit of 2000 grams, the LED strip flashes bright red to notify the user. - How often does the device check hydration levels?
The device measures hydration every 30 seconds to help the user drink 200ml per hour, totaling 2 liters over a 10-hour day. - What happens if the scale detects negative weight?
If the weight reading drops below the accuracy margin, the device automatically recalibrates itself. - Can I omit the acrylic parts from the build?
Yes, you may choose not to use acrylic, but this will result in a different visual outcome compared to using the transparent material. - What tool is needed to cut the case components?
A lasercutting machine is required to cut the shapes from the MDF and acrylic sheets based on the provided .dxf files.