Summary of DIY Wave Tank/flume Using Arduino and V-slot
This article details a low-cost DIY wave tank for students, designed to observe surface wave behavior. The setup uses two stepper motors connected to V-slot aluminum extrusions to drive actuator plates, creating waves within a large steel tank. An Arduino microcontroller manages the motor driver via a PC menu-driven program, allowing users to adjust wave height and length by changing motor speed. The project emphasizes affordability and modularity, utilizing standard materials like cast iron sheets and mild steel stiffeners.
Parts used in the DIY Wave Tank:
- Arduino micro controller
- 2*Stepper motor (2.8 kgcm torque per motor)
- 1*Stepper motor Driver
- 2*V slot gantry system
- Steel or iron plates for tank body
- L-stiffeners to support body
- Fiber or plastic sheet to make actuator plate
- Wires
- 48 volt DC power supply
A wave tank is a laboratory setup for observing the behavior of surface waves. The typical wave tank is a box filled with liquid, usually water, leaving open or air-filled space on top. At one end of the tank an actuator generates waves; the other end usually has a wave-absorbing surface.
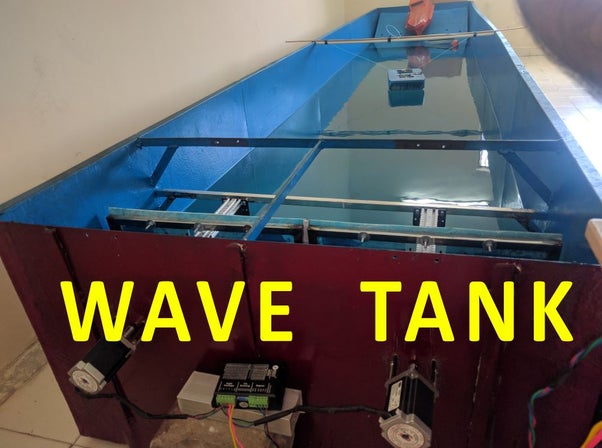
Usually these tanks cost a lot money so i tried to make a really really cheap solution for students who want to use the tank for testing their projects.
Step 1: How Dose It Work
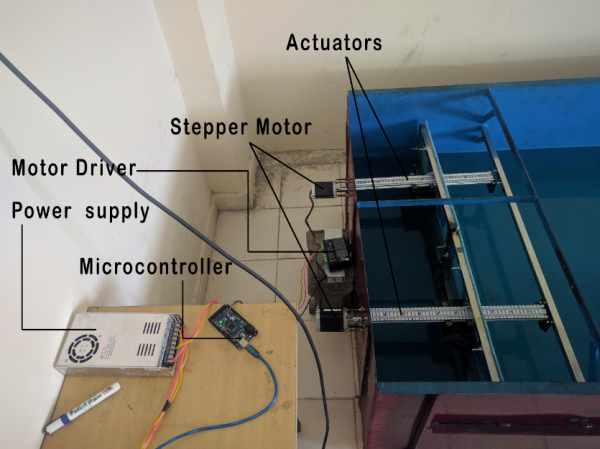
So the project consist of two actuators made using v-slot aluminium extrusions.
A stepper motor is connected to each actuator and both motors are controlled by same stepper motor drive so there is no lag.
Arduino is used to control the motor driver. A menu driven program is used to give input to the arduion connected via pc. Actuator plates are mounted on the v-slot gantry which will go back and forth once the motors start and this back and forth movement of plates generates the waves inside the tank.The wave height and wave length can be changed by changing the speed of the motor via arduino.
Step 2: Please Note Before Starting
I have not covered most of the small things how to use arduino or how to do welding to keep this tutorial small and easy to understand. Most of the missing things will cleared in the images and videos.Please message me if there are any problem or questions regarding the project.
Step 3: Gather All the Material
- Arduino micro contoller
- 2*Stepper motor (2.8 kgcm torque per motor)
- 1*Stepper motor Driver
- 2*V slot gantry system
- Steel or iron plates for tank body
- L-stiffeners to support body
- Fiber or plastic sheet to make actuator plate
- Wires 48 volt DC power supply
I have not included materials for v-slot gantry because the list will be very big then just google v-slot you will get many videos regarding how to assemble it i used 2040 aluminium extrusion. Motor capacity and power supply capacity will change if you want to carry more load.
Tank dimensions
Length 5.50 m
Breadth 1.07 m
Depth 0.50 m
Step 4: Variuos Dimensions
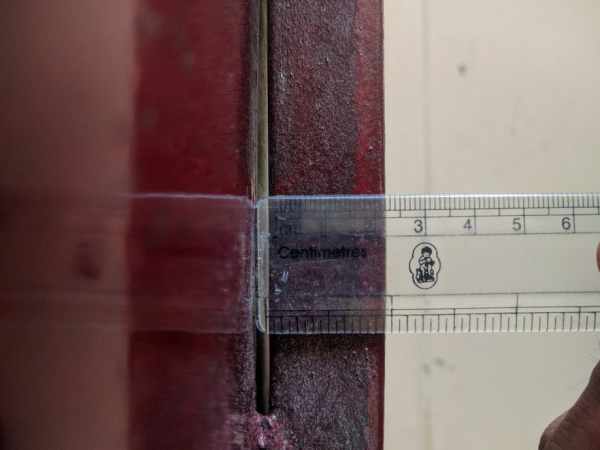
To make things simpler and tutorial shorter i have taken images of different components with a scale so that you can see the sizes of these.
Step 5: Making the Body
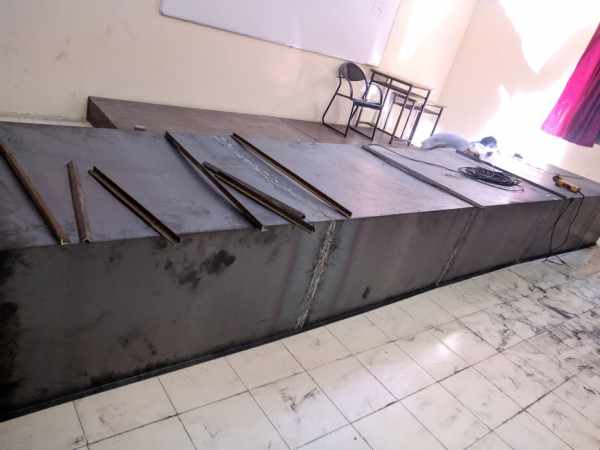
Body is made by 3 mm thick cast iron sheet.
Tank width is 1.10 meters ,length 5 meters and height 0.5 meters.
Tank body is made up of mild steel with stiffeners around it wherever necessary. Mild steel plates were bent and cut into various sections according to the tank dimensions. These sections were then erected by welding them together. Stiffeners were also welded together to make the structure more strong.
First plate was bent into the desired size in various sections and then these sections were welded together to erect the body. Stiffeners were added as a support stiffeners dimensions are shown in picture
Source: DIY Wave Tank/flume Using Arduino and V-slot
- How does the wave generation mechanism work?
Two actuators made with v-slot aluminium extrusions move back and forth using stepper motors to generate waves inside the tank. - Can I change the wave height and wavelength?
Yes, you can change the wave height and wave length by adjusting the speed of the motor via the Arduino. - What material is used to construct the tank body?
The tank body is made from 3 mm thick cast iron sheet or mild steel plates welded together with stiffeners. - What controls the stepper motors in this project?
An Arduino microcontroller controls the motor driver, which operates both stepper motors simultaneously without lag. - Is the V-slot gantry included in the provided parts list?
No, the author did not include specific V-slot materials in the list because assembly details vary and are available in other videos. - What type of program is used to input commands to the Arduino?
A menu driven program is used to give input to the Arduino connected via a PC. - What is the primary purpose of the L-stiffeners?
L-stiffeners are used to support the body and weld them together to make the structure stronger. - Does the tutorial cover welding and Arduino basics in detail?
No, the author has not covered small things like how to use Arduino or how to do welding to keep the tutorial simple.