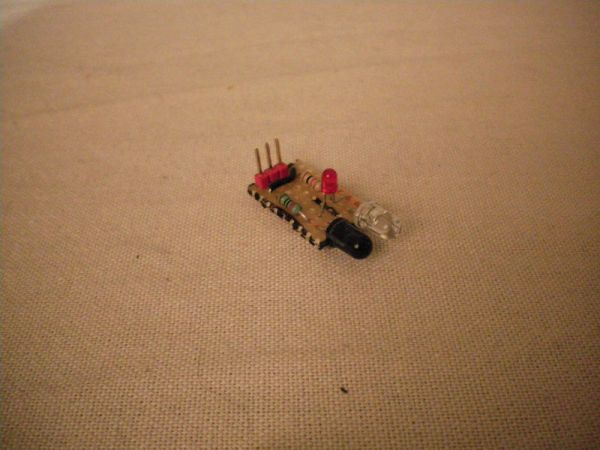
Summary of DIY Infrared Sensor Module using Arduino
This article guides users through building a low-cost line-following robot using infrared sensors, split into prototyping on a breadboard and fabricating a permanent strip board. It details circuit assembly, component placement, and provides Arduino code to detect lines via IR reflection.
Parts used in the DIY Infrared Sensor Module:
- 1x Arduino
- 1x Bread board
- 1x Strip board
- Wire reel, black
- Wire reel, red
- Wire reel, green
- 2x Infrared LED
- 2x Phototransistor
- 2x Red 5mm LED
- 2x 1k Ohm resistor
- 2x 220 Ohm resistor
- Wire cutters
- Wire strippers
- Helping Hands
- Soldering iron
- Solder
Have you ever wanted to make a line following robot but the infrared sensors were too expensive for you? Do you want to upgrade the robot in my other instructable?
Well this instructable comes in two stages, Stage 1 is the prototyping stage, where you build the circuit on the bread board and debug it for design flaws.
Stage 2 is fabrication where I’ll teach you how to create a strip board product that you can plug straight into your robot.
The good thing about this tutorial is you’re able to do many things with these sensors.
Also, if you’re from the UK and have a maplin store near you, you’ll be able to get some IR transmitter and receivers for 99p (They’re side facing LED/phototransistors, so you can have a low-profile sensor module), More on this at the end of the instructable.
1x Arduino
1x Bread board
1x Strip board
1x Wire reel, black
1x Wire reel, red
1x Wire reel, green
2x Infrared LED (Maplin/Sparkfun)
2x Phototransistor (Maplin/Sparkfun)
2x Red 5mm LED (Maplin/Sparkfun)
2x 1k Ohm resistor
2x 220 Ohm resistor
Wire cutters
Wire strippers
Helping Hands
Heat shrink tube (Not used)
Heat source (Not used)
Soldering iron
Solder
Step 1: Let’s Get Started
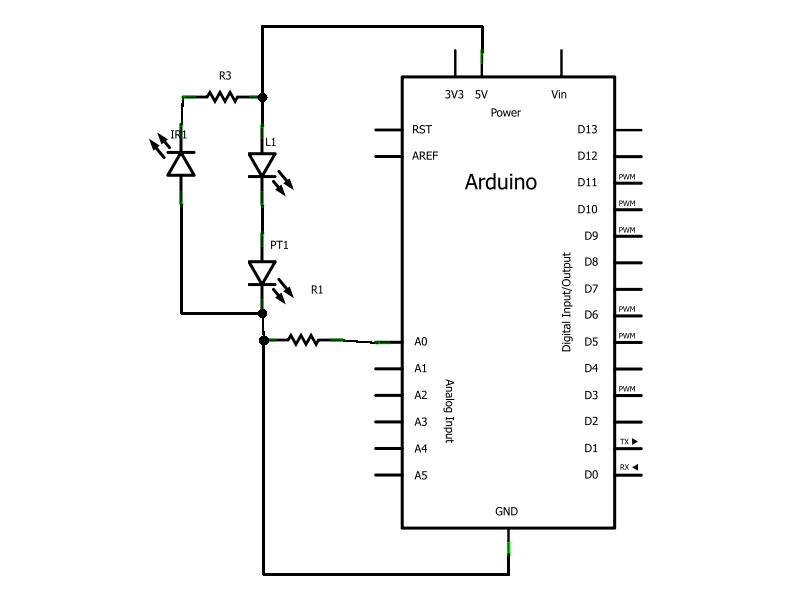
You want to take your bread board and your infra red LED’s and photo transistors and place them side by side (1 hole apart) in the bread board, repeat for the other infra red pair.
Now let’s start wiring up the infrared LED’s first, place a 220 Ohm resister in the same row as the IR LED cathode then wire it to ground, and make sure to wire both. Next you need to wire up both of the IR LED anodes to the power rail.
Step 2: Keep Going
Now we’re moving onto the photo transistors. Take the red LED’s and place the cathode in the photo transistors anode row, next we place a 1k Ohm resistor inside the photo transistors cathode.
Now we take a wire and connect the anode of the red LED to the power rail. We also need to ground the photo transistors do that now.
Now we just need to wire the photo transistors to the analogue inputs zero and one, to do this wire the cathode of the photo transistor before it goes to the 1k Ohm resistor, the left most wire should go to analogue zero and the one on the right should go to analogue one.
Step 3: It’s Alive, Alive!!!
Now if you wire in the power supply from the Arduino (+5v and Ground) if you wave your hand in front of the IR LED/phototransistor pairs, you should notice the red LED’s fading from dim to bright and back as you move your hand. If the LED’s are indeed facing back and forth congratulations you’ve completed the basic prototype, you can move onto the next step.
How ever, if you’re not getting any results from waving your hand back and forth you must check your wiring (Maybe your IR LED’s are either burned out or put it in backwards).
Step 4: The Code
If you want to test out the circuit, upload the following sketch to your Arduino.
/* Line Following Robot
Demonstrates the use of IR LED’s for a simple line
following robot, if it leaves the black line it will
attempt to locate it.
The circuit:
* Follow the instructable on how to construct it.
created 2011
by Dominion-Network
This example code is in the public domain.
*/
// Motor Outputs
// Left Motor
int M1B = 11; // Reverse
int M1F = 10; // Forward
// Right Motor
int M2B = 6; // Reverse
int M2F = 5; // Forward
// Motor Speed
int mSpeed = 115;
1x Bread board
1x Strip board
For more detail: DIY Infrared Sensor Module using Arduino
- How can I build a line following robot if infrared sensors are too expensive?
You can build one using two inexpensive IR transmitters and receivers, potentially costing 99p each at UK Maplin stores. - What are the two stages of this project?
Stage 1 is prototyping on a breadboard to debug design flaws, and Stage 2 is fabrication on a strip board for a plug-in product. - How do you wire the infrared LEDs in the prototype?
Place a 220 Ohm resistor with the IR LED cathode connected to ground, and wire both anodes to the power rail. - Which Arduino pins should be used for the photo transistors?
The photo transistors should be wired to analogue inputs zero and one. - Does waving a hand in front of the sensor pairs change the LED brightness?
Yes, the red LEDs should fade from dim to bright and back as you move your hand in front of the pairs. - What should you check if the sensor module produces no results?
You must check your wiring, ensure the IR LEDs are not burned out, or verify they were not inserted backwards. - Can you use side-facing LEDs for a low-profile sensor module?
Yes, side-facing LED/phototransistors allow for a low-profile sensor module design. - What is the purpose of the provided Arduino sketch?
The sketch demonstrates how the IR LEDs function for a simple line-following robot to locate a black line.