Summary of Did You Ever Want to Have a Video Doorphone?
Summary: This project repurposes an old Android phone as a video doorphone streaming to a browser on a new phone, PC, or tablet. An Arduino MKR1000 controls two relays that switch power to an Arduino Uno with a 2.8 TFT shield (showing a stored picture) and to the Android phone. The MKR1000 runs a WiFi webserver (modified WiFiWebServer example) to remotely toggle relays. The phone runs a security cam/babyphone app to provide video/audio. Code and TFT image handling examples are provided on the author’s GitHub.
Parts used in the Video Doorphone:
- Arduino MKR1000
- ICStation UNO (Arduino UNO R3)
- 2.8 TFT Shield for Arduino Uno (with SD card socket)
- Breadboard (generic)
- Relay module, 5V, 10A, opto isolated (2)
- Android cellphone (Samsung GT-S5830i used)
- Three 5V cellphone power supplies
- USB extension cable
- Connector fitting to 5V power supply plug from Windows 5 mobile phone
- Power plug for Arduino Uno
Recycle your old cellphone to build one and connect it by a browser to your new phone, PC or tablet!
Things used in this project
Hardware components |
||||||
 |
|
× | 1 | |||
 |
|
× | 1 | |||
|
× | 1 | ||||
 |
|
× | 1 | |||
|
× | 2 | ||||
Software apps and online services |
||||||
|
||||||
Story
About this Project
Introduction
At first, I wanted to use my actual Windows 10 Phone and Windows Virtual Shields to setup the video and audio connection to my Windows 10 PC. But this was to hard to realize for a beginner like me as I would have needed to write at least some apps for Windows 10 mobile and PC right from the scratch.
Thus, I decided to use my old Android cellphone and I have found all the apps I needed for my project in the Playstore, and there are more than one available of each kind. The only task to develop which was left to me was to invent the remote control for my device and the screen to display my own picture at the door. (I need this display because my old cellphone does not have a front camera and I have picked to use a security cam / babyphone app which does not provide a video stream back to the cellphone anyways.)
Video Doorphone in Action
Please, have a look how it works:
Materials used and where to get them
Arduino / Genuino MKR1000 (won as a contest prize)
Arduino UNO R3 Board
UNO R3 2.8 TFT Touch Screen with SD Card Socket for Arduino Board Module
Breadboard
Relay Module, 5V, 10A, Opto Isolated
Recycle ware: (use what you have or search for used staff in the internet)
Android cellphone from Samsung GT-S5830i
Three cellphone power supplies (5V)
USB extension cable
Connector fitting to 5V power supply plug from Windows 5 mobile phone
Power plug for Arduino Uno
Project instructions
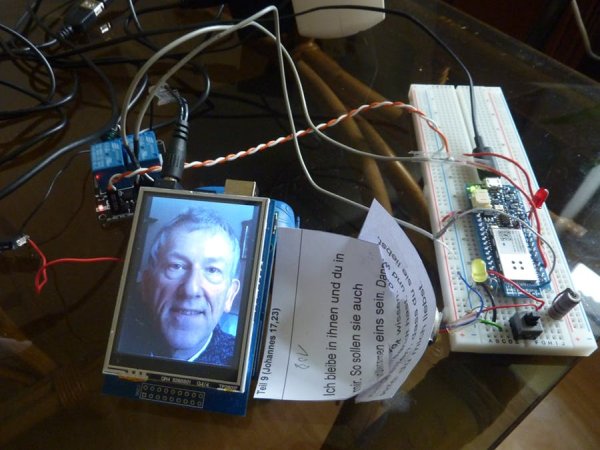
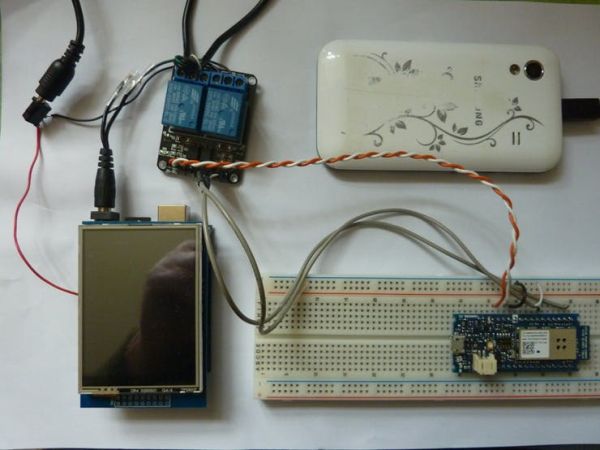
Setup the breadboard with the MKR1000 and put all the above mentioned parts together as shown in the pictures:
Overview:
The Uno R3 is flashed with the code necessary to display my picture stored on SD card sitting in the SD card reader which is a part of the screen shield plugged on top of the Uno. I have connected the power supply for the Uno to the right relay module as shown here:
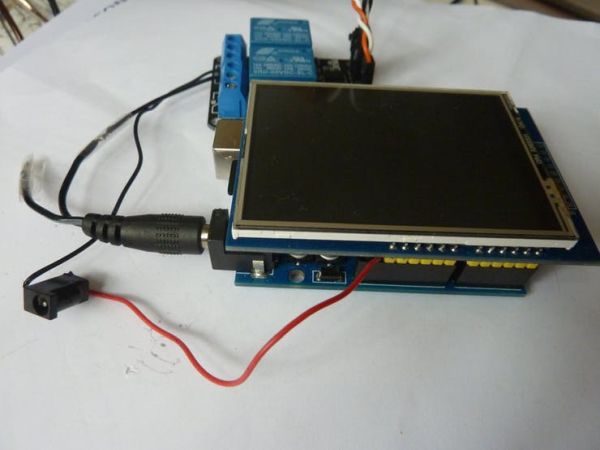
The kathode line to the Arduino Uno power plug is switched by the relay while the anode line is plugged into a 5V connector from the Arduino board. The other relay module will switch the power supply to the Android cellphone as follows:
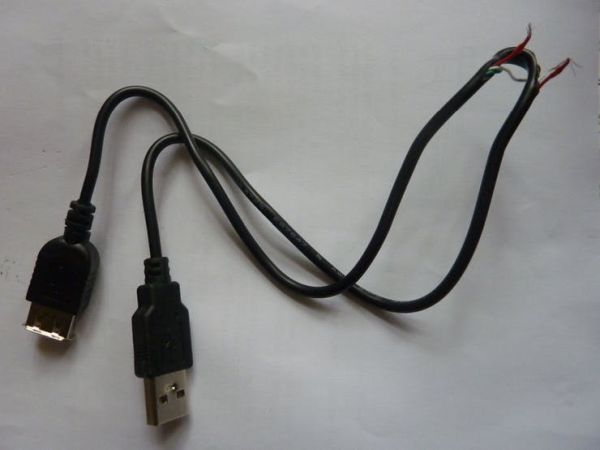
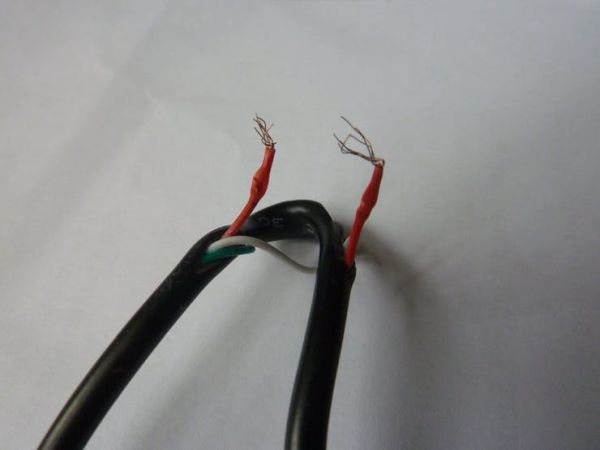
I have partly cut open this USB extension cable to switch the anode line by the relay (as the power to the cellphone is supplied by a generic USB cable).
Finally, the MKR1000 is flashed by a proper code to switch the relay modules and assembled as shown:
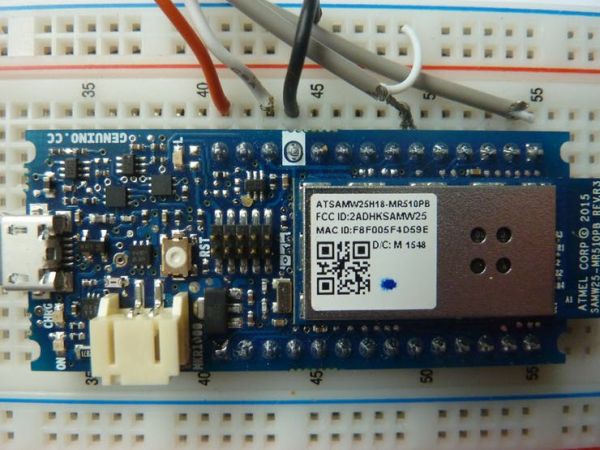
As you can see, I am using only 5 connectors from MKR1000: the top right one which is port 6, the one at number 49 which is port 11 and the three power connectors: 5V at number 41, 3.3V at number 43 (VCC) and the ground connector (at 44). These lines are connected to the relais modules as shown here:

From left to right: 5V, 3.3V at the left connector and ground, port 6 (IN1), port 11 (IN2) at the right connector.
If you are content to use Windows Remote Arduino you do not need to write any code at all for the MKR1000. Just flash the StandardFirmata example from the Arduino IDE to switch by USB or the StandardFirmataWiFi example to switch by network! Using StandardFirmata, every possible output from the MKR1000 may be used to switch something while using StandardFirmataWiFithe ports 5, 7, 8, 9 and 10 will not work. Therefore, I have chosen to use ports 6 and 11.
Much more comfortable and nicer to use is a webserver for switching. I have edited the IDE example WiFiWebServer from folder WiFi101. You may download the changed code here: https://github.com/kds678/Video-Doorphone/tree/master. At this address, I have also provided the code to display your picture on the UNO with TFT shield. Just save your own picture with 320 x 240 pixels and 24 bit to the SD card root as webcam.bmp and change line 85 in doorpic2.ino according to your needs (e.g. I setup my picture like I have done in the sketch to display it centered as it was 24 pixels smaller than the screen).
Conversation between the doorphone and your computer/cellphone/tablet
There are many possibilities to choose from. Just pick the securitycam or babyphone app from the Android Playstore which you like best. Usually, your cellphone will be serving the video and audio to your network and you may get these by a webbrowser/viewer running on the device you have chosen. If you are running a webserver for the remote control as well I recommend to use two different browsers. I have shown one solution in the video above.
Further improvements
A great idea would be to install a cellphone at the door which is capable to run Whatsapp or Skype. Using for example a Nokia Lumia 625 with Windows 10 would have the advantage that it automatically turns on when the power supply is connected. Thus it could be remotely switched on by the described remote control. It will also automatically shut down when the battery is almost drained. So, I would not need extra apps to perform these tasks like when I am using an Android doorphone.
It would also be worthwhile to implement notification to your actual cellphone which you are taking with you (e.g. by Blynk as shown by another contest participant) so you could perform a call to your doorphone and talk to the person who is just ringing your bell, even by a videocall.
To prevent stealing of the installed smartphone at the door one could use Azure IOT Hub to get a permanent record of safety cam pictures from the doorphone camera.
Schematics
Code
- Can I use an old Android cellphone for the video doorphone?
Yes, the project uses an old Android cellphone (Samsung GT-S5830i) running a security cam or babyphone app to serve video and audio. - What Arduino boards are used in the project?
The project uses an Arduino MKR1000 and an Arduino UNO R3 (ICStation UNO). - How is the phone powered and switched remotely?
The phone power is supplied via a USB cable whose anode line is cut and switched by a relay controlled by the MKR1000. - How is the display image shown at the door?
The UNO with a 2.8 TFT shield reads a webcam.bmp 320x240, 24-bit image from the SD card and displays it on the shield. - Do I need to write code for the MKR1000?
You can use StandardFirmata without writing code, or use a WiFi webserver sketch; the author modified WiFiWebServer and provided code on GitHub. - Which MKR1000 pins are used to control the relays?
The MKR1000 uses digital ports 6 and 11 plus power pins 5V, 3.3V (VCC), and GND to connect to the relay modules. - What app provides the video stream from the doorphone?
A security cam or babyphone app from the Android Playstore is used to serve the video and audio to the network. - Can the remote control be a webserver?
Yes, a webserver is more comfortable; the author edited the WiFiWebServer example for remote switching. - Where can I get the project code and TFT display sketch?
The author provided the modified code and TFT display sketch on their GitHub repository at https://github.com/kds678/Video-Doorphone/tree/master.