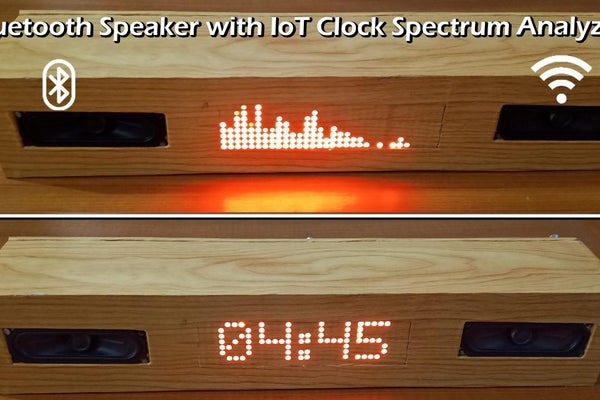
Summary of Bluetooth Speaker Wifi IoT Clock With Spectrum Analyzer
This project is a DIY Bluetooth speaker with an IoT clock, featuring real-time date, time, temperature, and humidity updates via the internet. It includes a 32-band audio spectrum analyzer that visualizes music patterns. The system uses an Arduino Nano for processing and display control, while an ESP-01 fetches weather data. Audio is handled by a Bluetooth module and a dual-channel amplifier driving 4-ohm speakers. Power is provided by rechargeable 18650 batteries housed in a custom plywood enclosure wrapped in wallpaper or paint.
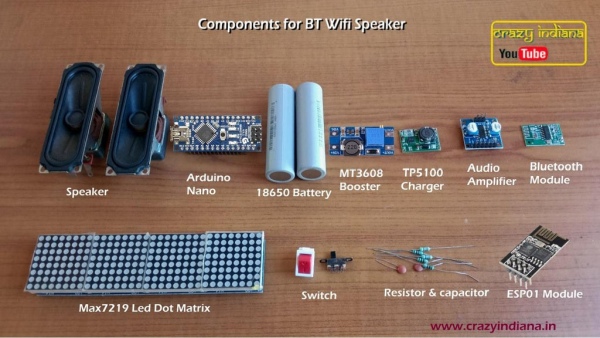
Parts used in the Bluetooth Speaker Wifi IoT Clock With Spectrum Analyzer:
- Arduino Nano
- ESP-01
- MT3608 Booster Module
- TP5100 Charger Module
- Bluetooth Audio Module
- Audio Amplifier (6/10 watts)
- Speakers 4ohm 3/5 watts
- Max 7219 Led Dot Matrix
- Resistors
- Capacitors 104, 10uf
- 2 * 18650 battery 2000mAh
- Switch SPDT 2 position
- On/off switch
- Tactile button
- Plywood of MDF board 10/12mm
- Fevicol adhesive
- Screws
- Wallpaper sticker
I made a Bluetooth Speaker with Clock . It display Date , Time, Temperature & Humidity & gets updated from Internet at 15 minutes interval.It also has a 32 band Audio Music Spectrum Analyzer which displays different music patterns. Clock or spectrum Analyzer can display while playing music. Clock can also display when Bluetooth is off.
This is made with Arduino Nano does all the processing & display function. And ESP01 gets time & weather report from Internet & sends the data to Arduino via serial communication.Bluetooth Module receives the audio & amplifier (5+5 watt) module sends it to (5+5 watt) speakers.A small circuit is made to analyze the audio with Arduino for Spectrum Analyzer. Power is supplied from 18650 Battery which can be recharged by any smartphone Charger.
Supplies
- Arduino Nano
- ESP-01
- MT3608 Booster Module
- TP5100 Charger Module
- Bluetooth Audio Module
- Audio Amplifier (6/10 watts)
- Speakers 4ohm 3/5 watts
- Max 7219 Led Dot Matrix.
- Resistors …
- Capacitors 104,10uf
- 2 * 18650 battery 2000mAh
- Switch SPDT 2 position ,On/off switch, Tactile button
Step 1: Making the Sound Bar
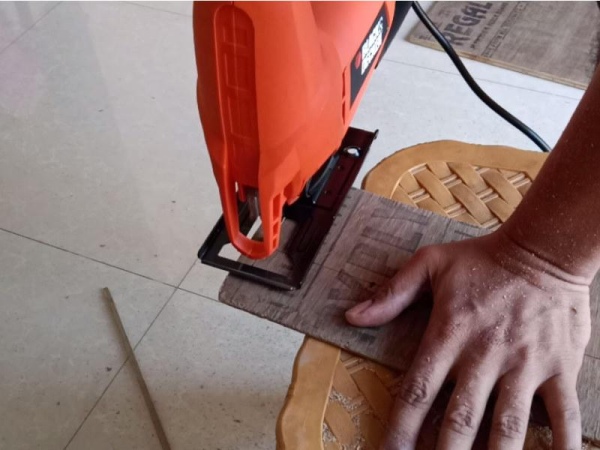
You can make the sound bar with Plywood of MDF board 10/12mm is enough.First take measurement of the speaker & led matrix 7219 cut it. Then use fevicol adhesive & screws to assemble them.i used 6mm for front/rear & 12mm plywood for front/back panel.
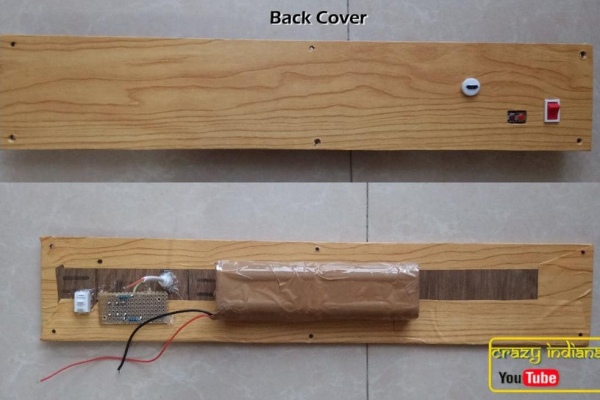
Step 2: Covering the Soundbar
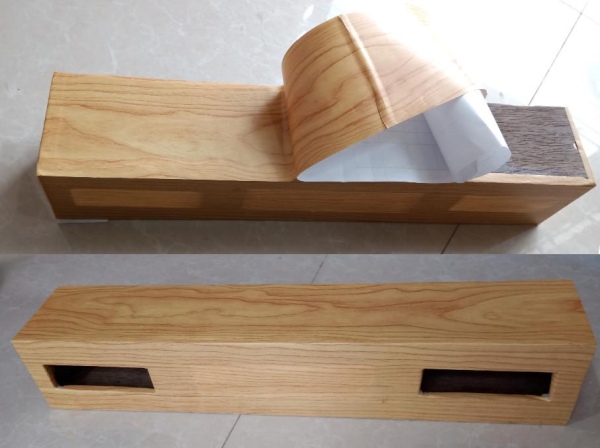
I used wallpaper sticker to wrap up the box. You need to do it slowly & patiently otherwise air bubbles will get inside. Or you can paint it with spray paint quite easy.
Step 3: Designing the PCB
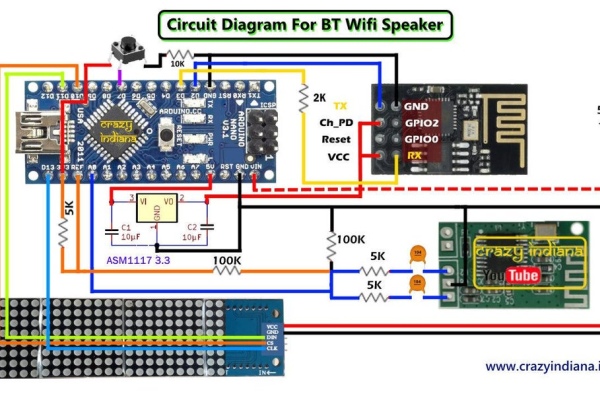
You need to solder the component in a PCB board & test it.Follow the circuit diagram & check the video for details.
Step 4: Making the Battery Pack
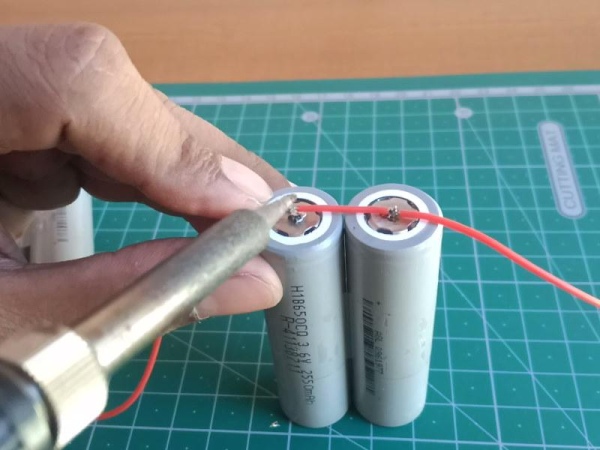
First solder the wire as per circuit diagram .Then wrap the end with tape to avoid short circuit. And finally cover the whole battery pack with another layer of Tape & check the voltage it should be around 4 volt. Though i used 4 batteries the voltage is same as all the batteries are connected in parallel.
Step 5: Programming the Arduino Nano & ESP-01
You need to program the Arduino nano & ESP-01 separately . You can download the code from below & upload to Arduino Nano. Next upload code to ESP-01 using FTDI or USB to UART/ESP8266 Adapter .Also to get weather report i.e temperature .. you need get a API Key from openweathermap.org it’s free..And finally test it before assembling. Check the video for complete details. You can use the tactile button to switch from clock to Audio Spectrum Analyzer..
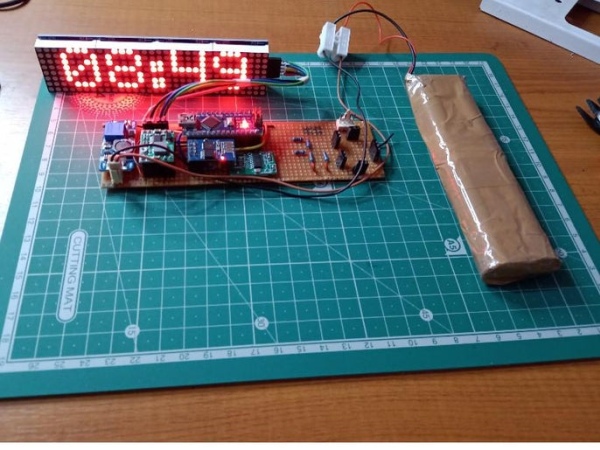
Step 6: Finally Assembling the Components
Now insert all the components inside the box and screw it . Turn on & enjoy the show…
Step 7: Video Demo
I have uploaded the Complete video check it out.
Source: Bluetooth Speaker Wifi IoT Clock With Spectrum Analyzer
- How does the clock get updated?
The clock gets updated from the Internet at 15-minute intervals using the ESP-01. - Can the spectrum analyzer work when Bluetooth is off?
No, the spectrum analyzer displays music patterns which requires audio input; however, the clock can display when Bluetooth is off. - What components process the display functions?
The Arduino Nano does all the processing and display functions. - How is the audio amplified?
An amplifier module sends audio to 5+5 watt speakers after receiving it from the Bluetooth module. - What power source is used for the device?
Power is supplied from 18650 Battery which can be recharged by any smartphone Charger. - How do you switch between the clock and spectrum analyzer?
You can use the tactile button to switch from clock to Audio Spectrum Analyzer. - What material is recommended for the sound bar casing?
You can make the sound bar with Plywood of MDF board where 10/12mm is enough. - How are the batteries connected in the pack?
All the batteries are connected in parallel to maintain the same voltage. - Where do you get the API key for weather reports?
You need to get a API Key from openweathermap.org which is free. - How is the ESP-01 programmed?
You upload code to ESP-01 using FTDI or USB to UART/ESP8266 Adapter.