Summary of Auduino Lo-fi Synth for Arduino
The Auduino is a lo-fi granular synthesizer built on an Arduino that uses five potentiometers for controlling grain pitches, decays, and repetition, and outputs audio via a speaker or jack from a digital pin. The project requires basic Arduino familiarity, wiring pots to analog inputs, and connecting audio out to digital pin 3. Sketch code by Peter Knight (Tinker.it) is provided for upload.
Parts used in the Auduino:
- Arduino (e.g., Arduino Uno R2)
- 5 x 5K potentiometer
- Breadboard
- 8 Ohm speaker or audio jack
- Various jumper wires
- 5 x knobs (optional)
Hello again. Today I’d like to show you the Auduino. That’s right, the Auduino is a Lo-fi Granular Synth that works on arduino. It uses some analog pins and a digital pin. I had loads of fun making and playing with it so I’d love to show you how to make it.
Sketch created by Peter Knight, Tinker.it http://tinker.it.
For more information please visit the website.

I hope you are already familiarized with the arduino environment, if not get an arduino and check for more information at arduino.cc
Step 1: Materials
For making this synth you will need:
- X5 5K Potentiometer
- A breadboard.
- An 8 Ohm speaker or a jack.
This you’ll probably have laying around and will be needed:
- Various jumpers
- X1 Arduino (I am using Arduino Uno R2)
Optional:
- X5 Knob (For the Pots)
Step 2: The pots
So the potentiometers go on the breadboard, I couldn’t find the best stop for them because their back part wouldn’t fit. But I managed to squeeze them in at the last row and I flexed the breadboard as shown in the picture.
Basically all there positive leads are connected to 5V and all there negatives are going to ground. And the pots middle lead goes to an analog pin on the arduino.
Pot 1 goes to analog 4.
Pot 2 goes to analog 3.
Pot 3 goes to analog 2.
Pot 4 goes to analog 1.
Pot 5 goes to analog 0.
The pictures show how to connect the jumpers very clear.
Step 3: The speaker
I used a speaker but you can use a jack and connect it to the same arduino pins.
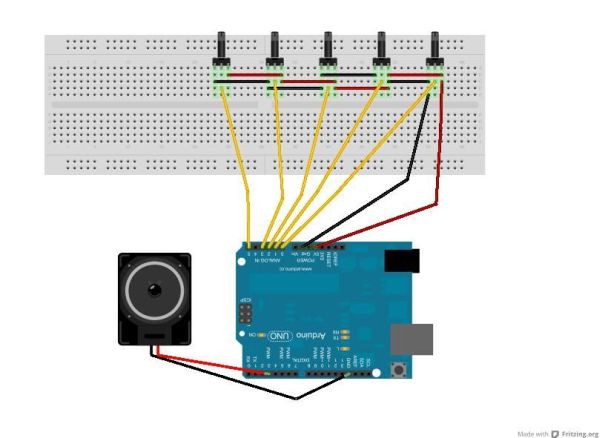
Speaker must go connect to digital 3 on the arduino. And negative to ground…
Step 4: The code
You can download the sketch here or you can just paste the code below on your arduino program and start to upload.
// Auduino, the Lo-Fi granular synthesiser
//
// by Peter Knight, Tinker.it http://tinker.it
//
// Help: http://code.google.com/p/tinkerit/wiki/Auduino
// More help: http://groups.google.com/group/auduino
//
// Analog in 0: Grain 1 pitch
// Analog in 1: Grain 2 decay
// Analog in 2: Grain 1 decay
// Analog in 3: Grain 2 pitch
// Analog in 4: Grain repetition frequency
//
// Digital 3: Audio out (Digital 11 on ATmega8)
//
// Changelog:
// 19 Nov 2008: Added support for ATmega8 boards
// 21 Mar 2009: Added support for ATmega328 boards
// 7 Apr 2009: Fixed interrupt vector for ATmega328 boards
// 8 Apr 2009: Added support for ATmega1280 boards (Arduino Mega)
Speaker
For more detail: Auduino Lo-fi Synth for Arduino
- What does the Auduino project do?
The Auduino is a lo-fi granular synthesizer running on an Arduino that generates audio using five potentiometers and a speaker or jack. - What parts are required to build the Auduino?
The article lists an Arduino, five 5K potentiometers, a breadboard, an 8 Ohm speaker or jack, jumper wires, and optional knobs. - Which Arduino analog pins are the potentiometers connected to?
Pots connect as follows: Pot 1 to analog 4, Pot 2 to analog 3, Pot 3 to analog 2, Pot 4 to analog 1, Pot 5 to analog 0. - How should the potentiometers be powered?
All potentiometers positive leads go to 5V and their negative leads go to ground; middle leads go to the specified analog pins. - Which pin is used for audio output?
Audio out is connected to digital pin 3 on the Arduino, with the speaker negative to ground. - Can I use a jack instead of a speaker?
Yes, the article states you can use a jack and connect it to the same Arduino pins as the speaker. - Where can I get the Auduino sketch?
The article provides the sketch code and references a download link and Tinker.it resources by Peter Knight. - Do I need Arduino experience to build this?
The article expects familiarity with the Arduino environment and recommends visiting arduino.cc if not familiar.