Summary of Arduino Interrupts and Debouncing
This article explains how to use hardware interrupts on an Arduino with a debounced button. It references prior content on debouncing and timer interrupts, providing links to downloadable programs, schematics, and a detailed parts list for the project setup.
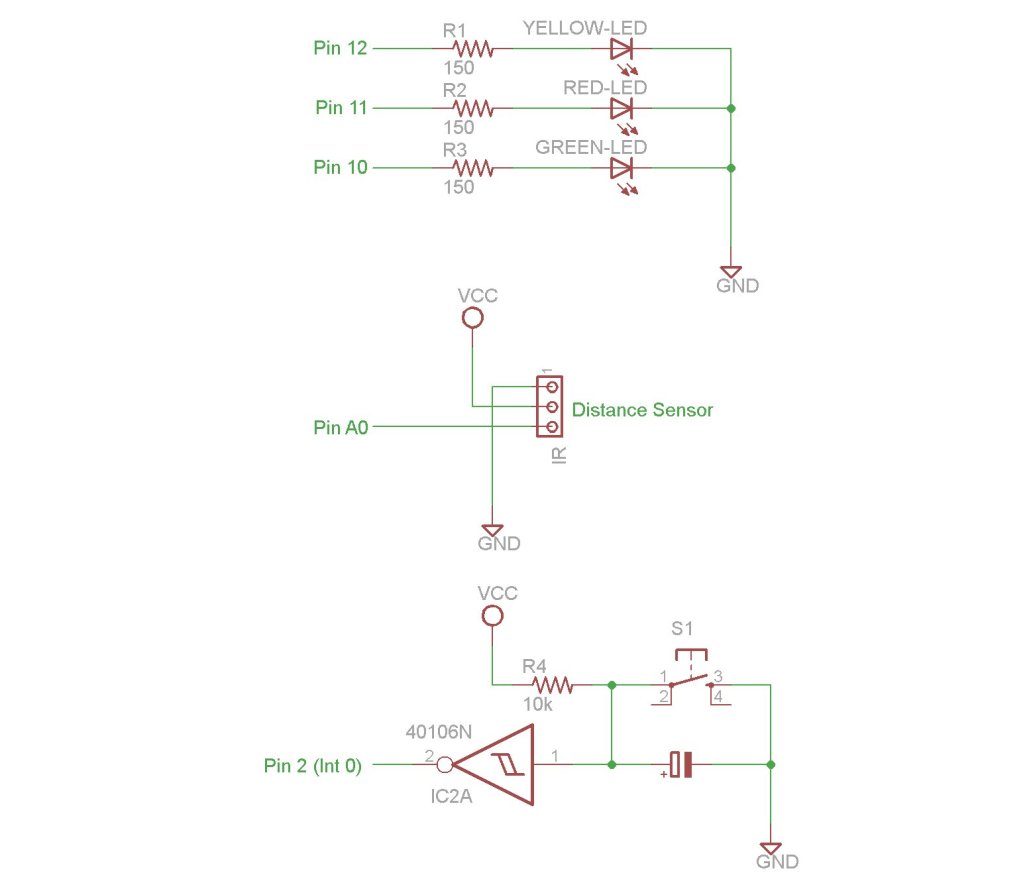
Parts used in the Arduino Interrupts and Debouncing Project:
- Arduino Uno
- USB Cable
- Arduino Software
- Breadboard
- LEDs
- 150 ohm Resistor
- Pushbutton
- Jumper Kit
- IR Distance Sensor
- Inverting Schmitt Trigger
- 10k ohm Resistor
- 10uF Capacitor
Interrupts are an extremely useful, yet often feared element of microprocessors. Interrupts allow you to run a program, while still being able to react to asynchronous input from the outside world.
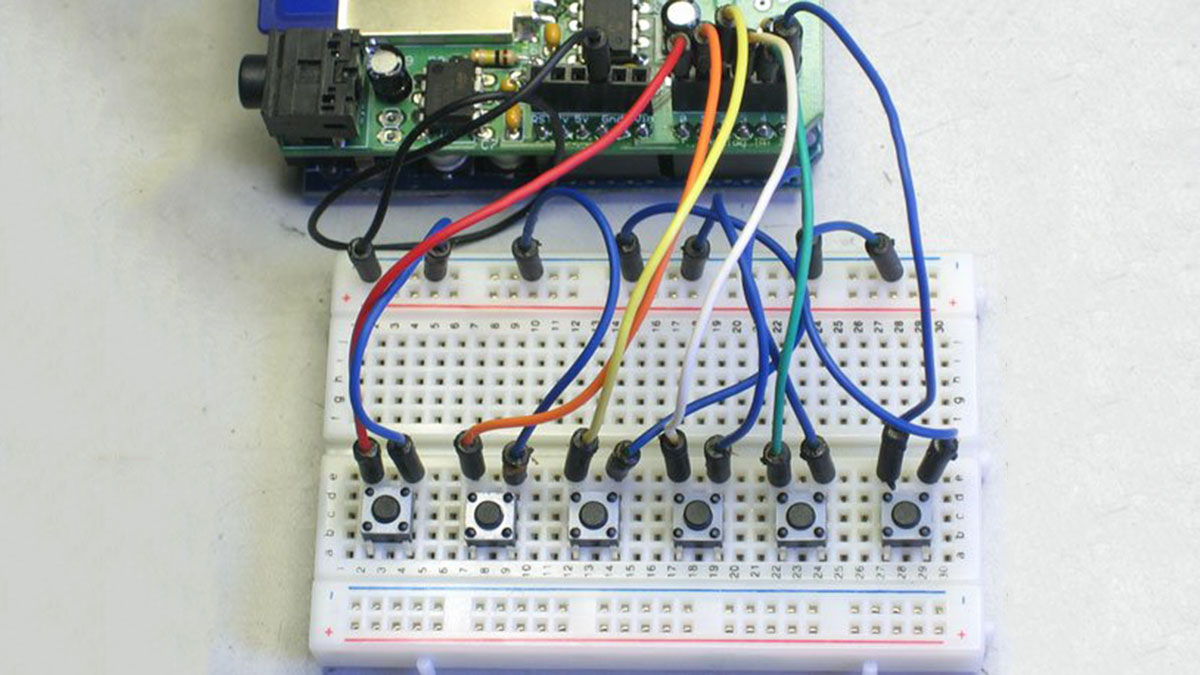
On many platforms they can be confusing to implement, but the arduino makes it easy! In this week’s episode, I’ll show you how to use a hardware-debounced button to activate a hardware interrupt on the arduino.
I’d suggest you go check out episode 2, where I initially introduced button debouncing, if you haven’t already. I won’t be covering timer interrupts in this episode, since I recently wrote an extensive blog post about using them. Enjoy the video!
EDIT: You can find a great run-down of debouncing techniques and problems here: http://www.ganssle.com/debouncing.htm (Thanks Jope)
You can download the files associated with this episode here:
1. Arduino Uno: http://us.element-14.com/arduino/a000046/arduino-uno -board/dp/13T9285
2. USB Cable: http://us.element- 14.com/jsp/search/productdetail.jsp?SKU=73H0884
3. Arduino Software: http://arduino.cc/en/Main/Software
4. Breadboard: http://us.element-14.com/jsp/search/productdetail.jsp?SKU=17C6965
5. LEDs: http://us.element-14.com/jsp/search/productdetail.jsp?SKU=30K0645
6. 150 ohm Resistor: http://us.element-14.com/multicomp/mcf -0 -25w -150r/resistor-carbon -film -150ohm-250mw/dp/38K0339
7. Pushbutton: http://us.element-14.com/c -k/ksl1m411 – lf t/switch -tactile -spst -no- 50ma-thd/dp/88K5321
8. Jumper Kit: http://us.element-14.com/3m/923351-i/pcb-accessories/dp/65F2290
9. IR Distance Sensor: http://us.element- 14.com/sharp/gp20a41sk0f/dp/14N9318
10. Inverting Schmitt Trigger: http://us.element- 14.com/stmicroelectronics/m74hc14b1r/ic – hex-inverter -schmitt-trigger/dp/89K0862
11. 10k ohm Resistor: http://us.element-14.com/multicomp/mccfr0w4j0103a50/resistor -carbon -film -10kohm-250mw/dp/58K5002
12. 10uF Capacitor: http://us.element-14.com/multicomp/mcgpr100v106m6 – 3×11/capacitor-alum- elect -10uf -100v/dp/70K9661
For more detail: Arduino Interrupts and Debouncing
- How can you react to asynchronous input from the outside world?
Interrupts allow you to run a program while still being able to react to asynchronous input from the outside world. - What makes implementing interrupts easy on the Arduino?
The Arduino platform makes it easy to implement interrupts, even though they can be confusing on many other platforms. - Can you find information about using timer interrupts in this article?
No, the author does not cover timer interrupts in this episode because they recently wrote an extensive blog post about them. - Where can you download the files associated with this episode?
You can download the Episode 10 Arduino Programs, Schematics, and Parts List from the provided links. - Does the article recommend checking out previous episodes for context?
Yes, the author suggests checking out episode 2 where button debouncing was initially introduced if you have not already done so. - What is the purpose of the external link provided by Jope?
The link provides a great run-down of debouncing techniques and problems. - How do interrupts help when running a program?
Interrupts allow a program to run continuously while remaining capable of reacting to external inputs. - What specific component activates the hardware interrupt in this project?
A hardware-debounced button is used to activate the hardware interrupt on the Arduino.