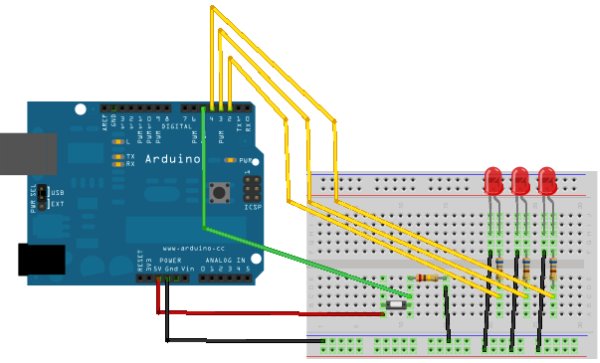
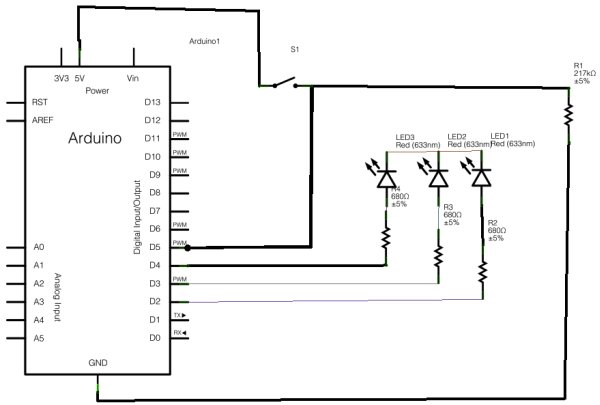
After buying a Nanode (an Arduino-compatible board with ethernet built-in) last weekend, we’ve been trying to work it out by making a couple of simple examples, the ‘Binary Dice’ is the first one with input and outputs.
A note, this code example is based on the one from the book Arduino: A Quick-Start Guide by Maik Schmidt.
You’ll need (other than the Nanode/Arduino board):
- 3 LEDs (ours were rated for 0.8mA-0.12mA at 6V)
- 3 Resistors to bring the 5V down to a reason current for the LEDs (we used 680Ω)
- 1 large resistor to flatten out the fluctuations in the ground rail (we used 17KΩ)
- A push-to-make button
Schematic and Breadboard
Arduino Sketch
You may need to change the constants at the beginning to match your board and where you plug things in.
const unsigned int LED_BIT0 = 4;
const unsigned int LED_BIT1 = 2;
const unsigned int LED_BIT2 = 3;
const unsigned int BUTTON_PIN = 5;
const unsigned int BAUD_RATE = 19200;

void setup() {
  pinMode(LED_BIT0, OUTPUT);
  pinMode(LED_BIT1, OUTPUT);
  pinMode(LED_BIT2, OUTPUT);
  pinMode(BUTTON_PIN, INPUT);
  Serial.begin(BAUD_RATE);
}

void loop() {
  const int CURRENT_BUTTON_STATE = digitalRead(BUTTON_PIN);

  int command = Serial.read();

  if (CURRENT_BUTTON_STATE == HIGH || command == '1') {
    reset_LEDs();
    delay(1000);
    randomSeed(analogRead(A0));
    long result = random(1, 7);
    output_result(result);
  }
}
void reset_LEDs() {
  digitalWrite(LED_BIT0, LOW);
  digitalWrite(LED_BIT1, LOW);
  digitalWrite(LED_BIT2, LOW);
}

void output_result(const long result) {
  digitalWrite(LED_BIT0, result & B001);
  digitalWrite(LED_BIT1, result & B010);
  digitalWrite(LED_BIT2, result & B100);
  Serial.print(result)
}
For more detail: Arduino Binary Die


