Summary of Ardubuino (an Arduboy Compatible Clone)
Ardubuino is a DIY, Arduboy-compatible handheld gaming console built from through-hole components on perfboard and a custom PCB. The creator prototyped multiple revisions, documented soldering steps, and provides videos and downloadable Gerber files to order PCBs. Core assembly involves soldering headers, tactile buttons, an SPI OLED, a buzzer, and a slide switch to an Arduino Pro Micro, then uploading games via the Arduino IDE.
Parts used in the Ardubuino:
- Arduino Pro Micro with male header (clone acceptable)
- 8 pcs 6x6x5 mm tactile buttons with caps (or any 6x6 tactile buttons)
- 0.96 inch 7-pin SPI OLED module (do not use I2C OLED)
- 5V small circle buzzer
- 3-pin slide switch
- Male header strips (for soldering to modules)
Arduboy is an open source credit card size gaming console that has an active community not only on its software where alot of people develop their own game for the platform but also on its hardware where there are also alot of people came up with their own custom arduboy hardware.
I personally cannot afford to buy the Arduboy console but fortunately I have the Components to build one. so I came up with two prototype on a perf board and then stepping it up with my Custom PCB that I got from here. This project also a stepping stone for me because this is my first time making a PCB.
Now I want to share the fun and excitement on making this project which only took few hours to build with some basic soldering skill because all the components are trough hole components.
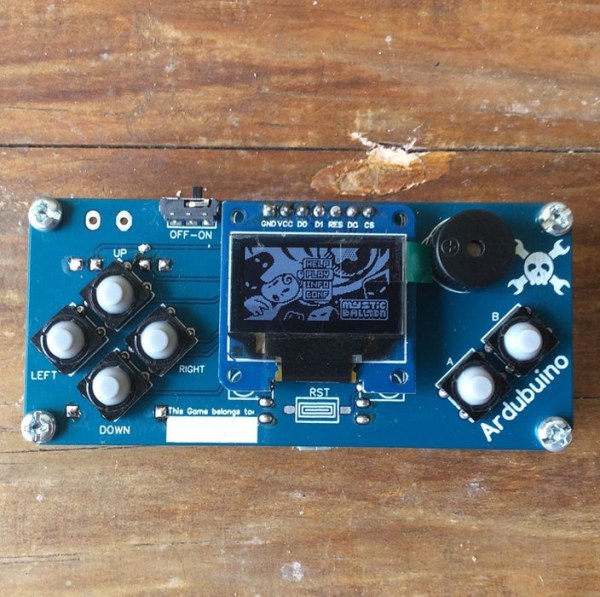
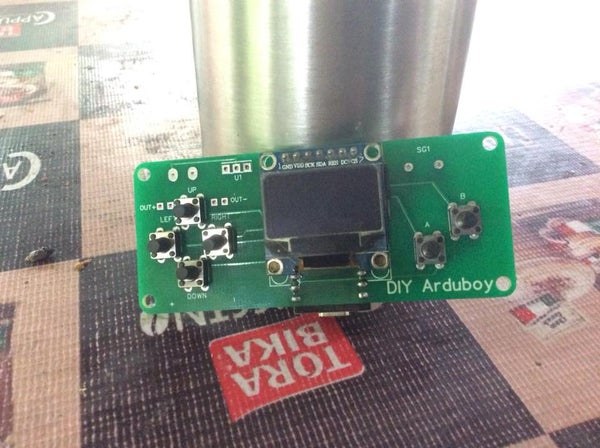
The Ardubuino itself has come along way since I was prototyping on a perf board until my 3rd n final revision of the ardubuino. above this text there are some picture of the evolution of my ardubuino console:
Step 1: Components and Tools
Components:
- Arduino Pro Micro with male header (Clone will also work)
- 8 pcs of 6x6x5 mm tactile Button with button Cap (actually any 6×6 tactile button will do, but this one I recommend for the model that I build)
- 0.96 Inch 7 Pin SPI Oled module (Do not use the I2C Oled, because it is incompatible with the arduboy platform)
- 5v small circle Buzzer
- 3 Pin slide switch
Tools:
- Soldering Iron with solder wire
- Snipper or wire cutter to cut the header of the components
- Third Hand (optional)
Step 2: Soldering the Header
This part is the easiest but it is the most tedious things to solder. But hang on for a while and you will get a great result. Make sure the oled module is not touching the PCB beside the headers
Step 3:
Soldering the buttons. make sure you have the right button size
Step 4: Finishing It Up
This is the last step to solder the few remaining components. I’ve already load the arduino pro micro with some game. Next step I’m gonna show how to upload another game
Step 5: Upload Game and PCB Files for You to Print Your Own
To upload a new game to the ardubuino is fairly easy if you are already familiar with arduino environment. It’s just as simple as uploading a new code to your arduino board. Above are the video explaining about it, Credits to Guru Edd for his awesome guide on this.
I also already made a timelapse video to recap the whole process on building the ardubuino
If you want to make your own ardubuino just grab my gerber files on this github or download from this page and while in zip format upload it to PCB service like JLCPCB or another pcb service that you like.
I was having a great time making this console and share this creation to my near friends. Hope you will have the same fun and excitement that we have.
Source: Ardubuino (an Arduboy Compatible Clone)
- Can I build the Ardubuino without soldering experience?
The project uses through-hole components and basic soldering skills; the creator says it took only a few hours with basic soldering ability. - What microcontroller is used in the Ardubuino?
The project uses an Arduino Pro Micro (clones will also work). - Which OLED display should I use for Ardubuino?
Use a 0.96 inch 7-pin SPI OLED module; do not use an I2C OLED because it is incompatible with Arduboy. - How many tactile buttons are required?
The build uses eight 6x6x5 mm tactile buttons with caps (any 6x6 tactile buttons will do). - Can I upload games to the Ardubuino easily?
Yes; uploading games is done through the Arduino environment just like uploading code to an Arduino board. - Are PCB files available to order a custom board?
Yes; Gerber files are available on the project GitHub and can be uploaded to PCB services like JLCPCB. - What tools are needed to assemble the Ardubuino?
Required tools include a soldering iron with solder wire and snippers or wire cutters; a third hand is optional. - Is the buzzer specification mentioned?
The project uses a 5V small circle buzzer.