Summary of Animatronic Eyes and Wii Nunchuck Part 2 using Arduino
This article details the second part of an animatronic face project, focusing on integrating voice and moving eyebrows. It outlines the assembly process using 3D-printed bases, 9-gram servos, and various connectors like Dubro EZ links and threaded rods. The guide explains how to program Arduino with a potentiometer for precise servo calibration, test Neopixel eyes, and implement sound-reactive jaw movement using either a custom circuit or a Sparkfun sensor module alongside a VS1053 sound module.
Parts used in Animatronic Eyes and Wii Nunchuck Part 2:
- Tower Pro MG 90 S 9 gram Servo
- Dubro EZ connectors
- Threaded rods
- Ball links (heavy duty)
- Arduino Uno
- Versatile Sound Interface (VS1053) sound module
- Pololu 8 servo controller
- Pop-rivet gun and pop-rivets
- File folders
- Aluminum flashing
- ICs and components for sound detection
- Flat brass or rigid plastic
- Foam core
- Dremel tool
- Steel ruler and ballpoint pen
- Neopixel LEDs
- Potentiometer
- Sparkfun sound sensor module
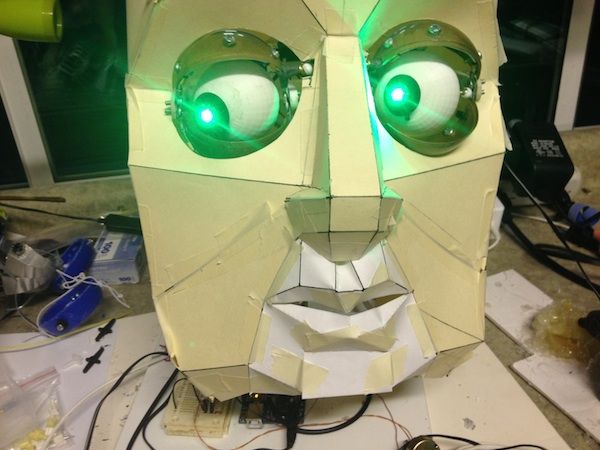
After I built the animatronic eyes in PART 1, I wanted to complete the face with a voice and possibly moving eyebrows. If you look back at my PART 1, you’ll see that for the base I used a model from Thingiverse. Once you have the model 3D printed, you will need to add in the 9 gram servos.
A quick check of Ebay gives you Tower Pro MG 90 S MG90s Full Metal Gear 9 gram Servo. They are very inexpensive at about $5.00 each.
Once you get your servos, you’ll also need hardware between the servo and the eye and eyelids. You will need Dubro EZ connectors ($9/dozen), threaded rods ( $3/six), and ball links ( $18/dozen for the heavy duty ones). If you live in a larger city ( larger than mine) it would be best to go to a hobby store and purchase the parts so you can see the size and how the connections work. Otherwise, there are many online stores with remote control parts.
After you get it all connected, it’s time to figure out how to adjust the servos. If you send a command to move the servo too far, you will burn the motor out (I destroyed two). Then I wrote an Arduino program that allows you to use a potentiometer to move the servo back and forth. Looking at the computer serial monitor you can read the values as you adjust the servo motion back and forth.
To make that work, use the code attached. Make sure that your Pololu servo controller is connected to your Arduino. The code has some links to let you know how to connect the potentiometer. Record the settings for each servo and use them in the later code to control the eyes.
You will also want to test out your Neopixel eyes if you decide to use them. The Adafruit site has a great tutorial on wiring up the Neopixels and some code to test them. You’ll want to set the number of Neopixel units to 2, otherwise the second eye won’t light up.
WOW – That’s a lot, but now you’re set up to make this robot head even more complex!
ou will notice that the eyes go through the Adafruit “rainbow” sequence between sound files.
 Servo_Pot_Polulu_tester.ino
Step 1: Materials:
Well, there are lots of materials…I will only list a few here:
- *I used and Arduino Uno for the brain
- *You will need a VS1053 sound module or some other sound module compatible with the Arduino
- *Also a servo controller. There are a bunch out there to choose from. I am using a Pololu 8 servo controller.
- *a pop-rivet gun and pop-rivets or alternately 1/2″ bolts and nuts to hold the head together
- *file folders for the prototype
- *aluminum flashing for the skin
- *a couple of ICs and some components if you choose to build a sound detector yourself instead of using the Sparkfun one.
- *a moderately heavy set of scissors
- *some flat brass or other metal, or possibly rigid plastic for the jaw
- *some foam core for the electronics platform
- *a dremel tool for various drilling
- *a steel ruller and ballpoint pen and fine sharpie
Step 2: How to make a jaw react to sound.
How to make the jaw of an animatronic robot coordinate with a recorded voice?
I found this fun Instructable that seemed to hold the solution:
http://www.instructables.com/id/Animatronic-Talkin…
Randolfo figured out a circuit that takes the audio input and sends an analog output to the Arduino. That way you can look at the level of sound and have the mouth open more with a louder sound, and less with a softer sound, and close with no sound.

However, if you don’t want to build your own sound sensor, I found this possible replacement from Sparkfun. If you look down the comments, you’ll find someone who wants to de-solder the mic and hook it to an audio output. Apparently, if you do that and remove one resistor, you can use all of its sensor data. That means an analog readout as well as a gate. You could use the gate for two positions: open or closed. Or you could use the analog readout to set the servo position: louder=mouth more open.
http://www.thingiverse.com/thing:32189 by Kongorilla.
For more detail: Animatronic Eyes and Wii Nunchuck Part 2 using Arduino
- What type of servos are recommended for this project?
The article recommends Tower Pro MG 90 S Full Metal Gear 9 gram Servos. - How can you prevent burning out the servo motor?
You must use an Arduino program with a potentiometer to adjust motion limits and avoid sending commands that move the servo too far. - Can you use online stores for purchasing connection parts?
Yes, many online stores sell remote control parts like Dubro EZ connectors and ball links if you cannot visit a local hobby store. - How do you set up Neopixel eyes for two units?
You must set the number of Neopixel units to 2 in the code so that both eyes light up correctly. - What is the best way to make the jaw react to sound?
You can use a circuit that sends audio input as an analog output to the Arduino to open the mouth wider with louder sounds. - Does the Sparkfun sound sensor provide an analog readout?
Yes, by removing one resistor from the sensor, you can utilize its analog readout to set servo positions based on volume. - What material is suggested for the robot head skin?
The article suggests using aluminum flashing for the skin of the robot head. - Which sound module is compatible with the Arduino for this build?
A VS1053 sound module or another sound module compatible with the Arduino is required.