Summary of Alexa, Put the Kettle On!
This project turns a Tefal temperature-control kettle into an Alexa-controlled smart kettle using an Arduino MKR1000, a bi-directional logic level converter, MQTT via shiftr.io, an Alexa Smart Home Skill, and an AWS Lambda function. It simulates button presses, reads kettle state via LED/HEAT signals, and communicates through shiftr to Alexa. Detailed setup covers creating LWA credentials, Alexa skill, Lambda deployment, Arduino sketch configuration, wiring, and testing.
Parts used in the Smart Kettle:
- Arduino MKR1000
- SparkFun Logic Level Converter - Bi-Directional
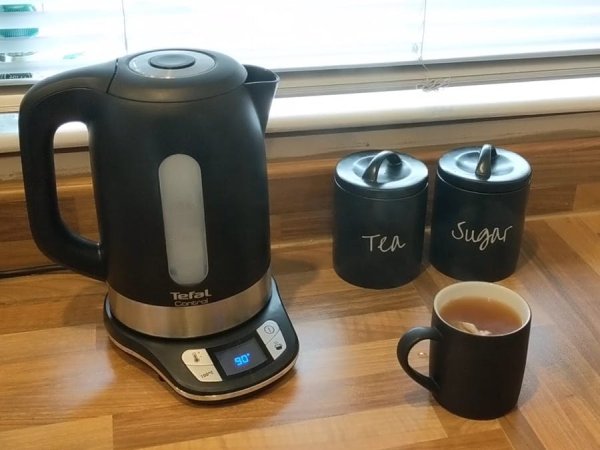
- Tefal Temperature Control Kettle
- USB cable for MKR1000
- Soldering tools and wires
- Computer with Arduino IDE
Make a smart kettle for under £60 using Alexa and Arduino.
Things used in this project
Hardware components |
||||||
 |
|
× | 1 | |||
 |
|
× | 1 | |||
|
× | 1 | ||||
Software apps and online services |
||||||
 |
|
|||||
 |
|
|||||
 |
|
|||||
|
||||||
Story
Introduction
Why make two trips to the kitchen, or hang around waiting for the kettle to boil when you can just ask Alexa to put the kettle on?
This project uses as few components as possible and is really easy to follow but it does involve tinkering with mains powered devices and water. So be careful and always make sure the kettle is unplugged when working on it! You will need to know how to solder to complete this hack.
Try it for yourself
I’ve published a demo version of the Skill HERE. If you add this to your Alexa account then visit the Shiftr Namespace HERE you will be able to say “Alexa, put the kettle on” and see a blip move around the node map to the device brewTime-TEST. You can also see the state of the request in the top left corner. The device brewTime-01 is the kettle in my house, you can’t control this but you can see it’s state.
Prerequisites
- An Amazon developer account, create one here if needed
- An Alexa-enabled device associated with the above account
- This can also be a virtual device like echosim.io or reverb.ai
- An AWS account, create one here if needed
How the services communicate
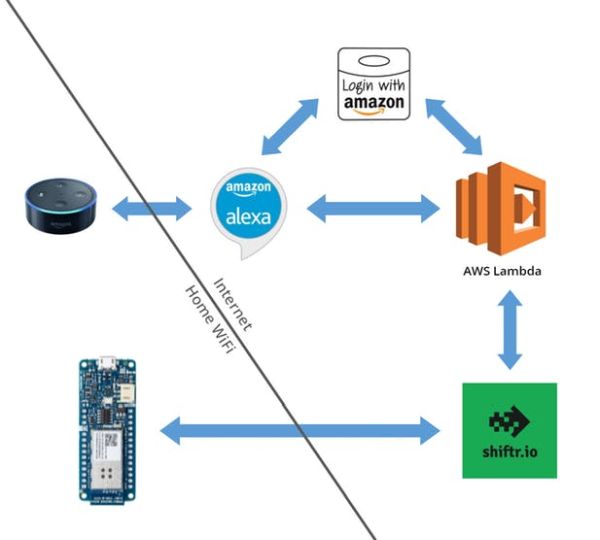
The software
Let’s get your MKR1000 talking to Alexa before we start hacking the kettle. This involves creating an Alexa Smarthome Skill, an AWS Lambda function to handle the requests from Alexa and using Shiftr.io to communicate with the MKR1000.
Setup a Namespace on shiftr
This service allows your MRK1000 to talk to AWS via a simple protocol called MQTT.
- Log in to your dashboard on shiftr.io
- Click New Namespace, give it a name and click Create
- Click on the Namespace Setting Page link and click Add Token
- Leave everything as default and click Create Token

Make a note of your key and secret, you’ll need these later.
Setup LWA
First, you need to create an LWA security profile. Here’s how:
- Go to the Amazon Developer Console and sign in as needed
- Click on Developer Console in the top right corner if you are not redirected
- Click on Apps & Services, in the menu then click Login with Amazon in the submenu. (link)
- Click on Create a New Security Profile
- Fill in all three fields to create your security profile and click Save. The name and description are up to you and the privacy URL can just be http://example.com/privacy
- On the cog icon, click on Security Profile

Make a note of Client ID and Client Secret, we will need these later.
*** Leave this tab open, we will need to come back here later!
Create the skill
This is super easy! The steps here will provide you with the bare minimum required for a working Smart Home skill.
- Go to the Amazon Developer Console and sign in as needed
- Click on Developer Console in the top right corner if you are not redirected
- Go to Alexa > Alexa Skills Kit (Get Started) > Add a New Skill (link)
- In the Skill Information tab:
- Skill Type = Smart Home Skill API
- Language = Choose your region e.g. US or UK – this is important and has to match your Alexa device and Lambda function region.
- Name = Test Smart Home Skill (or whatever you want)
- Payload Version = v3
- Click Save
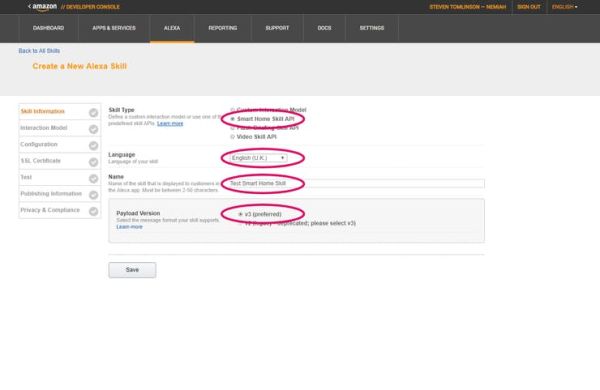
This creates the skill. Note the skill ID near the top, underneath your skill name.

Create a Lambda function
This couldn’t be easier! I’ve included a zip file with everything you need to upload to AWS. Now let’s setup the Lambda function:
- Go to the AWS Console and sign in
- Go to Services > Compute > Lambda
- In the top right corner of the page next to Support will be a geographical region. e.g. “Ireland” or “N. Virginia”. Click this dropdown and choose Ireland for an Alexa Skill in the UK, or N. Virginia for US. I’m not sure what other regons are needed for Alexa in other countries.
- Click on Create Function
- Step 1: Click on “Author from scratch” and enter the following into the fields…
- Name = SampleLambdaFunction (or whatever you want)
- Runtime = Node.js 6.10
- Role = Create a Custom Role which will launch a new tab. Click Allow. This will create a new role named lambda_basic_execution and automatically insert this role into the Lambda basic information dialog.
- If after you click Allow the Role changes to Choose an existing role, then select the Existing role named lambda_basic_execution from the box below.
- Click Create Function

- Step 2: In the Add Triggers List, click Alexa Smart Home, then scroll down to the box titled Configure Triggers. If you can’t find the Alexa Smart Home trigger it’s becasue your Lamda function is in the wrong region. Try creating a new function in a differnt region.
- Application Id = skill ID of your test skill that you noted above
- Enable trigger = checked
- Click Add

- Step 3: Click on the name of your function in the layout box at the top of your page e.g. SampleLambdaFunction, it has an orange icon.
- Scroll down to Function Code and enter the following information…
- Code entry type = Upload a .ZIP file
- Click on Upload and choose the upload.zip from the repo HERE
- Handler = index.handler
- Under the Environmental Variables section, enter the following keys/values:
- key=MQTT_KEY value=Your shiftr key from earlier
- key=MQTT_SECRET value=Your shiftr secret from earlier
- key=DEVICE_ID value=brewTime-01 (the device ID can be changed as long as you change the device ID in the Arduino sketch as well)
- Click Save at the top of the page.

In the top right corner, note the Lambda ARN.
Configure the Skill
Now that you have all the components, let’s put everything together.
- Go back to the Amazon Developer Console and sign in as needed
- Click on Developer Console in the top right corner if you are not redirected.
- Go to Alexa > Alexa Skills Kit. (link) Then click the test skill you created earlier
- In the Configuration section:
- Endpoint > Default = enter your Lambda ARN noted from the previous step
- Authorization URL = https://www.amazon.com/ap/oa
- Client ID = your client ID from LWA noted in a previous step
- Scope = profile (click Add Scope first) *this is case sensitive*
- Access Token URI: https://api.amazon.com/auth/o2/token
- Client Secret: your client secret from LWA noted in a previous step
- Client Authentication Scheme: HTTP Basic (Recommended)
- Click Save
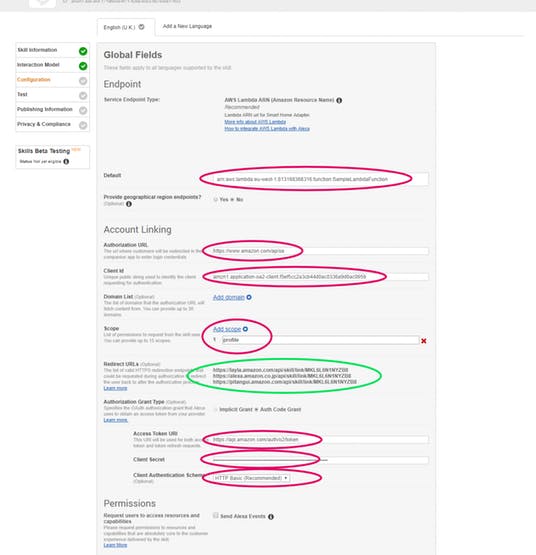
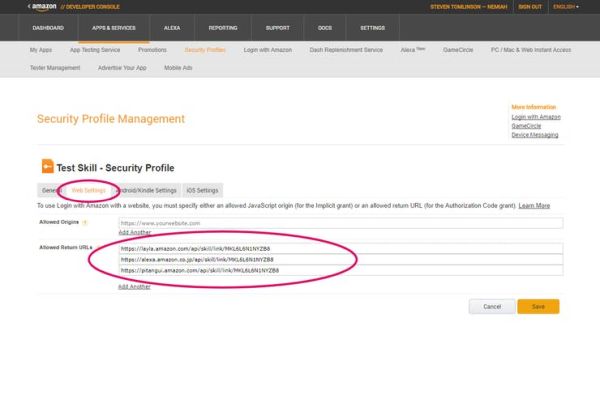
Provide Redirect URL’s to LWA:
- The Configuration page for your Skill lists several Redirect URLs (shown in green above). Open the LWA security profile you created earlier (the tab that you left open) and click on the Web Settings tab. Click Edit and provide each of the Redirect URL values from your Skill in the Allowed Return URLs field. Click Save.
Upload the sketch to your MKR1000
- Download the Arduino IDE from https://www.arduino.cc/en/Main/Software
- Don’t connect your MRK1000 just yet
- Launch the IDE and open the MKR1000 sketch from the repo. HERE
- Click on the tab called arduino_secrets.h
- Enter the SSID and password for your WiFi into SECRET_SSID and SECRET_PASS
- Enter the shiftr key and secret you wrote down earlier into MQTT_KEYand MQTT_SECRET
- If you chose a different device ID when creating the Lambda function, then change MQTT_DEVICE_ID here to match.
- Click on the Tools menu, where it says Board: xxxxxxxxxxx and click Board Manager…
- In the text box enter MKR
- Click the entry called Arduino SAMD boards… and click Install. Once the install is complete click Close
- Click on the Tools menu, where it says Board: xxxxxxxxxxx and click Arduino/Genuino MKR1000
- Click on Sketch > Include Library > Manage Libraries… on the menu
- Search for WiFi101, click on WiFi101 by Arduino, click Install
- Search for MQTT, click on MQTT by Joel Gaehwiler, click Install, click Close
- Connect your MKR1000 with a USB cable.
- On the Tools menu again, where it says Port: xxxxx select the correct port, e.g. COM10 (Arduino/Genuino MKR1000) This may already be selected.
- On the menu click Tools > Serial Monitor to open the serial monitor window.
- Then click Sketch > Upload, once the upload has completed you should see the following appear in the serial monitor window…
Checking wifi...done
Connecting to MQTT broker...done
Status: OFF Power: OFF Heat: OFF
Test it!
Now comes the fun part:
- Open https://shiftr.io/ in your browser and login to your dashboard.
- You should see a variable appear in the list on the left called BrewTime/Actual and a blip moving around the nodes every 10 seconds.
- In a new tab open https://alexa.amazon.com
- Login with same Amazon developer account
- Make sure you have an Alexa device associated with the account. If not, in another tab visit https://echosim.io/ and setup a virtual Alexa on your Amazon account.
- Once you have an Alexa device setup Go to Skills > Your Skills (in the top right corner) then click on Dev Skills.
- Click on the skill and then click Enable
- Log in with the same Amazon credentials when presented with a LWA login page
- Allow LWA access, and you should see a message that says you can close this window. Close that window and you should be presented with a popup asking to discovery devices. Click Discover Devices.
- Go to Smart Home > Devices and you should see Brew Time Kettle
- Now with your Alexa device, try “Alexa, put the kettle on”, Alexa should respond “OK” and the LED should light up on the MKR1000.
- If this doesn’t happen check the CloudWatch logs for your Lambda function for error messages. https://aws.amazon.com/cloudwatch/
- If you get stuck, there are some notes on testing and debugging in the repo. https://github.com/TmpR/brew-time
The Hardware
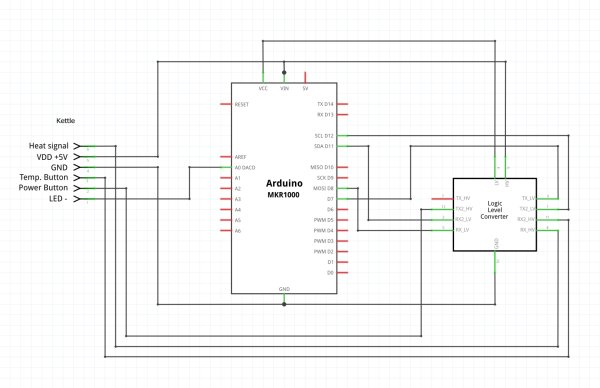
This video shows you how to wire up your MKR1000 and Logic Level Converter to the kettle. You can also refer to the wiring diagram, PCB image and schematic below for more info.
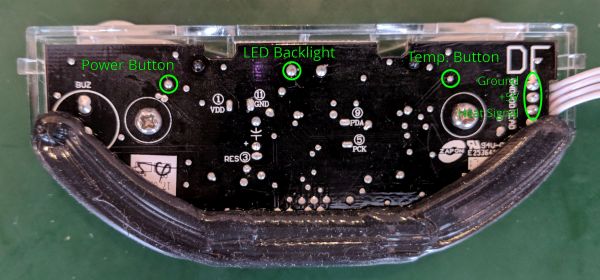
I chose this kettle because it had low voltage pushbuttons and a digital display. This makes it much easier to interface with the Arduino than a conventional kettle with a 240v switch, although the routine for turning it on and off is a little complicated. It also has all the electronics in the base, which gives us more room to add things and it’s completely separate from the 3kW heating element and water!
The process for boiling the water requires pressing the power button (unless the kettle is already powered on). Then pressing the temperature button, once only, pressing it again within 5 seconds will change the temperature. To stop the kettle we can just press the power button once, but we need to make sure it is actually on already. To get the Arduino to simulate pressing these buttons, we simply connect one side of the button to GND for 150ms.
We can read the state of the kettle by monitoring the LED backlight voltage, this will tell us if it’s powered on, and checking for +5v on the HEAT control wire to see if the kettle is actually boiling the water.
As the MKR1000 I/O pins operate at 3.3V we need to use a logic level convertor to step the voltage up and down to interface with the 5V kettle. The voltage between the LED backlight negative pin and GND is between 2 and 3 volts, so this can be connected directly to the MKR1000’s analogue in pin.
Further Reading
Some of the steps above were taken from Amazon’s guide to building a Smart Home Skill, it’s a useful resource. https://github.com/alexa/alexa-smarthome/wiki/Build-a-Working-Smart-Home-Skill-in-15-Minutes
Why use shifter as the MQTT broker and not Arduino Cloud or AWS IoT? At the time of writing Arduino Cloud is still in alpha and is fairly unreliable. This would be the obvious choice once they have worked out all the bugs. AWS IoT also integrates very nicely with Lambda, however it only supports certificate-based authentication and this can’t be done easily with the MKR1000 at the moment.
Schematics
Kettle PCB

Schematic
Code
Source : Alexa, Put the Kettle On!
- What components are required to build the smart kettle?
The article lists an Arduino MKR1000, a SparkFun bi-directional logic level converter, a Tefal temperature control kettle, USB cable, soldering tools/wires, and a computer with the Arduino IDE. - Can Alexa control the kettle directly?
No; Alexa communicates via a Smart Home Skill and an AWS Lambda function which publish messages to shiftr.io, and the MKR1000 subscribes to shiftr.io to control the kettle. - How does the MKR1000 simulate pressing the kettle buttons?
By connecting one side of the kettle button to GND for 150 ms to simulate a press. - How does the system detect whether the kettle is on or heating?
It reads the LED backlight voltage to know if powered on and checks for +5V on the HEAT control wire to detect boiling. - Why is a logic level converter needed?
Because the MKR1000 I/O runs at 3.3V while the kettle uses 5V signals, so the converter steps voltages up and down for safe interfacing. - What online services are required?
The project requires Amazon Developer (Alexa Skills Kit and LWA), AWS (Lambda), and shiftr.io for MQTT broker services. - What must be added to the Arduino sketch before uploading?
Enter WiFi SSID and password, shiftr key and secret, and ensure MQTT_DEVICE_ID matches the Lambda environment variable. - How do you test the setup after uploading the sketch?
Enable the skill in your Amazon developer account, login via LWA, discover devices, then say Alexa, put the kettle on and observe the MKR1000 LED and shiftr variables.