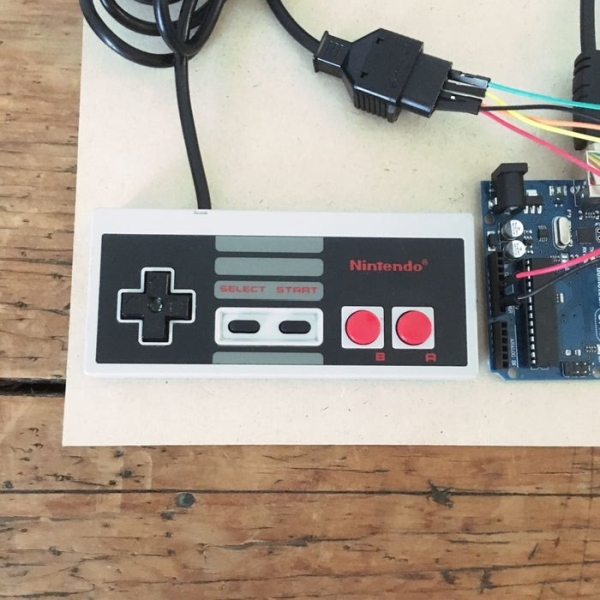
Turn your NES controller’s START BUTTON into an ON/OFF switch for lights with this Instructable – Other versions I have seen either gut or modify the electronics but in this project the electronics are intact so the controller can be used for retro gaming after the lights go out…
I used an LED for the light in this Instructable because I am a hobbyist. However with the right qualifications, experience, insurance policies, and Arduino-compatible relay I reckon you could install this light switch addition into any Nintendo-themed bedroom or work space.
For something that looks so simple (see video above) there is actually quite a bit involved…
Step 1: Equipment
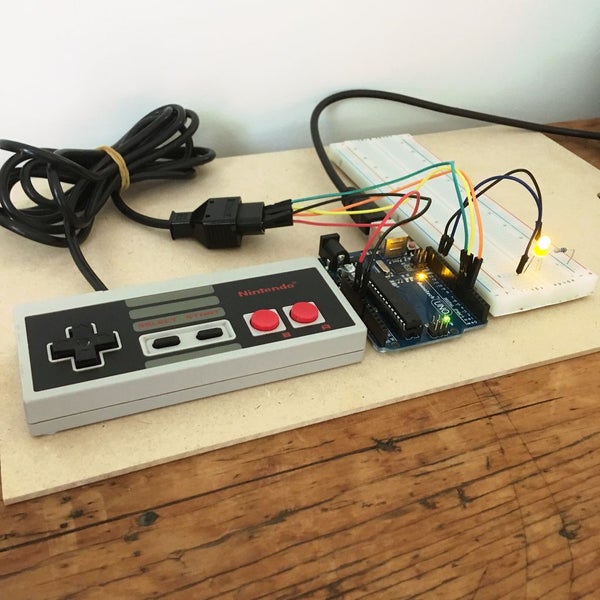
- 1 x original NES controller – I picked one up from a local secondhand shop
- 1 x Arduino UNO – I used a DuinoTECH classic (UNO)
- 5 – 7 x Male – male jumper wires – I recommend using various colours to make trouble shooting easier ( I always use black for GND and red for +5V and then rotate through the colours of the rainbow)
- 1 x LED (optional)
- 1 x 330 Ohm resistor (optional)
- 1 x breadboard (optional)
- USB cable
- Computer with Arduino IDE installed
Step 2: Connections
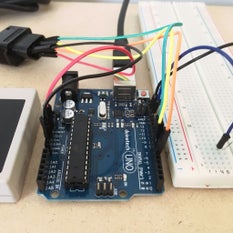
- Black wire from GND on Arduino to Pin 1 NES controller plug
- Red wire from +5V to Pin 7
- Orange wire from D5 to Pin 2
- Yellow wire from D6 to Pin 3
- Green wire from D7 to Pin 4
- Blue wire from D13 to LED anode
- 330 Ohm resistor from LED cathode to GND (use another black wire) – I think most Arduino UNO boards have a small surface mounted LED which is attached to D13 so wiring up another LED is optional.
The first picture shows the NES controller plug – Click on each socket/ pin to find out each function. Male – male jumper wires fit into the sockets perfectly.
Step 3: Button States and Debounce
If you were going to use two buttons (e.g. START for ON and SELECT for OFF) for this NES controller light switch it would be quite easy to adapt the NES Controller Piano sketch from my earlier instructable it would be quite easy:
- Label D13 as led
- Remove nes=255 line
- Remove the other button functions too
- Change bitRead (nes, 4) == 0 tone command to digitalWrite (led, HIGH)
- Change bitRead (nes, 5) == 0 tone command to digitalWrite (led, LOW)
 #define nesClock 5     // label pinout
 #define nesLatch 6
 #define nesData 7
 #define led 13
 byte nes = 0;         // global variable

void setup() {
  // put your setup code here, to run once:
Serial.begin (9600); // serial terminal speed
pinMode (nesData, INPUT); // set up pins
pinMode (nesClock, OUTPUT);
pinMode (nesLatch, OUTPUT);
pinMode (led, OUTPUT);
digitalWrite (led, LOW);
}
void loop() {
  // put your main code here, to run repeatedly:
nes = nesRead ();
if (bitRead (nes, 4) == 0){
 digitalWrite (led, HIGH);
}
if (bitRead (nes, 5) == 0){
 digitalWrite (led, LOW);
}
delay (180);
}
byte nesRead (){ // "bit banging"
  byte value = 0;
  digitalWrite (nesLatch, HIGH);
  delayMicroseconds(5);
  digitalWrite (nesLatch, LOW);
  for (int i=0; i<8; i++) {
    digitalWrite (nesClock, LOW);
    value |= digitalRead (nesData) << (7 - i);
    digitalWrite (nesClock, HIGH);
  }
  return (value);
}
However it took me a while to workout how to use just the START button. I adapted code from the Arduino.cc debouncing tutorial – debouncing is essential in this sketch (removing the debounceDelay and lastDebounceTime results in very unpredictable effects (sometimes the LED was ON, sometimes it was OFF, sometimes it was FLASHING and the serial monitor part of the sketch was working overtime to keep up).
int ledState = HIGH; // current state of LED pin
int buttonState; // see below in loop()
int lastButtonState = LOW; // last time START was pressed
long lastDebounceTime = 0; // for debouncing switch
long debounceDelay = 200; // for debouncing switch
void loop() {  // put your main code here, to run repeatedly:
buttonState = bitRead (nes, 4); // START pressed
nesRead ();
if (buttonState == 0 && lastButtonState == LOW && millis() - lastDebounceTime > debounceDelay){
  if (ledState == HIGH){
     ledState = LOW; // LED is OFF
  //Serial.println ("OFF");
  }
   else {
   ledState = HIGH; // LED is ON
  //Serial.println ("ON");
   }
   lastDebounceTime = millis ();
}
digitalWrite (led, ledState );
lastButtonState = buttonState;
Unfortunately the code I used to bit-bang in my NES Controller Piano sketch didn’t work in this case – see Step 4.
Step 4: Bit Banging
The NES controller uses a 4021 shift register to create pulses of data when a button is pushed – Click on the buttons in the picture to see the data created when each button is pressed or try running this sketch from bradsprojects.com– and the Arduino captures the pulses and interprets them by looking for the 0s in each pulse.
The code I used to capture the NES controller data was different to the code used in my other NES Controller Instructables. I couldn’t adapt Gordon McComb’s* method to do this task (using a single NES button to turn a light ON and OFF) – The LED just flashed continuously like the classic Blink sketch. I used a function separate to the Loop () function which I called nesRead () – This used bit shift in a slightly different way – I first read about it onarduino.cc.
void nesRead (){ //function to read data from NES controller  nes = 0;
  digitalWrite (nesLatch, LOW);
  digitalWrite (nesClock, LOW);
  digitalWrite (nesLatch, HIGH);
  delayMicroseconds (2);
  digitalWrite (nesLatch, LOW);
  nes = digitalRead (nesData);

  for (int i = 1; i <=7; i ++){
    digitalWrite (nesClock, HIGH);
    delayMicroseconds (2);
    nes = nes <<1; // bitshift
    nes = nes + digitalRead (nesData);
    delayMicroseconds (4);
    digitalWrite (nesClock, LOW);
  }
}
*Teachbot gamepad controller sketch in “Arduino Robot Bonanza” by Gordon McComb McGraw Hill 2013.
Step 5: The Complete Sketch
#define nesClock 5 // label pinout
#define nesLatch 6
#define nesData 7
#define led 13
int ledState = HIGH; // current state of LED pin
int buttonState; // see below in loop()
int lastButtonState = LOW; // last time START was pressed
long lastDebounceTime = 0; // for debouncing switch
long debounceDelay = 200; // for debouncing switch
byte nes = 0; // label 8 bit data from controller
/* Setup */
void setup() {
  // put your setup code here, to run once:
delay (1000);
// Serial.begin (9600);
pinMode (nesLatch, OUTPUT); // set up pins
pinMode (nesClock, OUTPUT);
pinMode (nesData, INPUT);
pinMode (led, OUTPUT);
}
void nesRead (){ //function to read data from NES controller
  nes = 0;
  digitalWrite (nesLatch, LOW);
  digitalWrite (nesClock, LOW);
  digitalWrite (nesLatch, HIGH);
  delayMicroseconds (2);
  digitalWrite (nesLatch, LOW);
  nes = digitalRead (nesData);

  for (int i = 1; i <=7; i ++){
    digitalWrite (nesClock, HIGH);
    delayMicroseconds (2);
    nes = nes <<1; // bitshift
    nes = nes + digitalRead (nesData);
    delayMicroseconds (4);
    digitalWrite (nesClock, LOW);
  }
}

void loop() {
  // put your main code here, to run repeatedly:
buttonState = bitRead (nes, 4); // START pressed
nesRead ();
if (buttonState == 0 && lastButtonState == LOW && millis() - lastDebounceTime > debounceDelay){
  if (ledState == HIGH){
     ledState = LOW; // LED is OFF
  //Serial.println ("OFF");
  }
   else {
   ledState = HIGH; // LED is ON
  //Serial.println ("ON");
   }
   lastDebounceTime = millis ();
}
digitalWrite (led, ledState );
lastButtonState = buttonState; // Current state (i.e. ON or OFF) of START is now lastButtonState
}
Source: Use Your NES Controller As On/Off Switch for Lights.