I have my online classes going on (still -_-) and the problem is I have a hard time waking up early. So I end up missing my first class every day. And yes, I do keep an alarm for 7 am but I always turn it off and go back to bed.
So I got this funny idea to force myself to wake up early. While you could make mechanisms that sprinkle hot water on your toes or make a hydraulic system that throws you off the bed, there are simpler ways to achieve this goal.
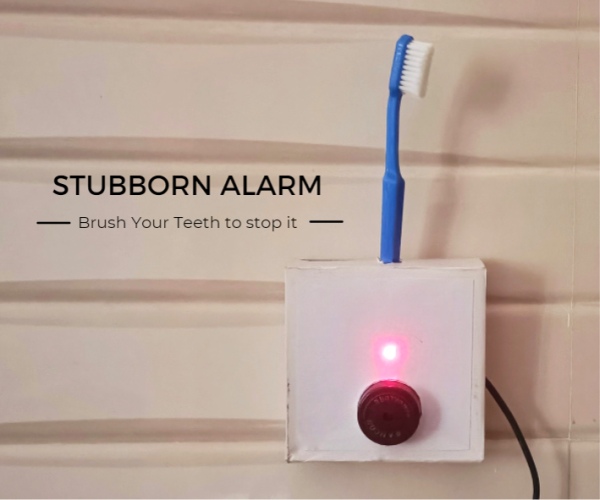
The idea is to have an alarm clock that is a toothbrush holder. Once the alarm rings, you have to go to your washbasin (or wherever you brush your teeth every morning), pull out the toothbrush from the holder after which the alarm stops. Then you can put it back in the holder after using and the alarm will not ring anymore till you set your next alarm.
It’s obviously not something like a “breakthrough invention”, but this project is fairly simple and is a great one to start learning to emulate an Arduino on tinkercad. So let’s get building!
Supplies
Arduino Uno / NANO https://www.amazon.com/ATmega328P-Microcontroller-…
Jumper wires (optional)
Buzzer https://www.amazon.com/RuiLing-Decibels-Continuous…
LED
Proximity sensor https://www.amazon.com/HiLetgo-Infrared-Avoidance-…
Cardboard
Step 1: Circuitry
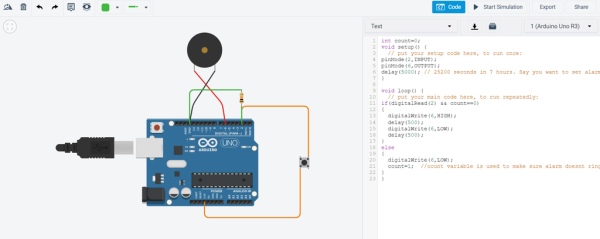
The components are very few which makes this project a good choice for beginners to the Arduino world. All you need is a proximity sensor, push-button, a 10K resistor, and a buzzer.
Make the connections as shown in the images above. I like how by typing the value of the resistor, the color code changes automatically. I have replaced the proximity sensor with a push-button for simplicity. Tinkercad is very easy to use and also allows you to emulate the Arduino. Meaning, you can run the code virtually and see how the Arduino behaves. I have added an LED parallel to the buzzer but it’s not compulsory. Also, I have added an extra push button to reset the Arduino. This is to make the reset button easily accessible because the Arduino will be placed inside a housing.
Step 2: Code
The good news is, you can directly download the code from this step and upload it to your Arduino without any changes. If you’re not much of a coder, you need not worry. But if you’re interested in the working of the code, I’ll do a code walk-through at the end of the Instructable.
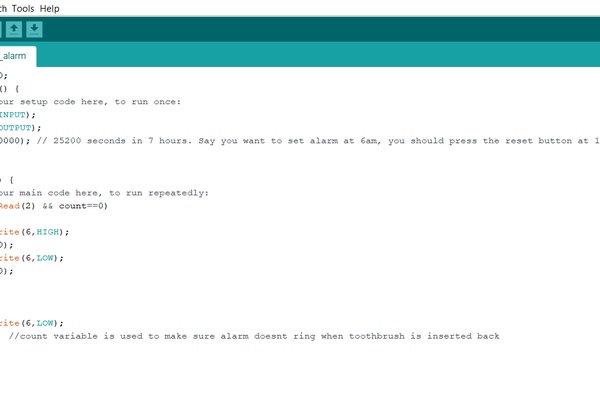
For now, all you need to know is what the code does. The code is designed for a 7-hour delay. The reset button of the Arduino will work as your ‘set alarm’ button. So if you want to set an alarm for 6 am, you’ll have to press the reset button on the Arduino at 11 pm the previous night. You can change the delay period based on what time you want to set the alarm for.
To change the delay, you’ll have to change the value of delay(); in the setup function. The value of the delay should be in milliseconds.
Step 3: Testing the Code on Tinkercad
Copy the code and paste it into tinkercad code editor in the circuit you made. To test it, we can change the delay from 7 hours to 5 seconds (unless you want to wait for 7 hours to test your code).
Replace delay(25200000); by delay(5000);
Click on Start Simulation and press the right side button immediately. What should happen now is that the buzzer should start beeping after 5 seconds. Once you release the button, it should stop beeping. After that even if you press the button, it shouldn’t beep anymore. If you press the reset button and repeat the above steps, it should work all over again.
You can also try out my circuit by interacting with it above.
Great job if you got it working! If not, try re-uploading the code and recheck your connections.
Step 4: The Housing
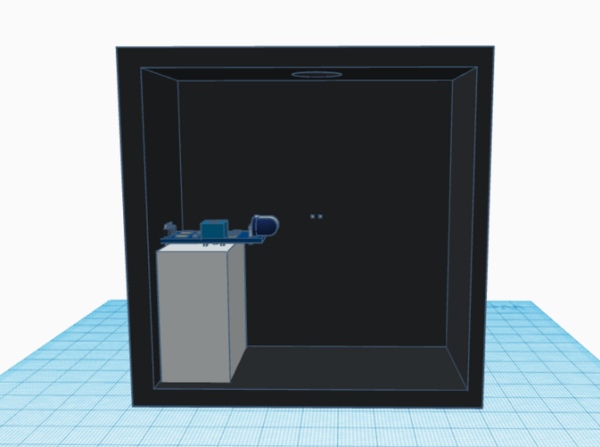
The housing was done in tinkercad 3D design. It’s a simple box with a small support to add the proximity sensor inside. There’s a hole on the top to insert the toothbrush and the buzzer and LED are mounted on the front.
You can check out and interact with my 3D design.
Step 5: Assembly
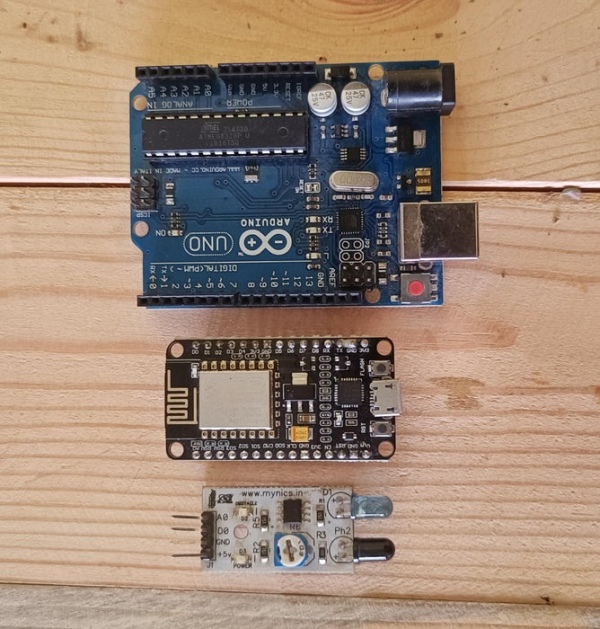
I didn’t have a 3D printer so I made the housing with a cardboard box. The circuit is straightforward, just follow the tinkercad circuit design. I actually used a nodemcu instead of Arduino because my Arduino UNO was too big to fit in the housing. The nodemcu is much smaller, in fact, it’s almost the size of the proximity sensor!
You can use an Arduino nano or make the housing bigger. I also made a hole on the side to pass the power cable to the nodemcu.
Step 6: Ready to Wake You Up!
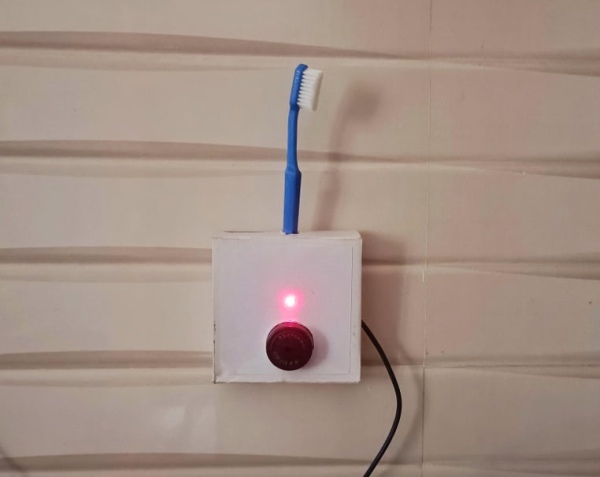
The Stubborn alarm is ready! It’s a simple project and sounded kinda funny when I actually came up with it. It’s good to see it working finally!
I know you might say, “Hey! It’s so easy to fool this. I can just go and take out the toothbrush and get back to sleep” Well, yes you are right. But since you walked all the way and took out your toothbrush, you might as well brush and get ready for the day.
“How is it different from keeping your alarm clock near the washbasin?”, You may ask. It’s actually no different. This is just a fun project to try out. Maybe a creative solution for your sleepy cousin or your kids? No matter what, I’m sure this project would have helped you explore tinkercad and start programming an Arduino even if you don’t have one.
In any case, if you make this project too, I would love to have a look! If you have any suggestions about making the project or the code better, do let me know in the comments. Happy making!
Step 7: Code Walkthrough
The code is very simple
All we’re doing is setting a delay for 7 hours in the setup function, which equals 25200000 milliseconds (I chose that duration because 7 hours is the ideal sleep duration). The setup function only runs once after the Arduino is powered.
Then we have the loop function which will continually run. This function will start running when the alarm should ring. So basically we check if the toothbrush is being detected by the proximity sensor. If it is, then the alarm rings. If not then the alarm won’t ring. The count variable acts like a check mark once the toothbrush is pulled out, so that when you put it back in, the alarm shouldn’t ring again.
The reason there’s a High and a delay of 500 then a LOW and a delay of 500 is to make the alarm beep instead of a continuous tone.
Source: Stubborn Alarm – Doesn’t Stop Until You Brush Your Teeth