Summary of Smartphone controlled Arduino tank using Annikken Andee
Summary: At Arduino Day Singapore 2014, the author demonstrated the Annikken Andee–controlled Andee Battle Tank (ABT). This guide explains assembling a Pololu Zumo chassis, modifying the Annikken Andee to move its communication from pin 8 to pin 4, and integrating a WLToys V959-19 missile turret for smartphone-controlled firing via an Android device.
Parts used in the Andee Battle Tank (ABT):
- Arduino Uno
- Pololu Zumo Robot
- Annikken Andee
- WLToys V959-19 Missile Launcher
- Smartphone (Android 4.0 and above)
- 2.54mm Row Male Pin header
- 2.54mm Row Female Pin header
- Thin insulated wire
- Insulated tape
- Double sided tape or Blu-tack or other adhesive
- Soldering and desoldering tools
- 4 x AA batteries
It was a big hit with our audience and many of them has enquired on the making of the Tank. We wanted to share our Tank making knowledge to the Instructables community. So to get you in the seat of a POTENTIAL TANK COMMANDER, I am going to give a step by step guide on creating the Andee Battle Tank, or ABT in short.
Please like our Facebook page and view Video Highlights of ABT and Arduino Day Singapore 2014!

Step 1: What do you need?
1 x Arduino Uno
1 x Pololu Zumo Robot
1 x Annikken Andee
1 x WLToys V959-19 Missile Launcher (Amazon) (Aliexpress)
1 x Smartphone (Android 4.0 and above)
(note: if you are using iOS, u will need to the get Annikken Andee for iOS)
You might/will also need to the followings to get the job done
2.54mm Row Male Pin header
2.54mm Row Female Pin header
thin insulated wire
Insulated Tape
Double sided Tape / Blu-tack / Something Sticky
Some Soldering and Desoldering work
4 x AA Batteries
Step 2: Assemble the Zumo Chassis
In This Guide I will not be mentioning much about the assembly of the Zumo Chassis as user Qtechknow has already made a comprehensive guide on Zumo Tank Assembly. You can also visit Pololu Official page for the documentation.
Just don’t arm the metal plate that comes with the Zumo Kit, ABT uses speed as its defence, not armor =)
Female header for The Turret
After the Assembly, Solder the 2.54 mm Female Pin Header to the pin 2 and ground hole on the Zumo Shield. We will be using Pin 2 of the Arduino to fire the missile.
Step 3: “Hack” Annikken Andee
This poses a problem for Arduino as he is unable to differentiate the source of the communication (Andee or Zumo?).
To get around this problem, we are going to do a little hack
Modify Annikken Andee
Wait, what is Annikken Andee?
Annikken Andee is a bluetooth shield that allow easy communcation between your smart phone and your Arduino. As it comes with Andee Arduino library and free downloadable Andee App for your smart phone, you do not need to develop the App. You can create the UI all via your arduino codes.
What we are doing here is to reroute the communication from pin 8 to 4. You can also try pin 1,2,3,5,6,7 if you want. But because i like pin 4, i am going to use pin 4.
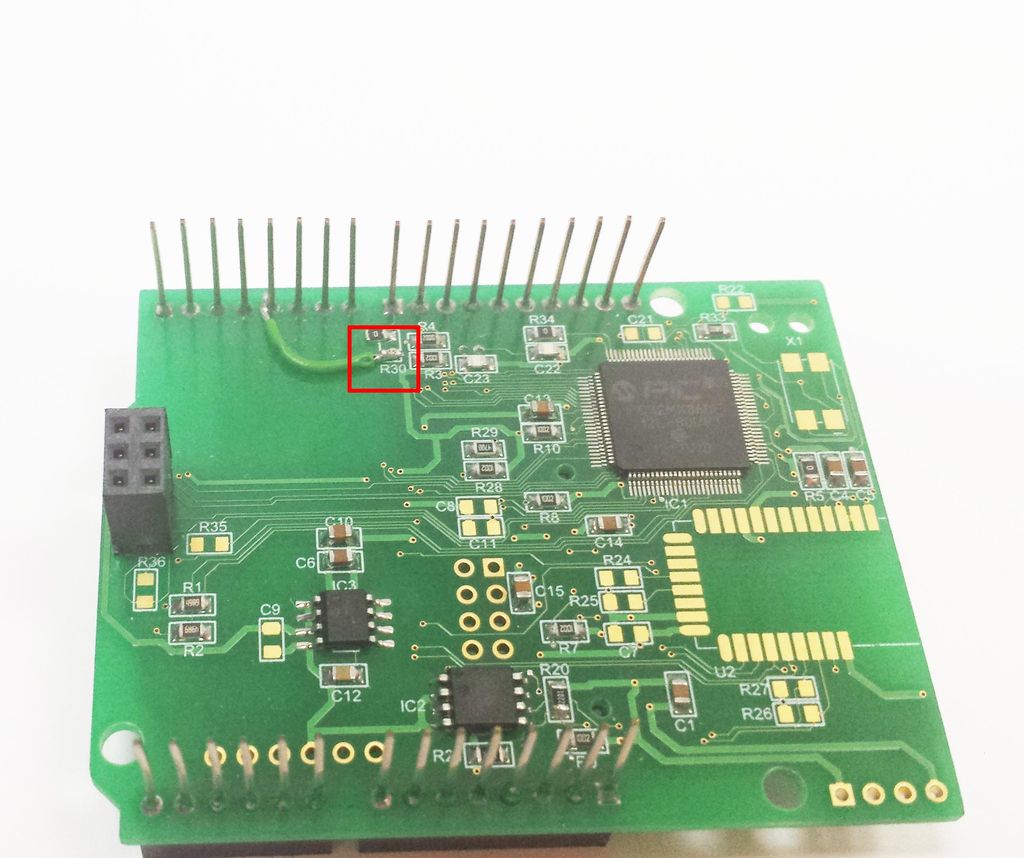
Step 1) Desolder R30
R30 is a 0 Ohm resistor that you can find on the underside of Annikken Andee. Taking it out severs the connection between the leg of pin 8 and Annikken Andee.
Step 2) Connect Annikken Andee to Pin 4.
Using a piece of short wire, short-circuit the copper base which previously house the 0 Ohm resistor of R30 to the leg of pin 4. This way the communication between Andee to Arduino will done via pin 4, and not pin 8. Check out the picture above for reference.
Step 4: Turret (Missile Launcher)
With lacking of online documentation of this fearsome weapon, The follows are my understanding based on trial and error.
The Yellow and White wires is connected to the DC motor behind the turret. As the motor rotates, it will trigger the mechanism to release a missile.The Red and Black wires will short-circuit every time the missile’s release mechanism is triggered. However for simplicity sake, we are not using this 2 wires for the project.
The missile launcher’s wires originally uses 1.25mm pitch header, which obviously doesn’t fit the 2.54mm Pin header Arduino uses. Therefore we need to carefully cut the 1.25mm header connected to Yellow and Whie wires and replace it with 1×2 2.54mm male Pin Header. Just remember to insulate the exposed copper and solder with insulated tape!
What to do with the Red and Black Wires?
Since we are not using the Red and Black wire pair, tuck these 2 wires somewhere below the turret. We might still need them in another project. Who knows? =P
- What is the base chassis used for the ABT?
The base chassis is built using the Pololu Zumo Robot kit. - Which Arduino pin is used to fire the missile?
Pin 2 of the Arduino is used to fire the missile. - Why is the Annikken Andee modified?
Because both Zumo Shield and Annikken Andee use pin 8, the Andee is modified so its communication is rerouted to pin 4 to avoid conflict. - How is the Annikken Andee modified to use pin 4?
Desolder the 0 Ohm resistor R30 on the underside of the Andee, then solder a short wire from the R30 pad to the leg of pin 4 to reroute communication. - Which wires from the WLToys missile launcher are used to trigger firing?
The yellow and white wires connected to the DC motor are used to trigger the missile release mechanism. - What should be done with the missile launcher red and black wires?
The red and black wires are not used in this project and should be tucked under the turret for possible future use. - What pitch connector does the missile launcher originally use and how is it adapted?
The launcher uses a 1.25mm pitch header; cut it off and replace with a 1x2 2.54mm male pin header, then insulate exposed copper. - How is the ABT powered?
The Zumo Shield, Andee, and Arduino are powered by 4 x AA batteries mounted below the chassis.