Summary of Party’s Over!
This Arduino school project creates a diorama depicting a party ending abruptly. When music stops, a bright light activates, and two servo-controlled figures react: one appears to have a stroke, while the other decides to drink more. The build utilizes two Arduinos to manage distinct functions without code conflicts, featuring dynamic disco lighting and sound effects controlled by a potentiometer.
Parts used in the Party's Over Diorama:
- 2 red leds
- 2 green leds
- 2 blue leds
- bright white or blue led
- 8 resistors 330 ohm
- mini speaker
- 2 servo motors
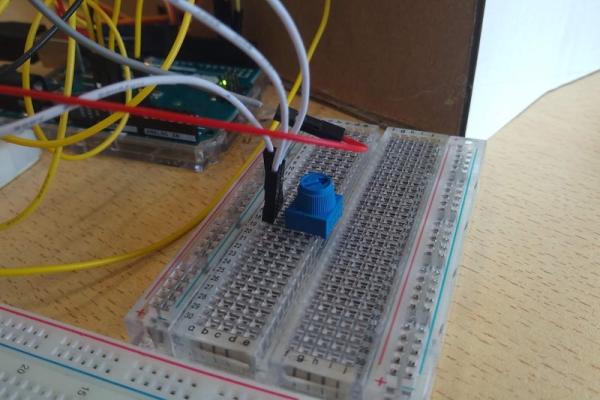
- potentiometer
- 2 Arduino boards
- cardboard
- hot glue gun
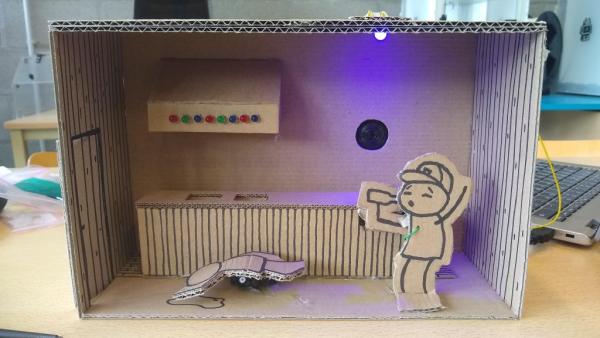
This is a little diorama made with Arduino for a school project.
What happens is a party which just stops playing music. As the sound stops there’s a bright light which turns on. There are two partypeople. One is having a stroke or something because of the alcohol. The other one thinks ‘Dam’n, the party is over, let’s have another drink!’.
I was just a beginner noob when I made this, so it should be easy for everyone to make.
Step 1: Materials Needed
For making this kind of diorama you’ll need these components:
- 2 red leds
- 2 green leds
- 2 blue leds
- bright white or blue led
- 8 resistors 330 ohm (to go with the leds)
- mini speaker
- 2 servo motors
- potentiometer
Step 2: Connecting the Leds to the Arduino

In the diorama I used 8 leds to make it look like a true party.
Every light is connected with the ground by making the negative line the groundline, you can see this in the drawing.
Each light is connected to a pin. Make sure not to swich some of the lights or the disco effect won’t work (at least not with my code).
1st led (red) Pin 1
2nd led (green) Pin 2
3rd led (blue) Pin 3
4th led (red) Pin 4
5th led (green) Pin 5
6th led (blue) Pin 6
7th led (red) Pin 7
8th led (green) Pin 8
Each led is connected with a 330 ohm resistor.
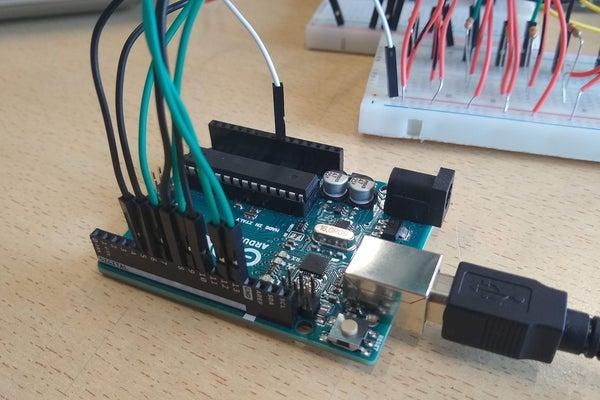
Step 3: Connecting the Servomotors, Bright Led, Potentiometer and Mini Speaker to a 2nd Arduino
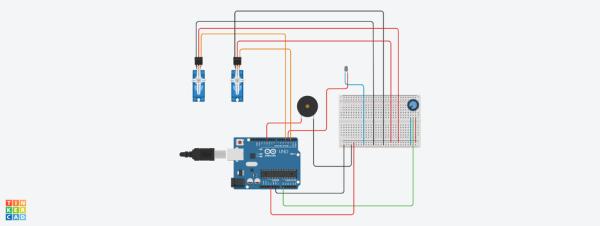
For this diorama I used 2 Arduino’s. This so the diffrent codes won’t work against each other.
The positive line on the breadboard is connected with 5V.
The negative line is connected with ground.
For the pins:
- Mini speaker Pin 11
- Potentio + Led Pin 3
- Servo1 Pin 4 (the person with the stroke)
- Servo2 Pin 2 (the one who drinks)
Step 4: It’s Coding Time!
FOR THE LEDS
There are 5 different patterns made in a random order. In the first pattern you see the lights go from left to right. After that they blink three times. This followed by alternating between the leds, followed by groups of four leds alternating and lastly groups of two leds alternating.
This is put in a loop.
When the music from the other Arduino stops I simply unplugged the ground wire so it looks like the party stops as the music does.
Step 5: Codingtime But This Time Take Another Arduino
In this code everything but the leds is included.
When the songs stops playing, make sure you turn the potentiometer to max so the light will be as bright as is can be.
Many people use a piezo buzzer as a speaker for which you’ll need a resistor. If you use a mini speaker like I did a resistor only makes the music rather quiet.
Also don’t forget to unplug the ground of the disco leds when you play the diorama.
Step 6: The Diorama
To make the diorama itself I’d say, be creative! There are many ways to make such a box. I only used cardboard and a hot glue gun.
Happy diy and coding time!
Source: Party’s Over!
- How many Arduinos are required for this project?
The project uses 2 Arduinos so that different codes do not work against each other. - What happens when the music stops playing?
A bright light turns on, and the ground wire for the disco LEDs is unplugged to stop the lights. - Which pins connect the servo motors?
Servo1 connects to Pin 4 and Servo2 connects to Pin 2 on the second Arduino. - Can I use a piezo buzzer instead of a mini speaker?
Yes, but you will need a resistor if using a piezo buzzer, whereas a resistor makes a mini speaker quieter. - How should the potentiometer be set when the song stops?
You must turn the potentiometer to max so the light shines as brightly as possible. - What materials were used to construct the diorama box?
The creator used cardboard and a hot glue gun to make the box. - Why are specific LED pins assigned to specific colors?
Pins must not be switched because doing so prevents the disco effect from working with the provided code. - What are the five patterns created by the LED code?
The patterns include lights moving left to right, blinking three times, alternating LEDs, groups of four alternating, and groups of two alternating.