Summary of Nintendo Keyless Entry System using an Arduino
This article details the NoKES project, a DIY door lock system using a Classic Nintendo controller and an Arduino. The system reads button combinations to control a repurposed CD-ROM drive for locking and unlocking. It features security measures like audio alerts, webcam snapshots for incorrect entries, and vibration detection via a piezo element to capture visitors' images when idle.
Parts used in the NoKES Project:
- Arduino
- Cd-Rom Drive
- Classic Nintendo Controller
- Opto-isolator
- Male Molex power connector
- Green Led
- Red Led
- WebCam
- Piezoelectric element
- Speaker
- Wires
- Solder / solder iron
- Pcb project board or breadboard
- USB cable(s)
- 2 AA batteries
- 9V battery
- Electric tape
Use a Classic Nintendo controller to lock and unlock your door! The output from the Controller is read by an arduino and it looks for a particular combination of buttons, once the combination is entered it sends a signal to eject a Cd-Rom Drive which pushes or pulls the lock. I started making this project like I always do; with what I have on hand. So if you have the same stuff lying around it can be assembled for very little cost.
Once activated NoKES (NintendOKeyless Entry System) will be blinking letting you know that it is alert and keeping guard. Once the Start button is pressed on the controller, the arduino starts recording what buttons are pressed, converts them into a number and adds them together. When you press Start + Select the Arduino compares that number to the combination that you have set.
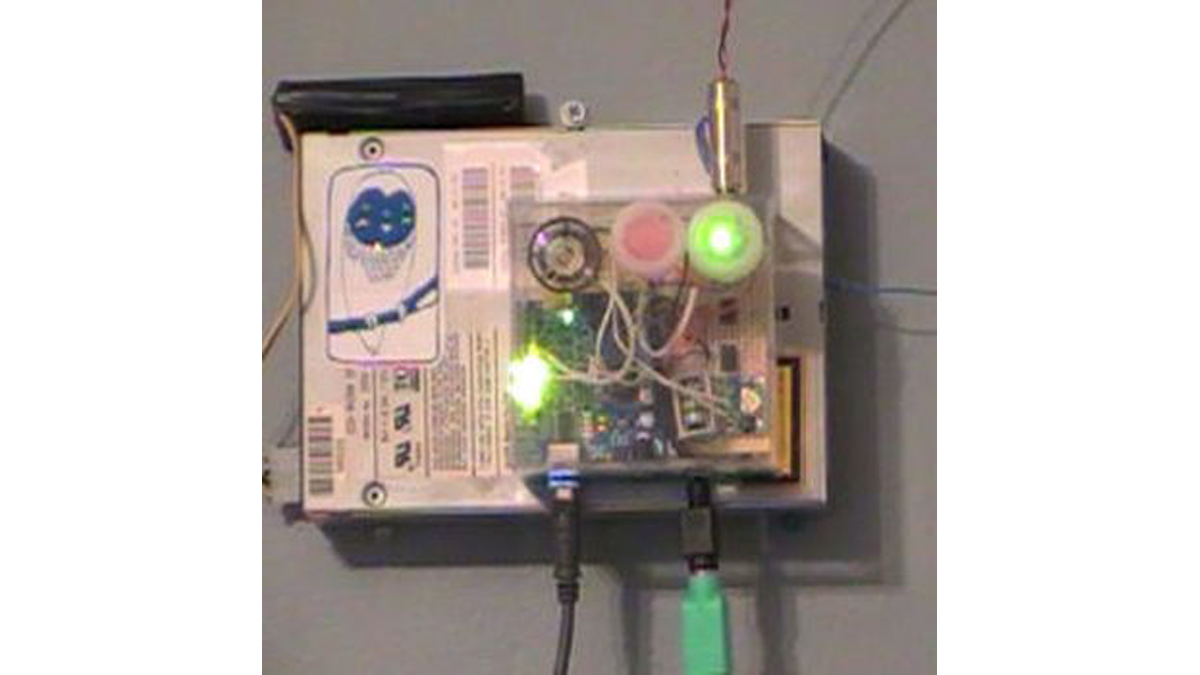
If you enter an Incorrect combination the arduino activates an attached circuit and plays a sound. It then sends a serial signal to processing and snaps a picture with an attached Webcam (so if someone is messing with your lock you have a picture of them).
If you enter a correct combination the arduino sends a signal to the cd-rom to eject and thus will lock or unlock the door. Upon a correct combination a signal is also sent to processing which plays a sound.
When idle NoKES will “listen” for vibrations with a peizo element that is attached to the door. If someone knocks on the door the vibration is sensed and a signal is sent to the Processing sketch. The Processing sketch will take another picture letting you know who stopped by. NoKES is constructed to be independent from processing in the sense that if you don’t have your arduino connected to a computer it will work on its own, you just won’t get the pictures or a confirmation sound when a correct combination is entered.
Step 1: Parts List
-Arduino
-Cd-Rom Drive
(this is a great way to re-purpose a dead Cd-Rom as long as it will open and close)
-Classic Nintendo Controller
-Opto-isolator(s)
(mouser P/N: 782-H11A2782-H11A2 or similar)
-Male Molex power connector
-Green and Red Led
Optional Parts:
WebCam
Piezoelectric element
Speaker
something electronic that makes a sound when you press a button
I used a circuit that was in a dinosaur pillow.
Other stuff you will/may need:
wires
solder / solder iron
pcb project board or breadboard
USB cable(s)
2 AA batteries
9V battery
electric tape
Software:
-NoKES_source.zip
 NoKES_Source.zip158 KB
Step 2: Cd-Rom Prerequisites
Before you dive too deep into this project you’re going to want to confirm that you have a usable Cd-Rom Drive.
Check to make sure that your Cd-rom will open and close with a battery pack and make sure that the Cd-Rom will not close on it’s own after being open. I have noticed that some Cd-Trays will close automatically after being open for several seconds I’m not sure if this is a Firmware or Software thing so best to check it out.
You can skip this whole step if you’ll be using a wal-wart type power supply to power the Cd-Rom Drive I’ve found that using a wal-wart works best.
Items:
Molex Power Connector
2AA batteries and a 9V battery
Electrical Tape
Start by removing the unused wires from the Molex Connector
you will only need the red and the black wires.

set up the batteries like the diagram and tape or adhere them together.
this gives you ~12V .
Enough to eject the Cd-Rom Drive
Connect and Test the eject button
you may have to reset the cd-rom by disconnecting and reconnecting the molex a couple of times I’m not sure why I had too but once it opens once it will open and close fine until the power is disconnected.
-Cd-Rom Drive
-Classic Nintendo Controller
For more detail: Nintendo Keyless Entry System using an Arduino
- How does the system verify the correct password?
The Arduino records buttons pressed after Start is hit, converts them to a number, adds them together, and compares this sum to the set combination. - What happens if an incorrect combination is entered?
The Arduino activates a circuit to play a sound and sends a serial signal to Processing to snap a picture with a webcam. - Can the system work without a computer connected?
Yes, the NoKES system is constructed to be independent from Processing so it will function on its own without the Arduino connected to a computer. - Does the system detect visitors when idle?
Yes, a piezo element attached to the door listens for vibrations caused by knocks and signals the Processing sketch to take a picture. - What component is used to physically lock or unlock the door?
A Cd-Rom Drive is used; upon a correct combination, the Arduino sends a signal to eject the drive which pushes or pulls the lock. - How should the Cd-Rom Drive be tested before assembly?
You must confirm the drive opens and closes with a battery pack and ensure it does not close automatically after being open. - What voltage is required to eject the Cd-Rom Drive?
Setting up two AA batteries and a 9V battery gives approximately 12V, which is enough to eject the drive. - What happens when a correct combination is entered?
The Arduino sends a signal to the Cd-Rom to eject and also sends a signal to Processing to play a confirmation sound.