I’ve always played with legos as a kid, but I didn’t have any of the ‘fancy’ legos, just classic lego bricks. I’m also a huge fan of the Marvel Cinematic Universe (MCU) and my favourite character is Hulk. So why not combine the two, and make a giant hulk minifigures, because bigger is always better, right? So I decided to make a 10:1 scale model of the original lego minifigures.
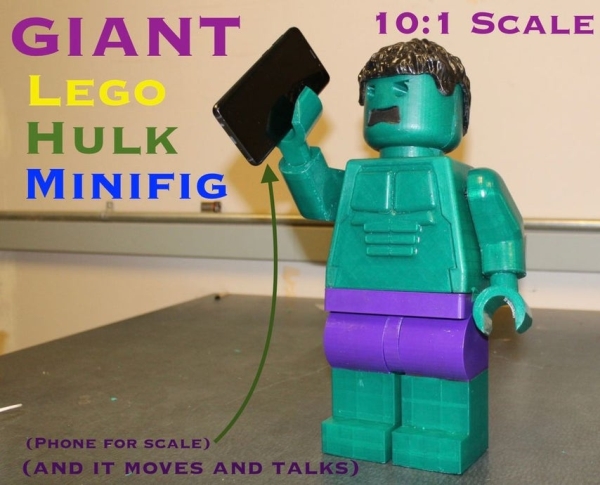
A Giant Lego Hulk Minifig (I guess it’d be called megafig) isn’t enough I decided to have some more fun and bring it to life. I’ve also added some extra novel features to it that allows it to both move and speak by adding 3 Servo motor, an MP3 Player Module and a Speaker with a built-in amplifier.
Since it has an MP3 Player Module and a Speaker, you can actually load up all your favourite tunes on an SD Card and use it as a speaker too!
The electronics and hardware of this project is also easily sourced and relatively inexpensive. That way, this project is easy reproducible by the masses (and Instructables community). My estimate for the project cost is around $50-80 — this will depend on where you source the items. If you’re willing to wait for eBay or Aliexpress it’ll be cheaper, if not DFRobot shipped mine via DHL and I got it in 2 days. Same argument can be said for the quality of the filament you used. Considering you can pick up a tiny one for $5 from Amazon, I’d say the price scales up quite linearly, or less given that this has way more features than any store-bought lego figures.
Step 1: Bill of Materials
Hardware
1kg of Green PLA (I got a ton of filament for a good deal on Kijiji, but you can get yours from Amazon or filaments.ca if you’re in North America)
200g of Purple PLA (I used the CCtree brand from Amazon and it exceeded my expectations for the price point)
200g of Black PLA (I used my favourite trusted, though slightly expensive brand, Innofil)
Epoxy Resin and Hardening Agent (this is for smoothing and shining the print, you can also use XTC3D but I found them very expensive)
CA Glue and Accelerant or Superglue (the former is preferable because you can accelerate the curing time to mere seconds)
Foam Brush ( I got mine from a local art store, Curry’s, who gave me a student discount!)
Pro Tip / Fun Fact: CA Glue is actually just super glue, where CA stands for Cyanoacrylate (kind of like how when you buy Tylenol vs Acetaminophen at a pharmacy, the latter being a generic brand with the actual chemical name). The benefit of using CA Glue is you can buy it with accelerant which reduces the curing time to a couple of seconds, so you don’t need to clamp it or hold it until it dries.
Caution: Careful not to get any CA glue + accelerant mix on your hands though because it’ll burn.
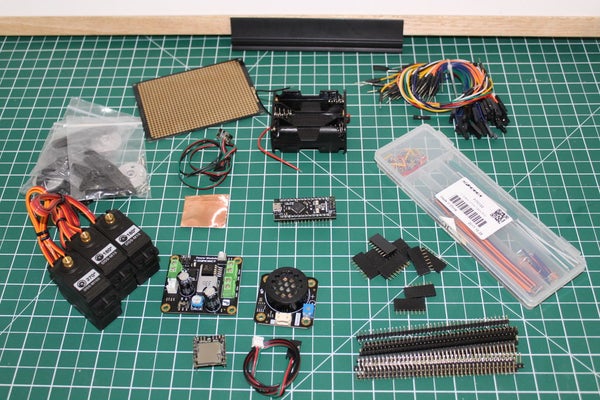
Electronics
180 and 270 degree Servos (I chose to use 2 180 degree for the arm and 1 270 degree for the head)
Voltage Step-Down Converter (You can also use a 7805, but they can’t provide as much current as this one, plus this works for a 3 cell LiPo too!)
1K Ohm Resistor (I’m sure you probably have some lying around or you can buy a pack that’ll last a lifetime)
2 cell Lithium Polymer (LiPo) Battery or 6V AA battery holder (I prefer LiPo since it’s rechargeable and can give 7.2V to the Servo motors)
XT60 Connector (if you choose to use a lithium polymer battery with an xt60)
JST Crimp Pins (Or you can just solder those female ends of the jumper wire — I already owned a crimper and had JST Crimp pins, so I used this to make it look more professional)
Heat Shrink (Much neater and more professional-looking than electrical tape!)
Tools
3D Printer
Soldering Iron, Solder, Desoldering pump
Multimeter (For troubleshooting circuits)
Crimper (If you choose to use a lithium polymer battery with an XT60 connector)
X-acto knife – I got mine at a local art store for around $2 with a student discount
Sandpaper – 400 grit, 600 grit, 1000 grit, 200 grit
“But, I don’t have a 3D printer”
No problem! You can send the STLs to 3D printing services like Shapeways and 3DHubs
I know the list looks daunting and long. I tried to make it as comprehensive as possible, while providing justifications and details as to how I went about my design choices. That way, you can pick and choose and modify the project to turn it to your own. My goal is to always enable users to be creative and make their own projects while using mine as a guide rather than simply cargo cutting, but feel free to duplicate it as well!
3D Printing is becoming more common too, so maybe you have a friend who has a 3d printer that you can use. Filaments are getting cheaper and you can get a spool of 1kg for less than $20CAD or AUD (or < $15 USD)!
Step 2: Divide and Conquer
This build may not seem complex, but it does encompass the fundamental blocks of robotics — electromechanical, circuitry, and embedded programming. As such, some preplanning would greatly help in the build.
I’ve separate this build into 5 segments:
- Design and 3D printing Phase
- Post-Processing
- Electronics
- Code
- Assembly
Divide and conquer! While you’re waiting for your prints to finish, you can get started with the electronics and coding.
Step 3: [Optional] Design and 3D Print: Design

Since my Fusion360 skills are limited, I got a friend to help me CAD these files. You don’t have to design your own if you follow this guide exactly. Simply go to the next step, and 3D print them. All the dimensions are metric!
However, if you do choose a different PCB or speaker, then you may need to resize the holes and cut extrusions where the components are supposed to be.
However, if you do want other lego minifigs who isn’t the hulk, then feel free to CAD your own. Someone, please make a giant lego batman version of this!
Pro Tips: Design with 3D printing in Mind
(1) Tear drop shaped circles can be printed with no supports, so incorporate tear dropped shapes for circular cutouts instead of circles
(2) 45 degree angles or steeper can be printed without supports so make your overhangs have 45 degree angles to support them.
Step 4: Design and 3D Print: 3D Print
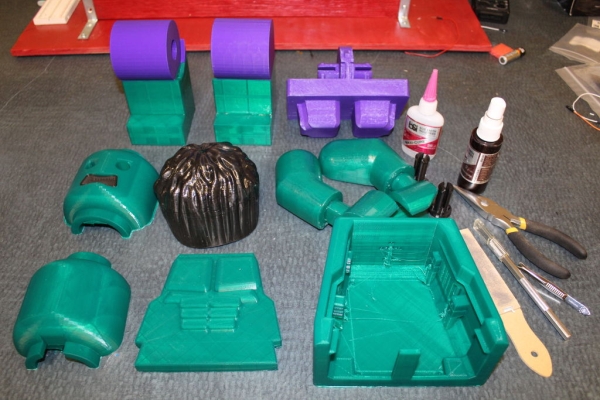
This step is pretty straight forward, grab your SD card, save the gcode from your slicer for whichever STL file you want to print and print it or just order it from Shapeways or 3DHubs.
The total print time for all the prints was around 80 hours. It used up around just over 1kg of material in total using black, purple, and green filaments — mostly green because hulk is green, duh. You can always print it mono-coloured then spray paint the individual pieces which is another method of smoothing it (see next step).
Pro Tip 1:Fighting the Translucent Filament
If you have a transparent looking filament like I got for my green, you can get away with it still looking opaque by (1) increasing the shell thickness or (2) using a dynamic infill set to fill up to 50% in 5% increments. Unfortunately, since resin is transparent, it doesn’t cover up the transparency of the filament.
Pro Tip 2: Dealing with Non-Plastic Deformation
For parts that need to flex slightly, print it at a higher infill than the default setting, around 50%, so it is not too brittle when you have to squeeze the pins together. You can leave the default wall thickness. It took me around 5 tries before I got the right combination of infill and wall thickness. Also use high quality filament. The CCTree filament from Amazon is excellent since it allows for a non-plastic deformation on the pins.
Pro Tip 3: Reducing Print Time
There is no free lunch if you want to save time 3d printing. There is almost always some tradeoff you have to make. Here’s a few that I used that didn’t affect the print quality much:
(1) Use a higher layer height — around 0.2mm is acceptable for the head and front of the body and 0.3mm for everything else.
(2) Lower the infill density to around 5-10% or use dynamic infill as stated in ProTip 1.
(3) Turn on Combing Mode for reducing travel times.
(4) Use brims or rafts — It may be counter intuitive to use brims and rafts, but it’ll save you time from failed prints that came off the print bed from the nozzle striking some slightly off z-axis prints repeatedly.
(5) Use less supports. For prints that require a large number of supports like the hair, use a lower density supports around 5-10% will still yield a successful print.
Step 5: [Optional] Smoothening 3D Prints

This is a long and onerous process, yet very rewarding. You don’t have to do it, but it makes the end result look so much better. Following BrittLiv’s guide, I chose to smoothen my print with epoxy coating, except I decided to sand it down to 1000 grit first (preferable 2000, but I didn’t have any).
Mix epoxy with a 30 minutes to 1 hour working time to allow you to get all the pieces done before it hardens. Then it’ll take another 24 – 48 hours to cure, depending on how thick a layer you used.
Caution: Wear gloves when epoxying. You can get allergic to epoxy which will result in contact dermatitis, so you don’t want any on your hands. Plus, you don’t have to painstakingly sand your fingerprints away on your print job that just took 12 hours to print.
This step is rather long and verbose, though the actions taken to smoothen the print is quite simple. There were many techniques that were used and tried throughout the process, and I wanted to share all the lessons I’ve learned.
Pro Tip 1: Levelling the Coat
Use a paper plate or any flat surface as a ‘palette’ prior to painting, as opposed to dipping the foam brush onto a cup full of epoxy. This will allow you to control and apply even coating onto the print job.
Pro Tip 2: Use a Foam Brush
I have no prior knowledge in the arts or anything related to it, so when it came to picking a brush from a local art store, I had no clue what to pick so I asked for help. A very good point was brought up to me, if you use a typical brush, the strokes from the bristles will be visible, so use a foam brush since there are no bristles.
Pro Tip 3:Prevent stickiness by mixing the proper ratio and measuring accurately
Use a scale to measure the proper ratio of resin and hardener. Contrary to online advise of mixing more hardener for it to dry faster, always use the proper ratio. It’s simple science, or chemistry rather. Resin and hardener being mixed together is a chemical reaction — in fact, you can tell it is an exothermic reaction because the epoxy heats up as you mix them. The ratios suggested are the stoichiometric ratios that allow all the resin and hardener to react together to form the epoxy, thus anything in excess will not react and you will be left with a layer of stickiness.
Lessons Learned
1) Do not soak in water once done
I didn’t have a good surface to put the 3d printed parts onto, so I just placed it on top of scrap paper. As expected, the epoxy dripped down and bonded with the paper. It’s actually not hard to remove because you can just soak the paper in water and rub it off — that is if you didn’t put epoxy on the area making contact with the paper (you shouldn’t). Unfortunately, soaking the epoxied print in water made it look spotty — like a car that you tried to wash but didn’t dry properly.
There was nothing I can do to get rid of the spottiness even if I dried it properly. The only solution was to sand the whole thing again — and sanding epoxy is not fun at all — until it is smooth (sand up to 2000 grit), then coat it again in epoxy which means more waiting.
There is a the silver lining though, after I repeated the tedious process of smoothing and epoxying, the end result looked significantly better! I can imagine there is a point of diminishing returns to this and at some point there’s no point repeating this, where the first coat has the highest impact.
2) Do not heat gun
Do NOT use a heat gun to make epoxy cure faster. The plastic will soften and deform even if you are heating it from a distance. I had a sample piece of PLA and I learned that it’s better to just have patience and wait.
3) Keep Sanding
I was reluctant to sand it at first because it made it look white and scratched up and I was worried that when I cover it in a coat of epoxy it’ll maintain it’s dull scratched colour. I was wrong. In fact, sanding it down until it is smooth and very scratched up yielded the best results.
How does it work?
When you sand it, you are getting rid of any imperfections and bumpiness, so you get a smooth print, but it doesn’t fill any of the gaps and crevices. When you apply epoxy to a print, you’re effectively filling all the gaps left by the layers and any unevenness in the print. Notice, if you dip the 3d printed part in water it’s much smoother in appearance while wet — that’s because the water filled in the gaps, but it evaporates. The resin fills it in permanently and doesn’t leave any discolouration since it’s colourless.
Source: Moving and Talking Giant Lego Hulk MiniFig (10:1 Scale)