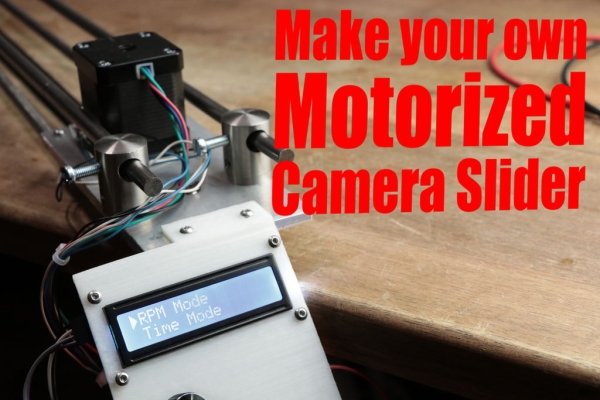
In this project I will show you how I repurposed two old camera tripods in order to create a motorized camera slider. The mechanical system consist mostly of aluminium and stainless steel which makes the slider sturdy and pretty decent looking. The electrical system consists of an Arduino Nano with LCD, rotary encoder, limit switches and stepper motor. Let’s get started!
Step 1: Watch the Videos!
Both video parts will give you a good overview on how to create such a camera slider. But the following steps will still contain some extra useful information.
Step 2: Order Your Parts!
Here you can find a parts list with example seller for the mechanical and electrical parts of the project:
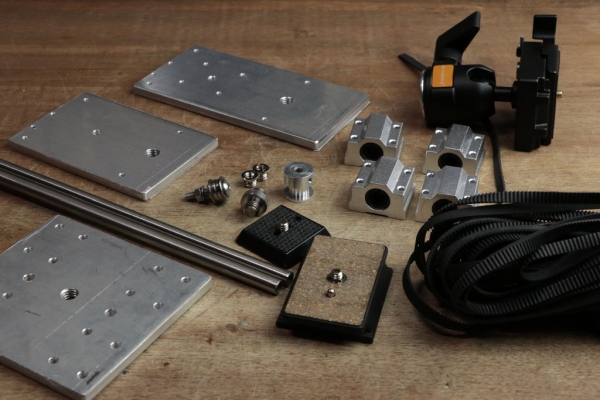
Mechanical:
Amazon.com:
4x Ball Bearing Slide Bushing: http://amzn.to/2bPalMg
2x Flanged Ball Bearing: http://amzn.to/2bPalMg
Timing Belt: http://amzn.to/2bPalMg
1x Pulley: http://amzn.to/2bPalMg
2x 1/4″ to 3/8″ Convert Screw Adapter: http://amzn.to/2bPalMg
1x Tripod Ball Head: http://amzn.to/2bPalMg
Ebay:
4x Ball Bearing Slide Bushing: http://amzn.to/2bPalMg
2x Flanged Ball Bearing: http://amzn.to/2bPalMg
Timing Belt: http://amzn.to/2bPalMg
1x Pulley: http://amzn.to/2bPalMg
2x 1/4″ to 3/8″ Convert Screw Adapter: http://amzn.to/2bPalMg
1x Tripod Ball Head: http://amzn.to/2bPalMg
Amazon.de:
4x Ball Bearing Slide Bushing: http://amzn.to/2bPalMg
2x Flanged Ball Bearing: http://amzn.to/2bPalMg
Timing Belt: http://amzn.to/2bPalMg
1x Pulley: http://amzn.to/2bPalMg
2x 1/4″ to 3/8″ Convert Screw Adapter: http://amzn.to/2bPalMg
1x Tripod Ball Head: http://amzn.to/2bPalMg + http://amzn.to/2bPalMg
Crossbar Holder: http://amzn.to/2bPalMg
Home Improvement Store:
6mm Aluminium, 4mm Aluminium, 8mm 2m stainless steel pipe, 8mm 2m stainless steel rod, bolt+nuts+washers
Electronics:
Amazon.com:
1x Arduino Nano: http://amzn.to/2cHpj7Q
1x A4988 Stepper Motor IC: http://amzn.to/2cHpj7Q
1x 74HC14N Schmitt trigger IC: http://amzn.to/2cHpj7Q
1x 16×2 I2C LCD: http://amzn.to/2cHpj7Q
1x Stepper Motor: http://amzn.to/2cHpj7Q
1x Rotary Encoder: http://amzn.to/2cHpj7Q
2x Limit Switches: http://amzn.to/2cHpj7Q
Ebay:
1x Arduino Nano: http://amzn.to/2cHpj7Q
1x A4988 Stepper Motor IC: http://amzn.to/2cHpj7Q
1x 74HC14N Schmitt trigger IC: http://amzn.to/2cHpj7Q
1x 16×2 I2C LCD: http://amzn.to/2cHpj7Q
1x Stepper Motor: http://amzn.to/2cHpj7Q
1x Rotary Encoder: http://amzn.to/2cHpj7Q
2x Limit Switches: http://amzn.to/2cHpj7Q
Amazon.de:
1x Arduino Nano: http://amzn.to/2cHpj7Q
1x A4988 Stepper Motor IC: http://amzn.to/2cHpj7Q
1x 74HC14N Schmitt trigger IC: http://amzn.to/2cHpj7Q
1x 16×2 I2C LCD: http://amzn.to/2cHpj7Q
1x Stepper Motor: http://amzn.to/2cHpj7Q
1x Rotary Encoder: http://amzn.to/2cHpj7Q
2x Limit Switches: http://amzn.to/2cHpj7Q
Step 3: Create the Mechanical Parts!
Here you can download the .svg files and the 123D Design file that I created for my design. Feel free to use them or modify them.
Step 4: Create the Circuit!
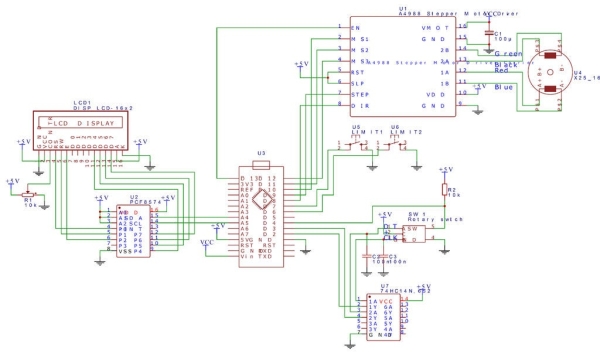
Here you can find the schematic that I created for this project. You can also find it on the EasyEDA website:
https://easyeda.com/GreatScott/MotorizedCameraSlid…
Read more: Make Your Own Motorized Camera Slider