
Summary of Make an Emoticon Jacket with LCD screen using Arduino
This article outlines a DIY project to create an interactive jacket featuring an LCD screen and a force-sensor keyboard. The device translates physical interaction intensity into textual emoticons, bridging the gap between virtual communication cues and real-world conversation. The build involves modifying a natural fiber jacket to house Arduino electronics, including a Lilypad board, force sensors, buttons, and an LCD display, allowing users to "subtitle" their interactions with dynamic text based on pressure applied to soft silicone keys.
Parts used in the Emoticon Jacket:
- LCD Screen from Adafruit with chip
- Hookup wire (solid 22 Gauge)
- Electrical tape
- Jacket made of natural fiber (cotton or wool)
- Force/pressure sensors
- Breadboard or protoboard
- Lilypad Arduino
- FTDI adapter and mini USB cord
- 3 AAA 1.5V batteries
- Fusible interfacing (medium and heavy weight)
- Solder
- Sticky hook and loop closure dots
- 4 resistors 10k
- Lilypad button
- Silicone keyboard cover
- Fray Check
- Extra jacket fabric or cotton twill
Concept:
I would like to make a jacket that has a small LCD screen to create subtexts for interpersonal human interaction. The user would use a limited “keyboard” with force sensors and buttons under soft silicone keys to create computer textual subtitles to human interaction (textual emoticons, ie: :P). The dichotomy between personal interaction that occurs in physical space and that which occurs on a computer or in virtual space will be evident and reference IMing, online gaming, texting, email, and other forms of distanced interpersonal interaction. The loss of intonation and body language that occurs at the intersection of computers and textual communication is evident in today’s culture.
In this application, the effort we put into replacing the nuances of personal communication with punctuation and textual cues in the virtual realm will help subtitle and enhance (or confuse) the conversation and interaction that occurs in the physical realm. Force sensors will allow the wearer to react to the conversation in a natural way, the more tension, the more force applied, the more more intense the emoticon. This also introduces a lack of control over the emoticon displayed and the perception of the emoticon in the context of the interaction.
 jacketSketches.pdf777 KB
Step 1: Supplies:
Tools:
Wire strippers
Needle-nose Pliers
Wire Cutters
Needle and Thread
Sewing Machine (optional)
Clothes Iron
Scissors
Soldering Iron
x-acto knife
fabric cutting board
tailor’s pencil or other fabric marker
Step 2: Jacket Requirements
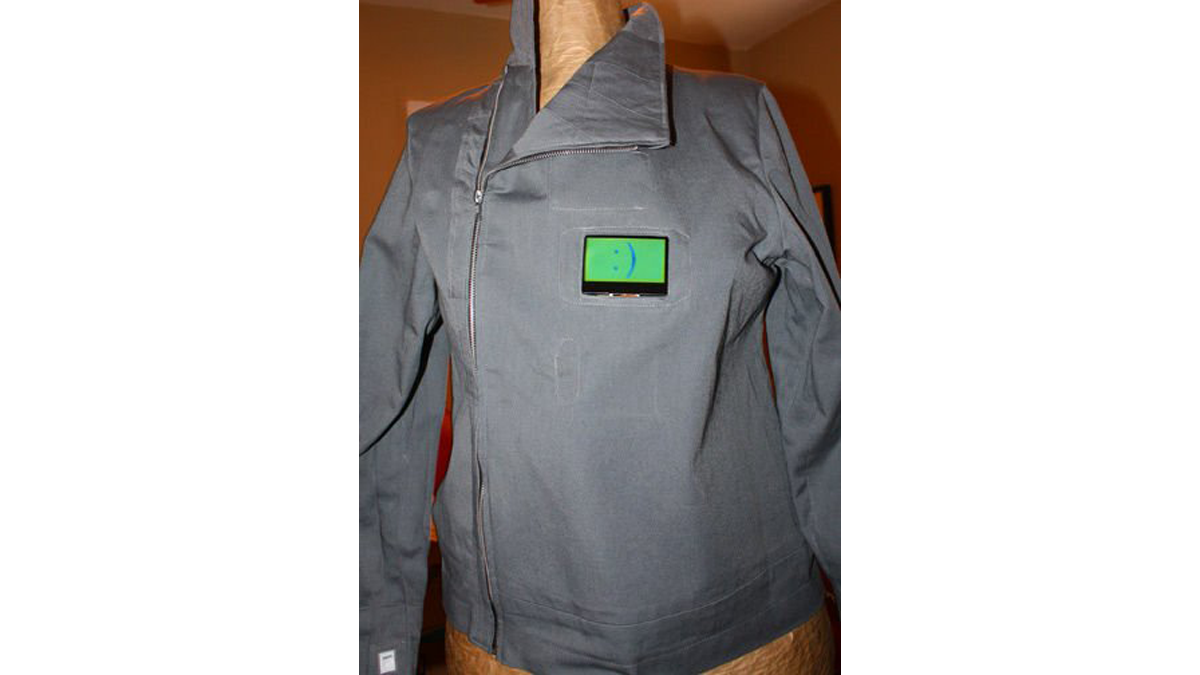
I made my own jacket from a pattern and design I created, but any jacket would work. Just make sure it is loose enough to have room for your board and other electronics. Also, having an asymmetrical cut will allow you to work with a larger space when placing and hooking up the LCD screen.
When choosing or making your own jacket, be prepared for the following:
1. The jacket should be made of a natural fiber, like cotton or wool. Cotton is best and will allow you to attach interfacing and will handle heat from your iron well.
2. If your jacket has a lining, be ready to rip it out. Grab a seam ripper and go for it. Try to save the lining if you would like to reuse it after the electronics are in.
Step 3: Electronics:
Go to the Adafruit instructions to wire up the LCD:
1. Solder wires to LCD
2. Download the library and save to your local Arduino folder
3. Hook up the screen and chip according to the instructions
4. Solder the wires to the Lilypad (an Uno is shown in the pictures)
5. Hook up connections to all the + and – rows on the breadboard
6. Connect pin 10 to the strip that’s connected to the white power wire for the backlight
Force Sensors:
1. Wire up the force sensors, directly into the breadboard for now
2. Wire one side of the sensor to ground
3. Wire the other side to the Analog Input Pin a2 (analog inputs are preceded by “a” on the board)
tip: use some tape on the back side of the Lilypad to hold the wire in place on the pad until soldered
4. Hook up a resistor to power from the pin row
5. Do the same with the other sensor, but hook up to the a4 pin
Button:
1. Solder small wires to the button and plug directly into the bread board
2. Hook up a wire to ground on one side of the button and a wire to Pin 12 of the Lilypad
3. Hook up a resistor to power from the pin row
LCD Screen from Adafruit with chip: $15.25
Hookup wire (at least 3 different colors can be helpful) solid 22 Gauge
electrical tape
Jacket you would like to modify
2 force/pressure sensors $6.95 each
Breadboard or protoboard $5.95 for breadboard
Lilypad Arduino $39.95 Pro Kit or $21.95 for the board only
FTDI adapter and mini USB cord (included in the Pro Kit)
3 AAA 1.5V batteries
medium and heavy weight fusible interfacing
solder
sticky hook and loop closure dots
4 resistors 10k (brown, black, orange, gold) $.25 each
1 Lilypad button
silicone keyboard cover
Fray Check
Extra jacket fabric or cotton twill
For more detail: Make an Emoticon Jacket with LCD screen using Arduino
-
What is the primary function of the force sensors?
The sensors allow the wearer to react naturally; the more tension or force applied, the more intense the displayed emoticon becomes. -
Which type of fabric is best for the jacket?
Cotton is recommended as it allows you to attach interfacing and handles heat from an iron well. -
How should the jacket be constructed to accommodate electronics?
The jacket must be loose enough to hold the board and electronics, and an asymmetrical cut helps provide space for the LCD screen. -
What happens if the jacket has a lining?
You should be prepared to rip out the lining using a seam ripper to make room for the components. -
How are the force sensors wired to the Lilypad?
One side connects to ground and the other to an Analog Input Pin (a2 or a4), with a resistor hooked up to power from the pin row. -
Can an Uno be used instead of a Lilypad?
Yes, while the instructions mention a Lilypad, an Uno is shown in the pictures for wiring the screen and chip. -
How do you secure wires before soldering them to the Lilypad?
You can use tape on the back side of the Lilypad to hold the wire in place on the pad until it is soldered. -
What specific tool is needed to remove the jacket lining?
A seam ripper is required to remove the lining if the jacket has one.
